Posts in lifestyle
Home Decor Inspiration - Vintage Sea Glass
Hello Lovely Living

via Pinterest

I don't know what it is about turquoise and teal -- maybe it's their resemblance to the colors of the ocean -- but I am absolutely obsessed with these colors! I remember walking the beaches of Guam, sorting through the sand, and finding sea glass in all sorts of beautiful colors -- like turquoise, peach, coral, and opaque white. It's those small things that stayed with me and bring back the nostalgia of my island home for me to reminisce upon. I am so glad that I have memories that I can carry with me wherever I go. Just thinking about it takes me back to a calm, peaceful moment on the beach, with the sand between my toes and the wind in my hair.

via Pinterest

via Pinterest

Okay, so now that I've relaxed you and got you into the mood, let's take a look at some beautiful rooms that incorporate beautiful sea glass inspired accessories. Everywhere I look, it seems that sea glass accessories are everywhere! It's hard not to want to snag a few things and add it to my home decor. 


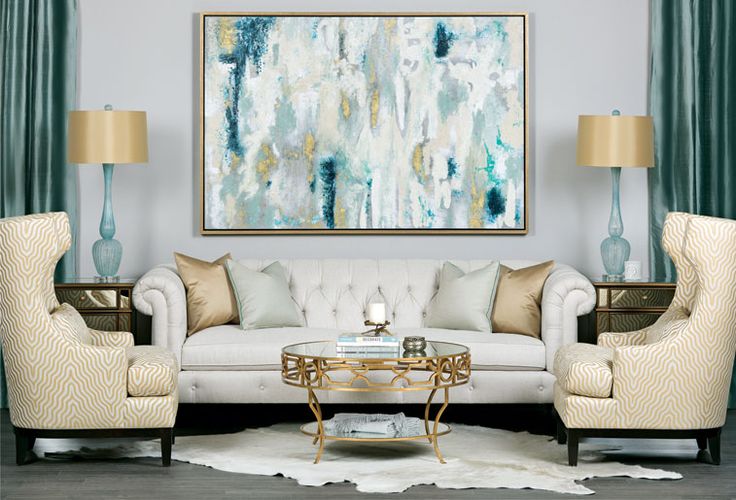
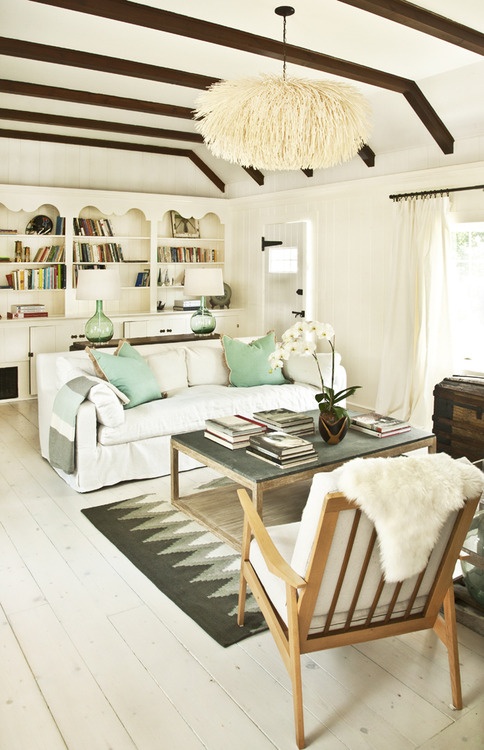
See how that wonderful turquoise color adds a subtle pop of color to each space? Imagine yourself coming home from a long day and entering one of these spaces. Could you picture yourself feeling relaxed, calm, and tranquil? That is the power of this color palette.

Colors have the power to evoke certain emotions. Blue hues evoke feelings of calmness and freshness, and when used in a space, lighter shades can give the sense of openness, like the sky. Since shades of blue are associated with calmness, using these colors in rooms where you would go to relax - like the bedroom, bathroom, and kitchen are ideal. Want to add a beachy feel to the space? Pair it with various greens, like seafoam. I just love the color of turquoise paired with gold, silver, and white - with subtle accents of driftwood and organic touches, such as orchids or palm trees. 

Take a look at a few decor items I chose that would look amazing in these types of spaces to create a relaxing and calming setting inspired by the sea.

So, what do you think? What pieces were your favorite? Let me know in the comments below. 


> DIY SEA GLASS INSPIRED STAINED GLASSWARE

Hello Lovely Living Vintage Sea Glass

There are tons of tutorials out there, but I suggest you do your research quite carefully and read reviews if other people have had positive results. Sadly, I tried my hand at one of the tutorials I found online, and the results were disappointing. I wanted to share it with you all, but I wasn't pleased with the final outcome. Once I perfect a DIY for you guys, I'll be sure to share it! You can also find tons of sea glass accessories online or at home decor and craft stores. 
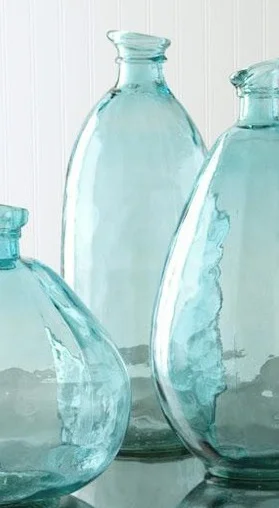
via Pinterest

via Pinterest

Aren't these just the prettiest arrangements! I love the clean, vintage look and feel. You can easily recreate this look by repurposing all sorts of bottles and glassware and staining them in those beautiful hues. Collecting glassware in different sizes and shapes is one of my favorite ways to recycle and reuse. The best part is they're free and you don't need to worry about your kids breaking your expensive glasses again! 

via Pinterest

via Pinterest

Thanks for dropping by, I hope this was helpful and inspiring. I love home decor, and I look forward to sharing more posts like this with you in the future.

xo stina 

lifestyleStina Xblue


Mini Sephora Haul
Tarte Amazonian Clay Full Coverage Foundation

So, I must admit, I recently spent 3+ hours at Sephora on a mommy's day out with a close friend. She and I have so much in common, and I discovered that a love for makeup was one of them! So, of course, Sephora was on our agenda for the day. Little did we know that Sephora would turn into an all day affair. I had made it a point all this time not to step foot into a Sephora unless I actually planned to spend money and had time to waste. So, this was it! I was finally able to treat myself after a long -- and torturous -- makeup diet. I had not splurged on the high-end stuff in a long time, so I was ever excited to get my hands on some new products to test out.

Yes, everything you've heard is true; Sephora is makeup heaven! Disclaimer: If you bring someone with you, make sure that they enjoy makeup as much as you do. Truth is, they will probably die of boredom if they are just not into makeup! Haha! So, on with my story. It's hard not to get side-tracked and to stay focused on one thing at Sephora -- from makeup to perfume, skincare to nail care -- they have it all. If you're like me and you're indecisive, like to try everything, and compare products, make sure you set aside several hours -- if not the entire day -- or prepare a list that you can take with you of items that you know you already want to try. You'll want plenty of time to try everything, and trust me, you will! Let's get into what I purchased!

Sephora.com is only a click away, so researching first always helps the buying process, especially when you have so many products to choose from.


purchased at: Sephora

price: $38

size: 1.7oz

color: light-medium neutral (light to medium skin w/ yellow and pink undertones)

shades: 25 options

Rating:  5/5 on tartecosmetics.com and 4/5 on sephora.com


always formulated without:

parabens • mineral oil • phthalates • triclosan • sodium lauryl sulfate • gluten

An oil-free, 12-hour liquid foundation formulated with Amazonian clay and non-chemical sunscreen filters.

Product Performance: 

Achieve flawless skin that looks healthy and natural with this supremely blendable liquid foundation that delivers up to 12 hours of satin-matte coverage while protecting skin from harmful UVA/UVB sun rays. Infused with skin-balancing Amazonian clay, the skinvigorating™ formula intuitively addresses your unique skin concerns, helping to improve overall skin clarity and texture, while the full coverage makeup fades over the appearance of large pores, discolorations and other imperfections. With all mineral, non-chemical sunscreen filters, this gentle formula features Broad Spectrum SPF 15 Sunscreen, is vegan friendly and oil-free. It’s now available in our largest shade range ever to match women’s unique skin tones and undertones.

Powered By:  

• Amazonian clay: nature’s most perfect ingredient for better, longer, truer wear
• vitamin A: antioxidant that retains moisture and helps protect against free radical damage
• vitamin E: natural preservative that also acts as an anti-inflammatory emollient and antioxidant
• mineral pigments: soothe and soften skin

So, I've been eying this foundation for a while now, mainly because Tarte is known for using primarily natural ingredients and does not use phthalates, parabens, mineral oil, triclosan, and sulfates, which are known or probable carcinogens. It feels good to know that there are companies out there that are conscientious of the ingredients they use and are trying to fill the demand for natural alternatives for makeup. I am all for lessening my exposure to synthetic ingredients, so I was curious about this one. Although it is not completely natural, it does lessen my chemical load, and it my book, that is better all around. If you do, however, want to completely avoid chemicals in makeup, the only sure-fire way is to make it yourself or not wear makeup at all -- and I'm just not ready to do either yet, so here goes!

Since I am a sucker for product packaging, I just have to point out how pretty it is. They made sure to appeal to all those earthy mamas out there with a wooden cap. The shade that I was matched with was Light Neutral, and it was a perfect match. I was told by one of the sales reps that this foundation was good for combination skin and that it had build-able coverage. I was able to get color matched by one of the sales reps at Sephora. They use this neat scanner that they place on your skin to determine your Color IQ. According to Sephora, this tool can precisely match your skin with a foundation from over 1,500 available formulas. How cool is that? 

I'll be testing this foundation for a couple months before I do a full review on it. But for now, here's my first impression thoughts on the product.

  • Lightweight

  • Natural look

  • Build-able coverage

  • Non-oily


PURCHASED AT: SEPHORA

PRICE: $24

SIZE: .08OZ

COLOR: 1.5 (fair to light skin tones)

shades: 12 options

RATING: 4.7/5 ON lauramercier.com and 4/5 on sephora.com


A moisture-rich concealer designed specifically for under and around the eye area to conceal discolorations and dark circles without settling into fine lines and wrinkles.


I've been wanting to purchase a high-end concealer after many years of using Sonia Kashuk's Hidden Agenda Concealer Palette. I basically stuck with it just to use it up before I purchased a different one, but I found that only one of the shades in the palette actually worked well for me. After I used that shade up, the other shades didn't match so well. So, I suggest getting a concealer in one shade unless you can find other uses for the other shades. I've tried the Laura Mercier Silk Creme Foundation a couple years back and loved it, so when one of the sales reps at Sephora recommended that I try out this concealer, I was highly interested. She recommended it for dry skin because it is hydrating. I also had two other options that I was considering; Nars Radiant Creamy Concealer and another one from Laura Mercier -- the Laura Mercier High Coverage Concealer. I was able to try all three and found that both concealers by Laura Mercier worked really well, and the texture was very creamy. The Nars concealer only had a few shades to choose from, so I couldn't find a shade that was perfect for me.

Ultimately, I actually wanted to go with the High Coverage Concealer, but for everyday wear, I decided that the Secret Concealer would be a better choice. Here are my first impression thoughts on the product.

  • Creamy

  • Perfect shade

  • A little goes a long way

  • After a while, I noticed creasing


So, there ya have it -- I only purchased two products! Sounds like a successful trip to me. With so much to choose from, it's easy to get tempted. I did find many other things that I wanted to take home with me, but I will share those finds in another post. Also, stay tuned for a full review on both products!

Thanks for stopping by, I hope this post was helpful. If you have tried or are planning to try any of the products mentioned, let me know what you think. I'd love to hear your thoughts.

xo stina


Chicken and Asparagus Ranch Thin Crust Pizza
Chicken & Asparagus Ranch Thin Crust Pizza

I've always been a little intimidated about making pizza -- mainly the thought of making pizza dough from scratch.  I mean, they make it look so fun and easy on TV, but I'm still not convinced about the dough part. One day I will try my hand at it, but until then, thankfully, there are these pre-packaged crusts that I found at Target. I usually get grossed out about the thought of pre-packaged pizza crusts, but these actually looked good. The best part is that they are ultra thin and crispy -- my fave! So, I decided to try them out for the first time, and I am so glad I did! These are amazingly good and crispy, and they are so much better than take-out. I wanted to do a chicken and ranch style pizza, but I realized it needed some pizzaz (in the form of veggies), so I decided to add some asparagus. Perfect -- I already had some sitting in my refrigerator! What resulted was this delicious, gourmet-looking pizza that reminded me of pizza from California Pizza Kitchen. I can't wait to make this again and try other toppings. Turns out, making pizza this way was fun and easy!


Chicken and Asparagus Ranch Thin Crust Pizza


Servings: 3

Prep: 10 mins

Cook: 20 mins

Total time: 30 mins


Ingredients

  • 2 ultra thin and crispy pizza crusts (pre-packaged)
  • 2 chicken breasts, chopped into 1" pieces 
  • 2 cups asparagus, chopped into 1" pieces
  • 1 cup mozzarella cheese, shredded
  • Ranch dressing
  • 1 oz cream cheese
  • 1 Tbsp butter
  • 2 cloves garlic, minced
  • 1/4 Tsp dried basil
  • 2 Tbsp olive oil
  • Salt and pepper to taste

Instructions

  1. Preheat oven to 400°.
  2. Season chicken with salt and pepper, then sauté in olive oil until browned on the edges.
  3. Add butter into the pan and let melt, then add garlic. Sauté for 2 minutes, then add in cream cheese. Stir until chicken is completely coated. Add basil and stir well. Set aside.
  4. Take 1 pizza crust and evenly sprinkle 1/2 cup of mozzarella cheese, 1/2 of the cooked chicken, then 1 cup of asparagus. Drizzle ranch dressing on top -- once horizontally, then once vertically to evenly coat the pizza. Repeat the same steps with the other pizza crust. 
  5. Bake for 10-12 minutes, until crisp along the edges.
  6. Enjoy!

Notes

  • If you want to be even more fancy, try grilling your chicken instead! I wanted to grill mine, but doing so in the dead of winter was just not an option for me. Haha!

With how easy and simple this was to make, I am inspired to make pizza a regular part of my household menu. Pizza is so versatile. Create any type of flavor combination and never get bored again. Plus, homemade is always healthier. Happy Eating! 

Follow @hellolovelyliving on Instagram and see what else is cooking in my kitchen! 

Have you tried making pizza from scratch or semi-homeamde before? Let me know in the comments!

xo, stina


Sensationail Gel Starter Kit First Impression | Review
Sensationail Gel Starter Kit

I have always loved a great mani and pedi, and so when I discovered that it was possible to do my own gel manicure at home, I was in. However, I was always skeptical. Did it really work? Was it worth the initial investment? I did like the idea that I could maintain a fresh-looking manicure for two weeks or more, be able to do it myself, save money, all the while getting professional results. So, after researching the many gel kits available, I found that Sensationail was actually one of the better ones out there in terms of price, performance, and ease of use. So, I decided to give it a try. This mommy bear was ready for a new set of paws!

Senationail Gel Starter Kit Unboxing

purchased at: target

price: gel kit $49.99 | gel color $9.99-$11.99

Rating:  4.5/5 on Amazon.com and sensationail.com

Set Includes:

  • Pro 3060 LED Lamp

  • Gel Cleanser

  • Gel Primer

  • Gel Base & Top Coat

  • Gel Polish 

  • Lint-free Wipes

  • Double-sided Nail Buffer

  • Manicure Stick 

  • Detailed instruction sheet

The kit comes with everything you need to get started and is supposed to last you 10 manicures. After that, simply purchase the Essentials Kit and gel color, and you're set to go for more! Although there are many steps involved, the process was simple and quick. Being that it was my first time, it did take a little longer for me to complete, but that was because I kept referring back to the instructions to make sure I was doing it properly. Generally, it should only take 15 minutes to complete. The gel color looked amazingly pigmented and everything in the kit looked very high quality. 

The gel color that I used was rose gold glitter, and when applied, it was a little blotchy and uneven, so I had to go over it several times to make it as evenly distributed as possible. Maybe this was due to the glitter content, so I will have to see if the solid colors apply better. The brush was a bit small and stiff too, so that could also have contributed to it being hard to evenly coat the nails. I also did experience some slight burning on my nails when I put my nails under the LED light during curing. This scared me at first, but since it didn't last too long--only the first few seconds of each round of curing--I didn't mind it. Other than that, I found the process to be fast and fool-proof. 

Rose Gold Glitter

Rose Gold Glitter

Taken in direct sunlight.

Taken in direct sunlight.

MY RATING: 4.5/5 (.5 off due to the brush being stiff)

PROS

  • Professional, salon quality results

  • Lasts for up to two weeks or more, low maintenance

  • Glossy, long-lasting color and mirror-like shine

  • Damage-proof and does not chip

  • Save hundreds compared to salon visits

  • Safer than UV nails and cures faster

  • Easy to use

  • Fast application, zero dry time

CONS

  • May be damaging to nails

  • Nails burn slightly under LED light

  • Time consuming removal process

  • Gel color was a bit thick when applied

  • Stiff brushes

Taken in the shade. Shiny, glossy...everything!

Taken in the shade. Shiny, glossy...everything!

Tip: I do recommend taking breaks in between manicures to let your nails breathe and recover, because constant use can cause nails to become weak and brittle.

This gel kit lived up to my expectations, and I am so pleased with the results. My nails turned out glossy, shiny, and sparkly. I was immediately able to do things and not worry about damaging my nails. It's perfect for anyone who doesn't have the time to do their nails every 3-5 days (did I mention the dreaded drying time), who hates having to deal with chipped nails and smudges, and the frugal mama who loves to do-it-herself and save money. This kit is so worth it; I can finally enjoy fresh, salon-quality nails at home, and you can too!

So sparklaaay!

So sparklaaay!

THE VERDICT: ABSOLUTELY AMAZING!

I highly recommend this product and can't wait to try out more colors. Have fun mamas! If you try it out, tag me on instagram using #hellolovelyliving with a photo of your gel mani. I'd love to see it and hear about your experience.

xo, stina


lifestyleStina X


Nagoya Fried Chicken Wings
Japanese Nagoya Fried Chicken Wings

I first experienced the most out-of-this-world chicken wings at a Japanese restaurant on Guam, which immediately became one of my favorite restaurants for authentic Japanese cuisine. Tucked away in the heart of Tumon, but not as well-known as other Japanese restaurants, Wara was like a hidden gem and a mini Japan getaway. My husband and I enjoyed many date nights there -- watching Japanese game shows and admiring the walls decorated with Japanese keepsakes. I just HAD to have these every time I ate there! After all, who can resist something so crispy with a coating of salty, sweet glaze and topped with crunchy sesame seeds!? These wings are addicting, so proceed with caution! 


Japanese Nagoya Fried Chicken Wings


hello lovely living

Servings: 3-4

Prep: 10 mins

Cook: 40 mins

Total time: 50 mins


Ingredients

  • 2 lbs chicken wings
  • Potato starch
  • Oil for deep frying
  • White sesame seeds
  • Salt and black Pepper

Glaze Ingredients

  • 1/3 cup mirin
  • 1 1/2 Tbsp sake (sub. white wine)
  • 2 Tbsp soy sauce
  • 1/4 cup sugar
  • 1/2 tsp garlic powder
  • 1/2 tsp ginger powder
  • Pinch of salt

Instructions

  1. In a small saucepan, bring the ingredients for the glaze to a boil. Reduce heat to medium low and simmer for 15 minutes, or until sauce has thickened to form a glaze. Set aside when done.
  2. Pat chicken wings dry with paper towels to remove any excess moisture. Coat evenly with potato starch and sprinkle with a dash of salt.
  3. Deep fry wings in oil until they are crispy and golden brown - about 7-8 minutes. Drain well and let cool.
  4. Place wings in a container and drizzle evenly with glaze, then cover and shake until well coated. Sprinkle evenly with sesame seeds and sprinkle with black pepper.

Notes

  • Serve with steamed, white rice.

Enjoy!

Itadakimasu いただきます ! (Let's eat!)