Posts in home
Enhance Your Property With Expert Roofing Services

When it comes to property maintenance, the roof often takes a backseat in terms of attention. However, it plays a crucial role in safeguarding your home from the elements while also contributing significantly to its overall aesthetic appeal.


Upgrading or maintaining your roof with Best Home & Roof Services in Tennessee can dramatically enhance your property, providing not only functional benefits but also boosting its market value. In this article, we share reasons why you should enhance your property with expert roofing services.

No. 1

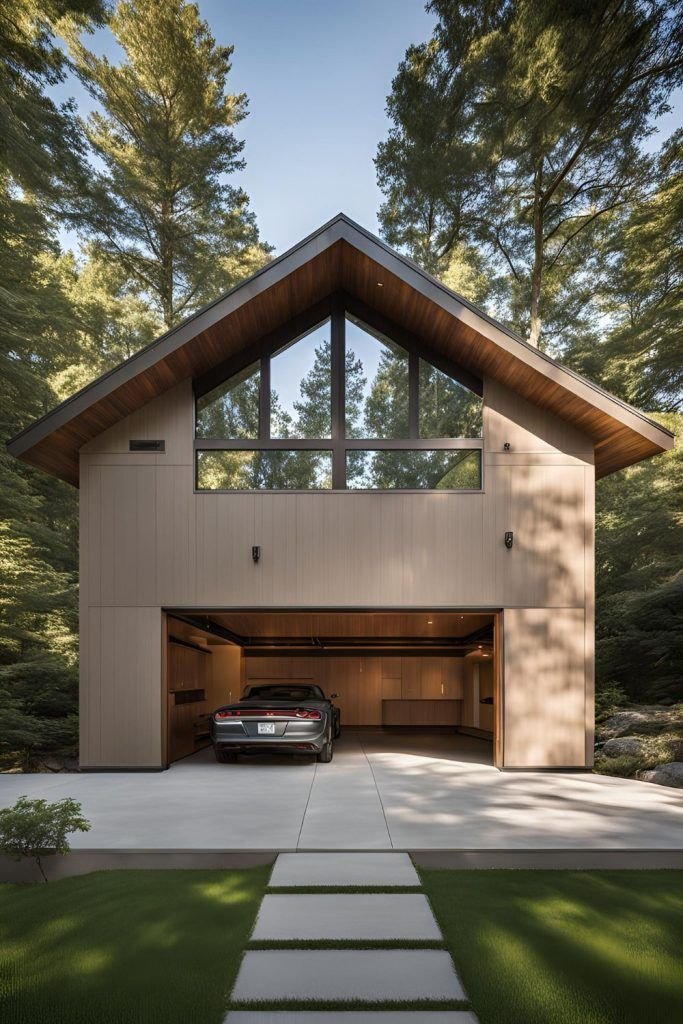
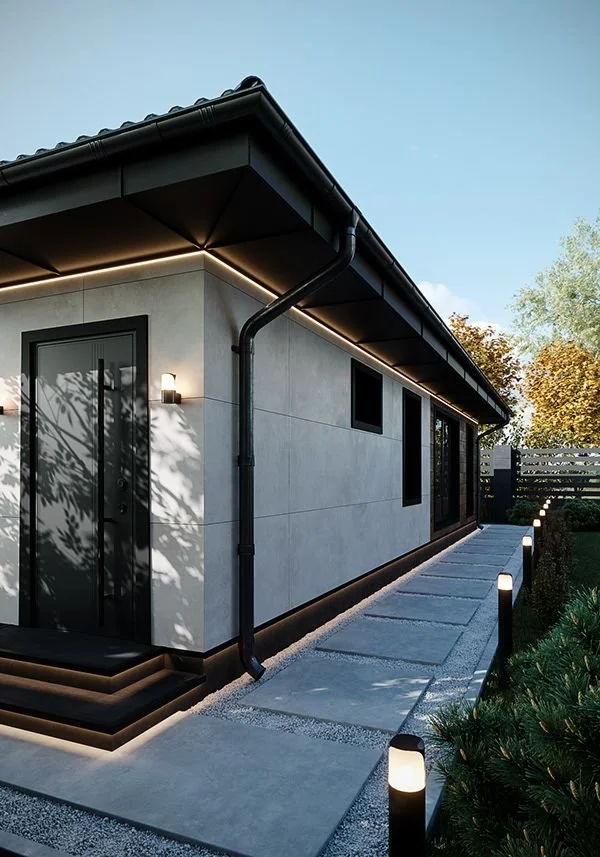
The Critical Role of Roofing

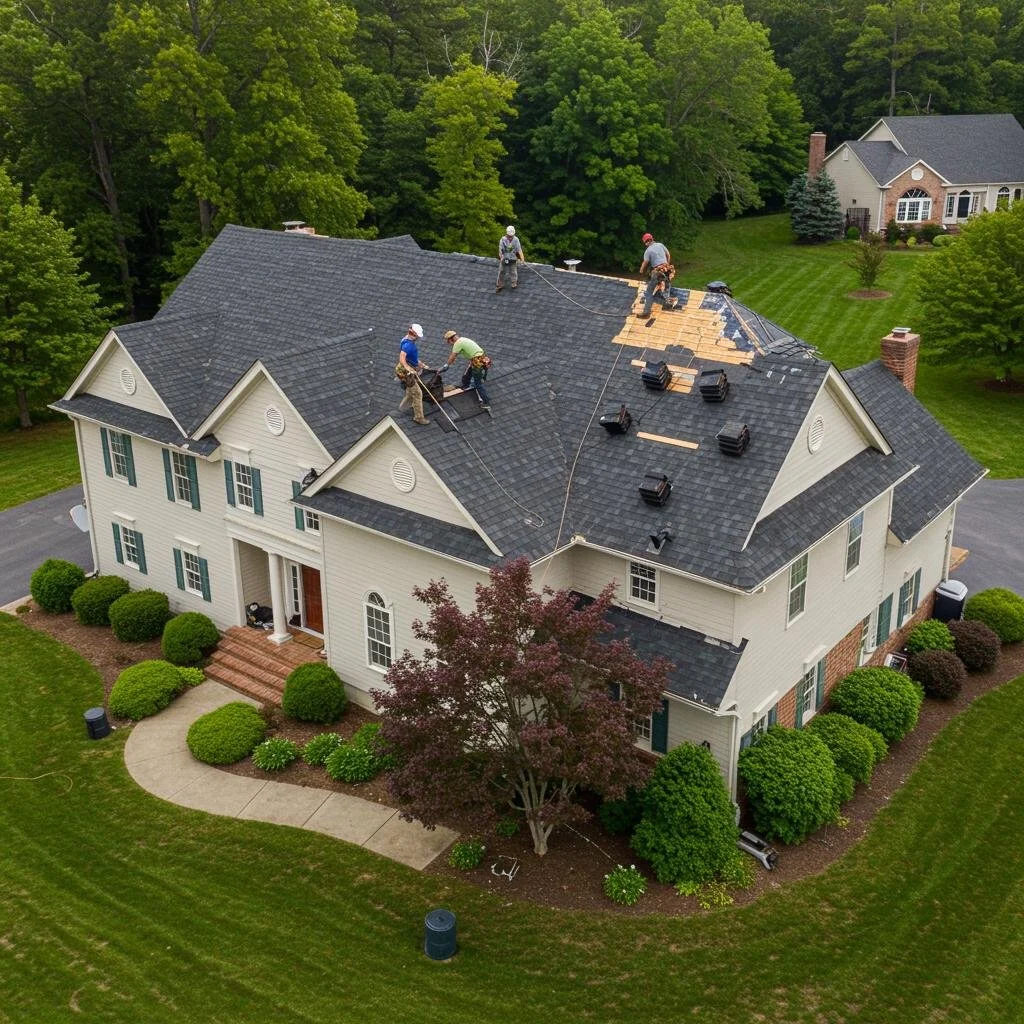
Your roof is the first line of defense against harsh weather, from torrential rain and heavy snow to fierce winds and blazing sun. A well-maintained roof prevents leaks and water damage, protecting your home’s interior and foundation from potentially devastating issues.

Over time, roofs can deteriorate due to age, weather exposure, storm damage, and neglect. This degradation can lead to costly repairs and even health hazards, such as mold growth. By investing in expert roofing services, you ensure that your roof remains in peak condition, safeguarding your property and its occupants.

No. 2

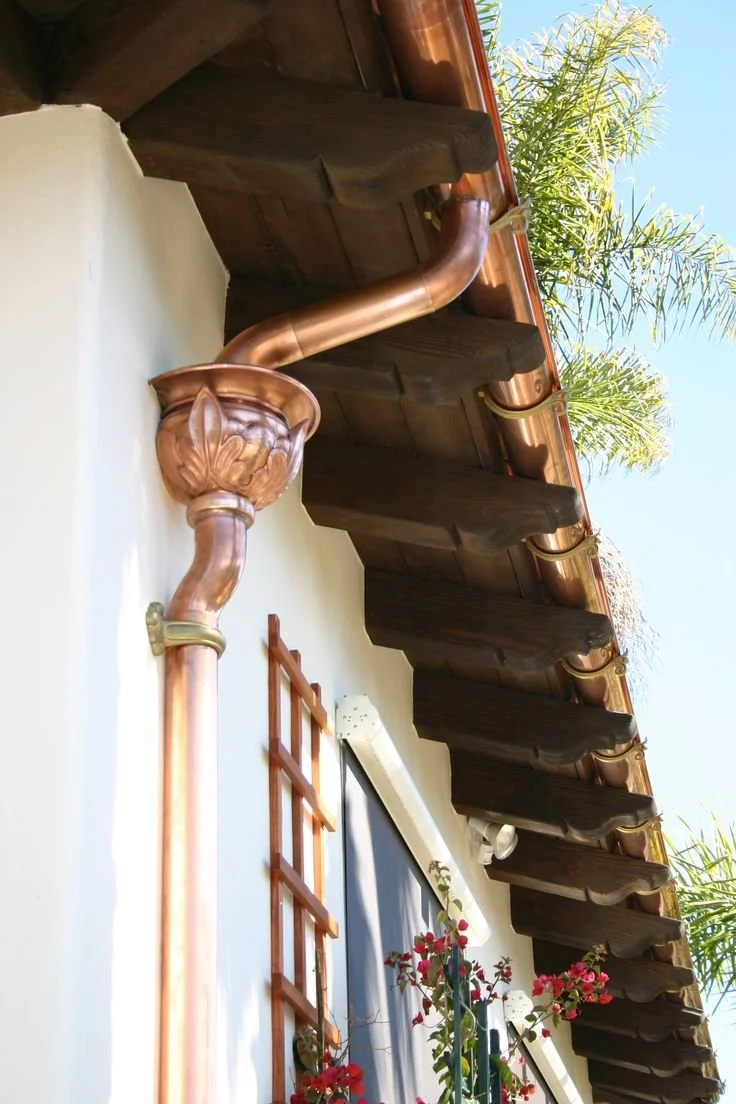
Transformative Aesthetic Appeal

A new or well-maintained roof can dramatically elevate your property's curb appeal. Whether you choose traditional asphalt shingles, elegant slate tiles, or sleek modern metal roofing, the right roofing choice can enhance your home’s exterior like nothing else.

A visually striking roof not only enhances your property’s overall look but also makes a powerful impression on visitors and potential buyers. If you’re considering selling your home, investing in roofing services can yield a remarkable return on investment by increasing your property’s market value.

No. 3

Energy Efficiency: A Smart Investment

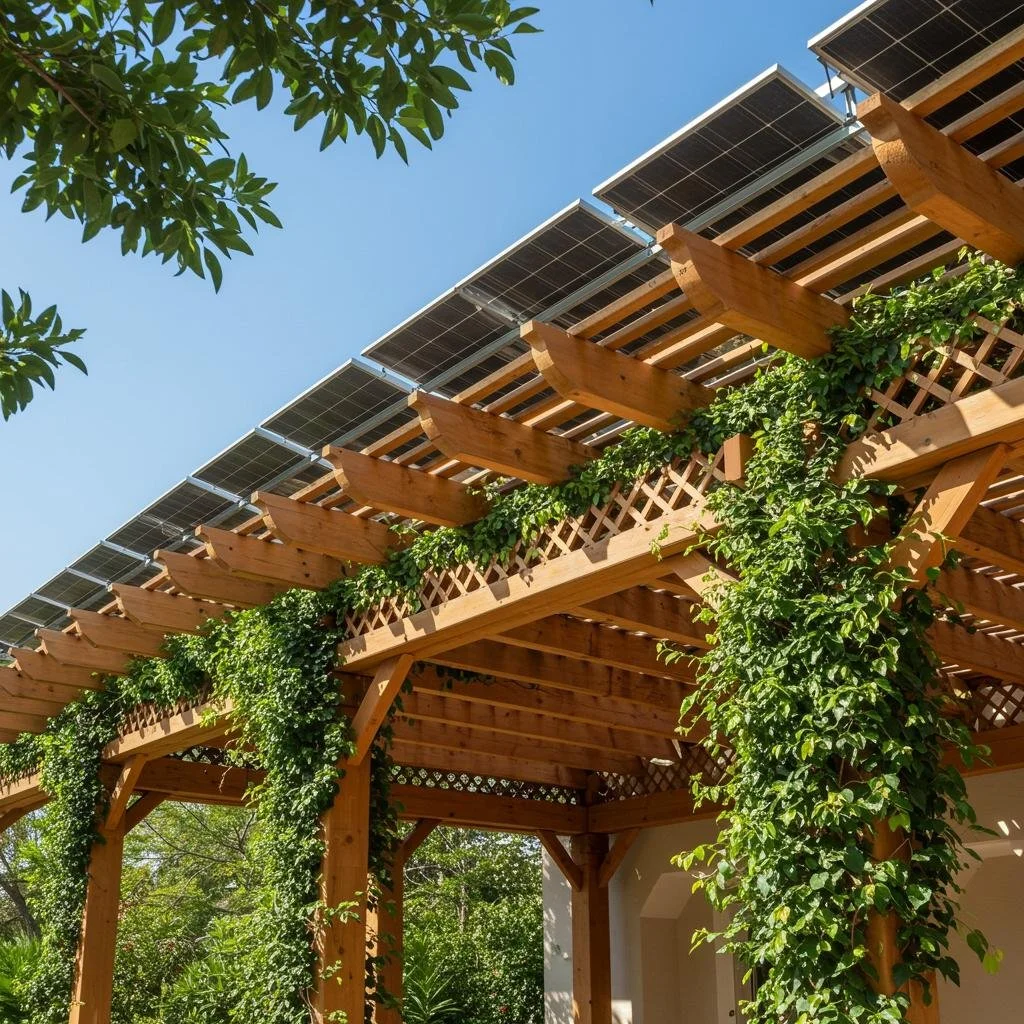
An outdated roof can lead to skyrocketing energy bills, as it may fail to provide adequate insulation or reflect sunlight effectively. Expert roofing services can guide you in selecting energy-efficient materials designed to minimize heat loss in winter and reduce heat gain in summer.

Lower utility costs are just one advantage—this investment also contributes to a more sustainable living environment. Many modern roofing solutions feature energy-efficient coatings that reflect sunlight, helping to keep your home cooler and more comfortable throughout the year.


hellolovelyliving houzz home improvement projects

Houzz

Make your home project a reality. Find inspiration, products, and the pros to make it happen - all in one place.


No. 4

Safety and Durability: Your Peace of Mind

When it comes to your home, safety is paramount. A compromised roof can pose serious risks, including structural damage and health hazards. Expert roofers are trained to identify potential issues, such as weakened structures or harmful mold growth.

By addressing these problems promptly, you can prevent extensive damage and ensure a safe living environment. Moreover, professional roofing services utilize high-quality materials that offer durability and longevity, ensuring your roof can withstand the test of time.

No. 5

Quality Installation and Repairs

One of the key advantages of hiring expert roofing services is the assurance of quality workmanship. Experienced roofers possess the skills and knowledge necessary to perform installations and repairs correctly, adhering to local building codes and safety standards.

They can also provide valuable recommendations tailored to your specific needs and budget. By opting for professionals for your roofing projects, you minimize the risk of mistakes that could lead to costly repairs down the line.

No. 6

A Long-Term Investment in Your Home

Investing in roofing services is not merely a short-term fix; it’s a long-term investment in your property. A high-quality roof can last for decades with proper maintenance, giving you peace of mind and protecting your home from future damage. Additionally, many roofing companies offer warranties on their materials and workmanship, adding an extra layer of security to your investment.

Takeaways: Invest in Your Roof, Invest in Your Future

Enhancing your property with expert roofing services is a wise decision that offers a multitude of benefits. From boosting aesthetic appeal and energy efficiency to ensuring safety and durability, a well-maintained roof is essential for any homeowner.

Don’t wait until minor issues escalate into major problems; consult with a professional roofing contractor today to explore your options. Remember, investing in your roof is investing in the future of your home—one that provides comfort, security, and lasting value.

Looking For Home Resources?

Looking to enhance your living space and create a sanctuary that supports your well-being? Explore our home partners who offer a wide range of resources to elevate your home environment.


homeHLL x Editor


Upgrade Your Home With Professional Roof Replacement Services

Upgrading your home is an investment that can yield significant returns, and one of the most impactful improvements you can make is replacing your roof. A well-maintained roof not only enhances your home's aesthetic appeal but also protects it from the elements and increases its overall value.


If you’ve noticed signs of wear, such as leaks, missing shingles, or mold growth, it may be time to consider professional roof replacement services. In this article, we share how to effectively upgrade your home with a new roof.

No. 1

Assess the Condition of Your Current Roof

Before diving into a replacement, it’s essential to assess the condition of your existing roof. Look for visible signs of damage, such as cracked or missing shingles, leaks in the attic, or water stains on ceilings.

Consider hiring a professional roofing inspector to provide a comprehensive evaluation. They can identify underlying issues that may not be immediately apparent and help you determine whether a full replacement or simple repairs are necessary.

No. 2

Choose the Right Roofing Material

Selecting the right roofing material is a crucial step in your upgrade process. Different materials offer various benefits in terms of durability, aesthetics, and energy efficiency.

Common options include:

  • Asphalt Shingles: Affordable and versatile, they come in various colors and styles, making them a popular choice.

  • Metal Roofing: Known for its longevity and energy efficiency, metal roofing can last 50 years or more and reflects sunlight to keep your home cooler.

  • Tile Roofing: Offers a distinctive look and excellent durability, making it ideal for warmer climates.

  • Slate: One of the most durable options, slate roofs can exceed 100 years in lifespan but come with a higher upfront cost.

Consider your home's architectural style, local climate, and budget when selecting materials. Consulting with a professional roofing contractor can help you make an informed decision.

No. 3

Hire Professional Roofers

One of the most significant advantages of opting for the best roof replacement services is the expertise they bring. Experienced roofers have the skills and knowledge to install your new roof correctly, ensuring it meets local building codes and standards. They can also help you select the right materials that fit your needs and budget.

Professional roofers will conduct a thorough inspection to identify any underlying issues and make necessary repairs before installation. This expertise minimizes the risk of costly mistakes that could arise from a DIY approach.


hellolovelyliving lowes roofing hardware supplies

Lowe’s

Transform your home with confidence! From tools to materials, Lowe’s has everything you need to tackle your next roofing project.


No. 4

Consider Energy Efficiency

A new roof is an opportunity to improve your home’s energy efficiency. Older roofs often lack proper insulation, leading to higher heating and cooling costs.

Modern roofing materials are designed to offer better insulation and can include energy-efficient coatings that reflect sunlight, reducing heat gain in the summer. This not only lowers your utility bills but also contributes to a more sustainable living environment.

No. 5

Plan for Long-Term Maintenance

Once your new roof is installed, it’s essential to plan for its long-term maintenance. Regular inspections and maintenance can extend the lifespan of your roof, helping you avoid costly repairs in the future. Most roofing professionals recommend annual inspections and prompt repairs for any issues that arise.

Takeaways

Upgrading your home with professional roof replacement services is a wise investment that offers numerous benefits. From enhancing curb appeal and energy efficiency to ensuring safety and durability, a new roof can transform your living space.

Don’t wait until minor issues escalate into significant problems—consult with a professional roofing contractor today to discuss your options. Investing in a new roof not only improves your home’s aesthetic and functional qualities but also safeguards your investment for years to come. Take the first step toward revitalizing your property and enhancing your quality of life today!

Looking For Home Resources?

Looking to enhance your living space and create a sanctuary that supports your well-being? Explore our home partners who offer a wide range of resources to elevate your home environment.


homeHLL x Editor


Plumbing 101: Your Guide To Simple Fixes

When plumbing problems arise at home, they can disrupt your peace of mind. From leaking faucets to severe pipe bursts, these issues often require a professional touch. However, Fergusons Plumbing Group believes there are simple fixes you can handle yourself.


Maintenance of your home’s plumbing system is a responsibility that should not be underestimated. Neglecting it can waste water, increase bills, and potentially damage your home’s structure.

Their insights simplify Plumbing 101, equipping you with the knowledge to tackle common plumbing problems. In this guide, we equip you with the necessary basics to confront unexpected plumbing issues head-on.

No. 1

Plumbing System Basics

Your home’s plumbing system consists of two subsystems: one for bringing in fresh water and another for carrying wastewater away. The incoming supply travels under pressure.

  • Main Water Shut-Off Valve: Central to this setup, this valve is usually found near the water meter. Use it promptly in emergencies to avoid widespread damage or flooding.

  • Individual Stop Valves: These provide localized control, allowing for small repairs without shutting down the entire supply. Monitoring pressure ensures water reaches upper floors and remote areas reliably.

  • Hot Water System: The hot water line draws from the cold supply to the heater and distributes heated water to fixtures. Proper insulation helps maintain warmth and overall efficiency.

No. 2

Common Plumbing Issues

Leaks, clogs, and low pressure can disrupt service. Quick fixes and routine checks help prevent bigger complications, ensuring your system remains dependable for daily needs.

  • Maintenance Tips: Regularly inspect pipes and fixtures for rust or dampness. Ensure adequate water pressure and drain flow. Address small signs early to avoid more extensive repairs later.

  • Preventive Measures: Insulate pipes in cold locations and avoid flushing unsuitable items. Good drain practices and protective measures safeguard against leaks and significantly reduce repair costs.

No. 3

Water Supply Steps

A systematic approach to water line repair simplifies complicated tasks. Follow these steps carefully:

  1. Initial Assessment: Inspect the line for leaks and deterioration. Identify potential causes, such as corrosion, shifting soil, or tree roots.

  2. Permits: Check local codes before starting repairs. Permits ensure your project complies with regulations.

  3. Temporary Water Supply: Establish a backup water line to maintain comfort and sanitation during major repairs.

  4. Shut Off Water Supply: Locate the primary shut-off valve near the meter and turn it clockwise until water flow ceases.

  5. Excavation: Dig along the existing water line to expose damaged sections. Proper trenching ensures you can install new piping without harming surrounding utilities.

  6. New Water Line Installation: Use durable piping like type-K copper to resist corrosion. Secure each connection to ensure a watertight seal.

  7. Final Step: Pressurize and examine the system for leaks. Reliable performance indicates success; an official inspection confirms adherence to codes.


hellolovelyliving rejuvenation bathroom fixtures

Rejuvenation

Elevate your space with Rejuvenation's timeless bathroom plumbing fixtures – where style meets functionality.


No. 4

Drainage and Venting

Inefficient vents can cause sewer odors or gurgling drains. Traps block fumes, but blockages above them allow gas through. Diagnosing vent problems helps maintain functional plumbing.

  • Bubbling and Gurgling: Noises after flushing or draining suggest air pressure issues from clogged vents.

  • Slow Draining: Sluggish drains may indicate obstructed vents, not just clogs.

  • Blocked Sewer Vent: Poor flush performance and an empty toilet bowl can signal vent blockages.’

No. 5

Clearing Clogged Drains

To clear blockages:

  1. Shut Off Water: Prevent flooding and limit damage while investigating or dislodging the obstruction.

  2. Remove Visible Debris: Use gloves or tools to extract hair or food from the drain opening.

  3. Use a Plunger: Create a tight seal and push and pull repeatedly to dislodge clogs.

  4. Try a Plumbing Snake: Insert slowly until resistance is felt, then crank gently to remove the clog.

  5. Baking Soda-Vinegar Solution: Pour this combination down the drain, let it fizz, then flush with boiling water.

  6. Hot Water Flush: Finish by running hot water to wash lingering particles away.

No. 6

Fixing a Running Toilet

Repairing a continuously running toilet requires patience. Techniques like float adjustment or flapper replacement can solve wasteful water usage problems.

  • Adjust the Float Level: Set the float lower if water overflows into the tube. This prevents excess filling.

  • Examine the Flapper: Clean or reposition the flapper if misaligned. Replace it if worn.

  • Inspect the Fill Valve: A faulty fill valve may fail to shut off completely. Replace it to avoid leaks.

No. 7

Maintain Overall Function

Regular inspections reveal leaks or corrosion early, allowing you to catch minor issues before they escalate. Use a gauge to confirm water pressure remains within safe operating levels.

For effective plumbing maintenance, it's essential to:

  • Perform leak detection through an annual inspection.

  • Clean aerators monthly to ensure optimal water flow.

  • Monitor water pressure regularly to maintain system efficiency.

  • Flush the heater annually to prevent sediment buildup.

  • Test toilets as needed to address any issues promptly.

Takeaways: Your Plumbing Future

Whether you're maintaining, repairing, or improving your home’s plumbing system, your newfound knowledge empowers you to handle simple fixes independently. Remember, professional help is always available if needed—there's no shame in asking for assistance. Check out reviews on Fergusons Plumbing for reliable service.

Looking For Home Resources?

Looking to enhance your living space and create a sanctuary that supports your well-being? Explore our home partners who offer a wide range of resources to elevate your home environment.


homeHLL x Editor


Essential Plumbing Advice For Stress-Free Home Living

You've likely faced a plumbing issue at home at some point. Whether it's a minor water leak or a major pipe burst, these problems can disrupt your peace of mind. Your ability to handle them effectively can make all the difference.


To safeguard your home and maintain comfort, understanding essential plumbing advice is crucial. This knowledge not only helps you prevent potential damage but also saves you money on costly repairs.

Equipping yourself with basic plumbing skills will pay off in the long run. In this article, we share some valuable plumbing advice, equipping you with the knowledge and tools needed to effectively tackle common challenges that may arise in your home.

Explore more valuable insights on managing your home's plumbing system efficiently at Dan's Plumbing FAQ. Let's tackle these common household issues together!

No. 1

Locate the Main Shutoff Valve

  • Find the Main Valve: Look for the main valve where your water line enters your home.

    Common locations include:

    • Basement near a foundation wall

    • Crawlspace

    • Mechanical closet

  • Outdoor Valves: In warmer climates, the valve may be located outdoors near faucets. Sometimes, an access panel in your yard might only house a curb stop valve, so confirm if it's your main shutoff.

  • Investigate the Basement: Follow the supply line (copper, galvanized metal, brass, or plastic) to where water enters from outside.

  • Follow Water Lines: Trace the cold line from your heater to find the primary inlet, which will help you locate the shutoff.

  • Locate the Meter: The main shutoff is often positioned directly after the meter, making it easier to spot.

  • Accessibility: Use a flashlight in crawl spaces or basements to find hidden valves and prevent mishaps.

If you can't locate the valve, check inspection reports or call your local water department. Consider installing secondary valves in easy-to-reach spots for emergencies.

The valve is usually recognized by its robust handle, which may require firm effort to turn. Learn proper operation techniques for handling leaks or urgent repairs.

No. 2

Check for Dampness Regularly

Frequent checks for dampness can help prevent surprise leaks. Inspect walls, ceilings, and areas around sinks for unusual odors or signs of water intrusion.

  • Mold and Musty Smells: Mold thrives in damp areas. Musty odors near bathrooms or kitchens may signal hidden plumbing problems.

  • Cracks and Bubbling Textures: Look for cracks or bubbling on walls or ceilings, which can indicate leaks damaging drywall from within.

No. 3

Monitor Water Bills

Keep an eye on your monthly water bill for unexplained spikes. A sudden increase could suggest a hidden leak, prompting further investigation to avoid bigger issues.


hellolovelyliving rejuvenation kitchen fixture faucet

Rejuvenation

Elevate your kitchen design with Rejuvenation's exquisite hardware and decor collection - where style meets functionality.


No. 4

Embrace Modern Leak Detection Devices

Consider using modern leak-detecting devices, such as:

  • Moisture Meters: Pin-type meters assess water content, while pin-less meters gauge surface dampness.

  • Heat Scanners/Thermal Leak Detectors: These tools detect temperature changes that reveal the presence of water.

  • Acoustic Listening Devices: These devices pick up subtle sounds caused by leaks, helping locate water seeping through inaccessible areas.

No. 5

Flush Your Water Heater Regularly

Flushing your water heater regularly removes sediment buildup that can cause tank rupture and reduce efficiency.

Here's how to prepare for the process:

  1. Shut Off Power and Water Supply: Before starting, ensure safety by shutting off the power and water supply.

  2. Cooling Down Process: Allow the water to cool for several hours to prevent burns and splashes.

  3. Draining Process: Attach a hose to the drain valve, position a bucket under the outlet, and reopen the cold supply briefly to wash away sediment.

Why is Flushing Important? It removes debris that fosters rust, corrosion, and leaks, thereby boosting your heater's longevity and safety.

No. 6

Prevent Common Clogs

Clogs often result from grease, hair, improper disposal, or debris accumulation.

Adopt these preventive habits:

  • Avoid Grease and Oil: Never pour cooking grease down drains; it hardens and creates blockages.

  • Install Drain Covers: Strainers trap particles before they enter pipes, preventing future complications.

  • Use Toilets Correctly: Only flush waste; non-flushable items can lead to clogs.

  • Regular Drain Cleaning: A monthly baking soda and vinegar rinse helps dissolve buildup and deodorize pipes.

  • Run Hot Water: Regularly run hot water through kitchen and bathroom drains to dislodge greasy residues.

  • Dispose of Coffee Grounds Properly: Discard coffee grounds in the trash to avoid plumbing issues.

No. 7

Insulate Outdoor Pipes

Outdoor pipe insulation reduces freeze risks and helps prevent flooding from bursts.

Consider these materials:

  • Fiberglass Pipe Insulation: Ideal for basic insulation needs.

  • Polyethylene Foam Insulation: Lightweight and moisture-resistant, suitable for exposed exterior lines.

  • Rubber Foam Insulation: Flexible and works well for irregular pipes.

  • Heat Tape: Effective for short lengths near entry points.

No. 8

Monitor Water Pressure

Keeping track of water pressure is essential for a healthy plumbing system.

Use a gauge to measure pressure levels:

  • Normal PSI Range: Aim for 60–70 psi.

  • High Pressure Risks: Surpassing 80 psi can rupture fixtures and stress pipes.

  • Low Pressure Issues: Below 40 psi weakens flow and reduces efficiency.

If you notice banging pipes, leaks, or appliance failures, check your water pressure. Install a regulator for high pressure or consider a booster for low pressure.

No. 9

Schedule Routine Checkups

Annual inspections can help spot potential faults early, covering heaters, pipes, and fixtures. Factors such as household size, climate, and pipe age influence inspection frequency.

  • Seasonal Inspections: Conduct pre-winter checks to safeguard pipes from freezing.

  • Maintenance Benefits: Early detection can save you from expensive repairs and water damage.

Takeaways: Your Plumbing Future

With these tips, you can confidently navigate common plumbing issues to enhance your home living experience. Visit Dan's Plumbing for more advice and assistance. Proactive care is your key to stress-free plumbing!

Looking For Home Resources?

Looking to enhance your living space and create a sanctuary that supports your well-being? Explore our home partners who offer a wide range of resources to elevate your home environment.


homeHLL x Editor


Turning A Wrench For Good: The Impact Of Charity Plumbing

When you grab a wrench, you're not just tackling home repairs; you're making a difference in your community. Turn your repair skills into benevolent action with charity plumbing.


Your plumbing know-how can aid those less fortunate, helping them maintain essential living conditions. By participating in charity plumbing, you're ensuring that everyone has access to clean and safe water for their everyday needs.

Dan's Plumbing fundraiser is an opportunity to contribute to this valuable cause, turning every twist of your wrench into invaluable support for those who need it most. In this article, we share a variety of helpful tips and essential plumbing safety and best practices designed to ensure you are thoroughly prepared for the job ahead.

No. 1

Essential Plumbing Tools

Having dependable tools on hand prepares you to handle a broken pipe or a mysterious leak.

This foundation truly begins with essential plumbing equipment:

  • Adjustable Pliers: These clamp various pipe sizes and replace many other pliers, delivering a secure grip without slipping.

  • Adjustable Wrench: Fits different nuts and bolts, combining multiple wrenches into one convenient and reliable solution.

  • Automatic Cordless Drain Auger: Tackles stubborn clogs quickly. Its flexible shaft navigates bends, reducing hassle for deeper or more intricate blockages.

  • Basin Wrench: Essential for cramped spaces behind sinks; it tightens or loosens nuts without uncomfortable contortions, making installation easier.

  • Cartridge Puller: Simplifies faucet repairs by removing worn cartridges. This specialized tool saves time and prevents damage during routine maintenance.

  • Hacksaw: Cuts through plastic and metal pipes with precision, making it a versatile choice for on-the-spot adjustments in professional and DIY projects.

  • Press Fitting Systems: Allow watertight pipe connections quickly, reducing installation time and minimizing soldering risks.

  • Thread Sealing Tape: Helps prevent leaks on pipe threads. When wrapped correctly, it increases durability, making pipe connections less prone to drips or seepage.

Stocking these tools sets you up for success when unexpected issues arise. For more detailed guidance, explore tips on advanced equipment.

No. 2

Pipe Wrench Safety

Using a pipe wrench properly keeps you safe when tightening or loosening pipes. Observing simple methods and precautions can prevent serious injuries and damage to plumbing.

  • Wear Protective Gear: Goggles or a face shield protect against flying debris, and sturdy gloves keep hands covered to avoid abrasions or bruises.

  • Choose the Right Wrench: Selecting a wrench that matches the pipe size ensures better leverage. Always use the appropriate tool for each specific task.

  • Proper Handling: Face the wrench forward to maximize grip. Always pull the handle instead of pushing, maintaining a steady footing for balanced control.

  • Maintenance Tips: Regularly inspect for cracks on the handle or worn teeth. Always replace damaged parts promptly to guarantee consistent, safe performance.

Following these guidelines reduces the risk of injury and broken tools. Keep pipe wrench usage straightforward, and you can handle tough plumbing challenges.

  • Avoid Overextending: Never chain two pipe wrenches for extra length. Always choose a larger wrench if more leverage is truly needed.

Safe pipe wrench practices keep stress off your body and minimize major accidental slips. Simple habits often avert costly repairs in homes or community projects.

No. 3

Plumber's Tape Advice

Applying plumber's tape properly can resolve small dripping issues before they escalate. Careful wrapping keeps connections sealed and safeguards your home from significant water damage.

  • Clean the Threads: Remove dirt or debris before starting every taping job to ensure better adhesion.

  • Wrap Clockwise: This ensures the tape follows the thread direction, keeping your layers intact during final tightening.

  • Overlap Slightly: Layer about half the tape's width, creating a tighter seal against leaks.

  • Smooth the Tape: After wrapping, press it in firmly with your fingertips to maintain alignment and stop unraveling during assembly.

  • Avoid Overwrapping: Thick layers can obstruct proper threading, so moderate coverage typically delivers a dependable, leak-resistant fit.

  • Do Not Reuse Old Tape: If fixing a leak, strip any worn material, clean thoroughly, and then apply a fresh layer for the best results.

Proper tape application saves time and prevents minor dripping from spiraling out of control. This extra care makes daily routines simpler and safer.


hellolovelyliving rejuvenation bathroom fixtures

Rejuvenation

Elevate your space with Rejuvenation's timeless bathroom plumbing fixtures – where style meets functionality.


No. 4

Avoid Scratching Fixtures

Whether installing a new faucet or adjusting an existing shower head, scratch-free surfaces preserve vital visual appeal. Simple methods can shield your fixtures from unnecessary harm.

  • Strap Wrench Usage: Opt for a strap wrench rather than gripping tools with teeth. The flexible strap prevents dents on polished metal surfaces.

  • Basin and Crescent Wrenches: A basin wrench reaches behind sinks without scraping, while a crescent wrench adjusts smoothly, minimizing damage to decorative finishes on fixtures.

  • Avoid Over Tightening: Applying just enough pressure prevents cracks in faucets. A gentle approach stops fixtures from deforming, safeguarding their original appearance.

  • Protective Covers: Shields like cloth or plastic reduce accidental scuffs during renovations. Secure them with tape, especially when handling large-scale home improvements.

Routine care also matters. Checking for rust or minor discoloration early prevents deeper harm. Well-kept fixtures remain beautiful and functional for many years to come.

No. 5

Kitchen, Bath, and Laundry Tips

Managing water usage in kitchens, baths, and laundry rooms preserves resources and extends appliance lifespans. Simple steps keep plumbing systems functioning reliably year-round.

  • Inspect washer hoses regularly - Swap older rubber hoses for braided, stainless steel ones to prevent potential bursts and costly damage.

  • Clean drain traps under sink basins - Removing debris before it accumulates stops foul odors and blockages.

  • Use strainers to catch hair in tubs or kitchens - This simple measure helps reduce clogs and saves time on messy cleanups.

  • Avoid chemical cleaners that can corrode pipes and harm the environment - Natural methods, like baking soda and vinegar, are safer alternatives.

  • Check fixture seals around sinks, showers, and bathtubs - This ensures watertight connections and prevents drips that lead to mold or structural concerns.

  • Run full loads in washing machines and dishwashers - This strategy maximizes efficiency, conserves water, and prolongs the life of vital appliances.

Maintaining healthy routines in these areas supports the broader plumbing system. A little foresight goes a long way toward protecting homes from unexpected troubles.

No. 6

Stop Pipe Deformation

Excessive heat or pressure can warp pipes, leading to costly replacements. Preventing deformation keeps water flow steady and significantly extends the overall life of installations.

  • Proper Support: Using hangers or brackets at regular intervals keeps pipes aligned, combating sagging in long extended horizontal runs.

  • Monitor Temperature: Extremely hot water can soften certain materials. Installing insulation or regulating water temperature significantly reduces warping and premature pipe failure.

  • Foundation Shifts: When foundations move, pipes can crack or bend. Checking for leaks after major shifts helps address hidden structural threats quickly.

  • Protective Coatings: Foam or styrofoam around exterior lines buffers against extreme temperatures. Sealing any tears ensures pipes remain secure under changing conditions.

Taking precautions against pipe warping goes a long way toward reliable water flow. Thoughtful assembly, careful maintenance, and regular inspections keep costly surprises at bay.

No. 7

Making a Difference

Plumbing skills can truly help communities thrive. By offering charitable services or donating time, you can turn wrenches for the greater good and foster meaningful change.

  • Volunteering Locally: Community centers, shelters, or nonprofit projects often need plumbing upgrades. Offering your time and expertise provides vital relief for budget-constrained programs.

  • Empowering Through Education: Teaching simple repairs can help families save money. Workshops or tutorials equip people with the knowledge to handle minor leaks confidently.

  • Spreading Awareness: Sharing plumbing tips online raises awareness of proper upkeep. Blogs, videos, and social media posts spark conversations about preventive measures.

  • Partnering with Charitable Initiatives: Collaborate with dedicated organizations to expand outreach further. Explore local charities like Charity Plumbing for potential partnership opportunities.

Some individuals share inspiring stories through social media groups. These personal accounts often motivate neighbors to volunteer or donate supplies.

Supporting these efforts helps entire neighborhoods flourish. With the right knowledge and a generous spirit, anyone can spark positive change and contribute to lasting improvements.

Takeaways: Empower Through Plumbing

Take your plumbing skills to the next level. Safeguard your appliances, avoid common plumbing mistakes, and most importantly, use your knowledge for a good cause. Visit Dan's Plumbing Guide to learn more and make a real difference in someone's life today.

Looking For Home Resources?

Looking to enhance your living space and create a sanctuary that supports your well-being? Explore our home partners who offer a wide range of resources to elevate your home environment.


homeHLL x Editor


The Secret To Beautiful Gardens That Stand The Test Of Time

A truly beautiful garden is more than just a collection of plants; it is a harmonious fusion of design, care, and practicality. Timeless gardens captivate visitors, enrich outdoor spaces, and retain their charm year after year.


But what’s the secret to creating a garden that endures? The key lies in thoughtful planning, selecting durable materials, and maintaining a balance between functionality and aesthetic appeal. In this article, we discuss all these things and more for a garden that stands the test of time.

No. 1

Choosing the Right Foundation for Your Garden

The foundation of any garden begins with its layout. Start by assessing your outdoor space to identify its strengths and weaknesses.

Consider factors such as:

  • Sunlight Exposure: Understand how much sunlight different areas of your garden receive.

  • Soil Quality: Evaluate the soil type and its ability to support plant growth.

  • Drainage: Ensure proper drainage to prevent waterlogging or erosion.

Once you’ve analyzed your garden’s natural attributes, design its layout to complement the environment rather than work against it.

  • Incorporate Pathways and Borders: Pathways, raised beds, and decorative borders enhance the structure and usability of your garden.

  • Use Metal Garden Edging: Metal edging ensures clean, defined lines that prevent soil or gravel from spilling into unwanted areas. It’s a practical and long-lasting solution that adds a sleek, professional touch to your garden.

No. 2

Selecting Durable and Weather-Resistant Materials

Materials that stand the test of time are essential for creating a garden that endures. Choose elements that can withstand changing weather conditions and require minimal maintenance.

  • Weather-Resistant Furniture: Invest in outdoor furniture made from materials like aluminum, teak, or synthetic wicker.

  • Durable Paving Stones: Opt for high-quality paving stones that resist cracking and fading over time.

  • Metal Garden Edging: Unlike wood or plastic, metal edging is robust, weather-resistant, and requires minimal upkeep. Its durability ensures that your garden retains its structure and elegance for years to come.

By selecting long-lasting materials, you’ll save time and money on replacements and repairs, allowing you to focus on enjoying your garden.

No. 3

Prioritizing Native and Perennial Plants

Plants are the heart of any garden, but choosing the wrong varieties can lead to high maintenance and disappointment.

  • Native Plants: Native plants are well-adapted to your local climate and soil conditions, making them easier to care for. They also promote biodiversity by supporting local wildlife.

  • Hardy Perennials: Perennials return year after year, providing consistent beauty with minimal effort.

  • Year-Round Interest: Incorporate a mix of flowering plants, shrubs, and evergreens to ensure your garden remains vibrant and textured throughout the seasons.

Tip: Research plants that thrive in your region and group them based on their sunlight and water needs for optimal growth.


hellolovelyliving terrain garden planters outdoor

Terrain

Indoor and outdoor living, garden, and entertaining essentials that are well-designed, lasting, and beautiful.


No. 4

Adding Sustainable Features

Sustainability is a growing priority in modern garden design. Incorporating eco-friendly practices not only benefits the environment but also enhances the longevity of your garden.

  • Rainwater Collection: Install rain barrels to collect and reuse water for irrigation.

  • Composting: Use kitchen and garden waste to create nutrient-rich compost for your soil.

  • Drought-Resistant Plants: Opt for species that require less water, reducing your garden’s environmental impact.

Durable features, such as metal garden edging, also contribute to sustainability by reducing waste and the need for frequent replacements.

No. 5

Balancing Form and Function

A timeless garden must strike the perfect balance between aesthetics and usability.

Think about how you intend to use the space:

  • Entertaining Guests: Create open areas with comfortable seating and ambient lighting.

  • Growing Vegetables: Dedicate raised beds or specific zones for planting fruits and vegetables.

  • Relaxation Retreat: Incorporate shaded areas, water features, or cozy nooks for unwinding.

  • Metal Garden Edging: This versatile feature can help create distinct zones within your garden, making it easier to organize spaces for relaxation, planting, or play.

No. 6

Ongoing Care and Maintenance

Even the most beautifully designed garden requires regular upkeep to stay vibrant and healthy.

  • Routine Tasks: Weeding, pruning, and feeding plants are essential for maintaining their health and appearance.

  • Structural Maintenance: Periodically inspect elements like pathways and edging for signs of wear. Metal garden edging, in particular, simplifies maintenance and keeps your garden looking fresh with minimal effort.

Tip: Establish a seasonal maintenance schedule to ensure your garden remains in top condition year-round.

Takeaways

Timeless gardens are a reflection of thoughtful planning, high-quality materials, and consistent care. By incorporating features like metal garden edging, selecting native plants, and adopting sustainable practices, you can create an outdoor space that is both beautiful and enduring.

With the right approach, your garden can become a cherished retreat—a place where functionality meets aesthetic appeal, and where your dedication and creativity shine. Invest in your garden today, and enjoy its beauty for generations to come.

Looking For Home Resources?

Looking to enhance your living space and create a sanctuary that supports your well-being? Explore our home partners who offer a wide range of resources to elevate your home environment.


homeHLL x Editor


4 Easy Ways To Improve Your Dining Area

Every room in your home deserves attention, but the dining room deserves a little extra love. After all, it’s not just a place to eat meals—it’s a space where you create memories and spend quality time with loved ones. In a world where screens dominate our living rooms, the dining room often becomes the only space where families sit down, talk, and connect.


So, why not make it as inviting and functional as possible? In this article, we share some practical tips to elevate your dining room. Follow these suggestions, and you’ll find your meals—and the time spent with your family—more enjoyable than ever.

No. 1

Improve the Lighting

Lighting plays a crucial role in setting the tone for your dining room, just as it does for every other space in your home. The right lighting can create a cozy and inviting atmosphere, much like the ambiance of a top-tier restaurant.

Tips for Better Dining Room Lighting

  • Install Pendant Lights: Add multiple pendant fixtures above your dining table for a stylish and functional look.

  • Opt for Dimmer Lighting: Dimmer switches allow you to adjust the brightness to suit the occasion, from casual family dinners to romantic evenings.

  • Choose Warm Bulbs: Avoid harsh white lighting, which can feel clinical. Warm bulbs create a more welcoming and relaxed environment.

Take a moment to reassess your current lighting setup and see how you can make it work better for your space.

No. 2

Clear the Space

A clutter-free dining room is essential for a relaxing and enjoyable meal. Think about it—have you ever seen a cluttered restaurant? Probably not. A clear dining area allows for free movement, ample space for dishes, and a better flow of conversation.

How to Declutter Your Dining Room

  • Invest in Storage Solutions: A wood sideboard is a stylish and practical option for storing plates, dishes, and other dining essentials.

  • Keep Only the Essentials: The only items on display should be those necessary for the meal or those that add joy to the space.

  • Avoid Using the Dining Room as a Dumping Ground: Resist the temptation to let the dining table become a catch-all for miscellaneous items.

Even if you only use the dining room for an hour a day, it’s an important hour—make it count by keeping the space tidy and functional.

No. 3

Add Decorative Touches

Decorative elements can elevate the look and feel of your dining room, making it a more enjoyable place to spend time.

Ideas for Decorating Your Dining Room

  • Hang Art on the Walls: Choose pieces that complement your dining room’s style and color scheme.

  • Incorporate Seasonal Decor: Add touches like winter branches, spring flowers, or autumn leaves to reflect the time of year.

  • Centerpieces: A simple yet elegant centerpiece, such as a vase of fresh flowers or a bowl of fruit, can bring life to the table.

These small additions can make a big difference in creating a warm and inviting atmosphere.


hellolovelyliving terrain dinnerware table spring dishware

Terrain

Indoor and outdoor living, garden, and entertaining essentials that are well-designed, lasting, and beautiful.


No. 3

Upgrade Comfort

Comfort is key to ensuring that your family and guests want to linger at the table. A few thoughtful upgrades can make your dining room cozier and more inviting.

Ways to Enhance Comfort

  • Add a Rug: A soft rug under the dining table can add warmth and texture to the room.

  • Install Curtains: Curtains not only enhance the aesthetics but also help with temperature control and privacy.

  • Use Cushions: If you’re not upgrading your dining chairs, consider adding comfortable cushions to make seating more enjoyable.

When everyone feels comfortable, you’re more likely to spend hours enjoying meals and meaningful conversations.

Takeaways

Your dining room is more than just a functional space—it’s where memories are made and bonds are strengthened. By focusing on lighting, decluttering, decorative touches, and comfort, you can transform your dining room into a space that’s as inviting as it is practical.

So, take these tips to heart, and start making changes today. With a little effort, you’ll create a dining room that’s perfect for both everyday meals and special occasions. Your family—and your future dinner guests—will thank you!

Looking For Home Resources?

Looking to enhance your living space and create a sanctuary that supports your well-being? Explore our home partners who offer a wide range of resources to elevate your home environment.


homeHLL x Editor


6 Home Maintenance Tasks You Shouldn’t Ignore This Year

Your home is more than just a place to live—it’s an investment, a sanctuary, and sometimes, a bit of a fixer-upper. But here’s the truth: small problems left unchecked can quickly escalate into major headaches. For instance, a tiny crack, a slow drain, or a clogged gutter might seem insignificant now, but they can lead to serious damage if ignored.


The good news? Staying ahead of these issues is easier than you think. By tackling a few key maintenance tasks, you can protect your home, save money, and enjoy lasting peace of mind. Wondering what should be at the top of your to-do list this year? In this article, we dive into six essential maintenance tasks every homeowner should prioritize.

No. 1

Inspect Your Plumbing and Sewer Lines

Your plumbing system is the lifeline of your home, yet it often goes unnoticed—until there’s a problem. A slow drain or a foul smell could indicate a bigger issue, such as a blockage or root intrusion in your sewer lines. This is where proactive measures like expert sewer inspections can save you from a messy and expensive headache.

Proactive Steps:

  • Schedule a professional sewer inspection to detect problems early.

  • Opt for advanced tools like video inspections to identify issues without invasive digging.

A quick assessment today can save you from costly repairs and unexpected disruptions tomorrow. With the right help, you’ll ensure your plumbing remains trouble-free and your home stays comfortable.

No. 2

Check Your Roof for Leaks

Your roof works tirelessly year-round, shielding your home from rain, snow, and sun. Even a small leak, however, can lead to significant water damage over time.

What to Look For:

  • Missing shingles or cracked tiles.

  • Signs of wear, especially after storms.

If climbing up feels unsafe, call a professional roofer to inspect and address any issues. Tackling minor repairs now will save you from expensive fixes later and keep your home warm and dry.

No. 3

Service Your HVAC System

Your heating and cooling system ensures year-round comfort, but neglecting it can lead to inefficiency and higher energy bills. Dirty filters and clogged vents force the system to work harder, consuming more energy.

Maintenance Tips:

  • Replace filters every three months to maintain airflow and efficiency.

  • Schedule a professional tune-up annually to address underlying issues.

Regular maintenance not only extends the life of your HVAC system but also improves the air quality inside your home.


hellolovelyliving rejuvenation exterior outdoor hardware

Rejuvenation

Rejuvenation believes in the power of thoughtful design - explore their extensive range of outdoor hardware, including stylish accessories that add character and charm to your home's exterior.


No. 4

Clear Gutters and Downspouts

Gutters play a crucial role in protecting your home by directing rainwater away from the foundation. When clogged with leaves and debris, they can cause water pooling, leading to cracks, basement flooding, or structural damage.

Best Practices:

  • Clean gutters twice a year—once in spring and again in fall.

  • Ensure downspouts direct water at least a few feet away from your home.

By keeping your gutters clear, you’ll prevent water-related headaches and maintain a solid foundation.

No. 5

Test Smoke and Carbon Monoxide Detectors

These small devices are lifesavers in emergencies, yet they’re often overlooked. Ensuring they’re in working order is a simple but critical step.

How to Stay Safe:

  • Test detectors monthly and replace batteries annually.

  • Upgrade to models with built-in 10-year batteries if your devices are over a decade old.

This quick check could mean the difference between life and disaster, offering peace of mind for you and your family.

No. 6

Perform Seasonal Exterior Maintenance

The exterior of your home endures wear and tear from changing seasons, and a little upkeep can go a long way.

Key Tasks:

  • Inspect for peeling paint, loose siding, or cracks that could let in moisture.

  • Drain and cover outdoor faucets before winter to prevent frozen pipes.

  • Clear snow away from your home’s foundation during heavy storms to avoid damage.

Addressing these issues early not only prevents weather-related damage but also improves your home’s energy efficiency.

Takeaways

Home maintenance may not be glamorous, but it’s essential for keeping your home safe, comfortable, and problem-free. By staying on top of these six tasks, you can save money, reduce stress, and enjoy your home for years to come.

So, grab a checklist, roll up your sleeves, and tackle these tasks one at a time. A little effort today can save you from a mountain of repairs tomorrow. Your home—and your wallet—will thank you!

Looking For Home Resources?

Looking to enhance your living space and create a sanctuary that supports your well-being? Explore our home partners who offer a wide range of resources to elevate your home environment.


homeHLL x Editor


How To Address And Prevent Mold Regrowth In Your Home

Black mold poses serious health risks, particularly for asthmatics, small children, and the elderly. Mold thrives in environments with high humidity and poor ventilation, making it difficult to detect its growth until it becomes a problem.


Understanding how to remove mold and prevent its regrowth is essential for maintaining a healthy home. In this article, we share steps on how to address, eliminate, and prevent the regrowth of mold in your living space.

Step 1

Address the Mold Problem

If you’ve discovered mold in your home, the first step is to search for mold removal companies near you. Professional mold removal services can quickly assess the damage and begin remediation.

What to Expect During Mold Removal

  • Inspection and Assessment: Experts will identify the source and extent of the mold.

  • Disinfection and Removal: The affected area will be cleaned and disinfected to eliminate mold spores.

  • Timeline: Mold removal typically takes up to two days, depending on the severity.

While mold remediation can be permanent, mold may reappear if the underlying conditions that promote mold growth are not addressed.

Step 2

Preventing Mold Regrowth in Bathrooms

Bathrooms are a common breeding ground for mold due to constant moisture and humidity.

To prevent mold from returning, follow these steps:

1. Use Mold-Resistant Materials

  • Apply mold-resistant paint and caulking, especially around tubs, sinks, and other moisture-prone areas.

2. Keep Surfaces Dry

  • Wipe down wet surfaces, including tiles, shower doors, and counters, after each use.

3. Improve Ventilation

  • Install or upgrade exhaust fans and use them during and after showers to reduce moisture.

  • If your bathroom has windows, keep them open when possible to promote airflow.

4. Repair Leaks

  • Regularly inspect plumbing, faucets, and seals around tubs and sinks. Fix any leaks promptly to prevent water accumulation.

5. Control Humidity

  • Use a dehumidifier if natural ventilation isn’t sufficient. Aim to keep humidity levels below 60%.


hellolovelyliving rejuvenation bathroom vanity fixtures

Rejuvenation

Elevate your space with Rejuvenation's timeless bathroom plumbing fixtures – where style meets functionality.


Step 3

Preventing Mold Regrowth in Basements

Basements are another area prone to mold due to poor drainage and limited airflow.

While they may have lower humidity levels than bathrooms, they require specific measures to prevent mold regrowth:

1. Improve Air Circulation

  • Use fans or HVAC systems to keep air moving and prevent stagnant conditions.

2. Prevent Water Intrusion

  • Fix cracks in walls or floors and ensure proper drainage around the foundation.

  • Install sump pumps and ensure gutters and downspouts direct water away from the house.

  • Apply waterproof coatings to concrete walls and floors to create a moisture barrier.

3. Avoid Mold-Friendly Materials

  • Avoid storing organic materials like cardboard, wood, and fabric in the basement.

  • Use plastic bins instead of cardboard for storage.

4. Control Humidity

  • Install a basement dehumidifier and maintain humidity levels between 30% and 50%.

Long-Term Mold Prevention

By addressing ventilation, moisture control, and storage materials in both bathrooms and basements, you can create an environment where mold is unlikely to return.

Additional Tips:

  • Conduct regular inspections of high-risk areas to catch mold early.

  • Perform proactive maintenance, such as repairing leaks and improving drainage systems.

  • Educate household members on the importance of keeping surfaces dry and maintaining proper airflow.

Taking these steps ensures long-term mold prevention, protecting both your property and your family’s health.

Takeaways

Effective mold prevention is crucial for maintaining a healthy living environment and safeguarding personal well-being. By implementing practical strategies such as controlling humidity levels, ensuring proper ventilation, and promptly addressing leaks or water damage, you can significantly reduce the risk of mold growth in your home.

Regular inspections and a proactive approach to cleaning and maintenance can further bolster these efforts. Ultimately, embracing these practices not only protects your living space but also empowers you to foster overall wellness and a sense of tranquility in your daily life that a well-maintained home brings.

Looking For Home Resources?

Looking to enhance your living space and create a sanctuary that supports your well-being? Explore our home partners who offer a wide range of resources to elevate your home environment.


homeHLL x Editor


Top Tips For Reliable Storm Damage Repair Services

Storms can wreak havoc on your property, leaving behind a trail of destruction that requires immediate attention. From damaged roofs to flooded basements, storm damage can be overwhelming, both emotionally and financially.


Finding a reliable storm damage repair service like Expert Storm Damage Repair by DM Best Homes is crucial to restoring your property and ensuring your peace of mind. But how do you choose the right service provider? In this article, we guide you through the top tips for selecting dependable storm damage repair services so you can rebuild with confidence.

Why Reliable Storm Damage Repair Services Matter

Storm damage isn’t just about aesthetics—it can compromise the structural integrity of your home or business. A damaged roof can lead to leaks, mold growth, and even electrical hazards. Similarly, water damage can weaken foundations and create long-term issues if not addressed promptly.

Hiring a reliable storm damage repair service ensures:

  • Timely Repairs: Preventing further damage and reducing repair costs.

  • Quality Workmanship: Ensuring repairs are durable and meet safety standards.

  • Insurance Assistance: Helping you navigate the claims process effectively.

Top Tips for Finding Reliable Storm Damage Repair Services

No. 1

Act Quickly but Don’t Rush

After a storm, it’s natural to want repairs done as soon as possible. However, rushing into a decision can lead to hiring unqualified contractors or falling victim to scams. Take the time to research and vet potential service providers.

What to Do:

  • Document the Damage: Take photos and videos of the affected areas for your records and insurance claims.

  • Secure Your Property: Cover exposed areas with tarps or boards to prevent further damage.

No. 2

Look for Local Contractors

Hiring a local storm damage repair service has several advantages:

  • Familiarity with Local Weather: Local contractors understand the specific challenges posed by storms in your area.

  • Quick Response Time: They can reach your property faster for assessments and repairs.

  • Reputation: It’s easier to verify their credibility through local references and reviews.

Pro Tip:

Avoid “storm chasers”—out-of-town contractors who show up after a storm and disappear once the work is done, often leaving behind subpar repairs.

No. 3

Verify Credentials

Before hiring a contractor, ensure they have the necessary qualifications to handle storm damage repairs.

Check for:

  • Licensing and Certification: Verify that the contractor is licensed to operate in your state and has certifications for specialized repairs (e.g., roofing or water damage restoration).

  • Insurance: Ensure they carry liability insurance and worker’s compensation to protect you from potential liabilities.

  • Experience: Look for contractors with a proven track record in storm damage repairs.


hellolovelyliving houzz home improvement projects

Houzz

Make your home project a reality. Find inspiration, products and the pros to make it happen - all in one place.


No. 4

Read Reviews and Ask for References

Online reviews and testimonials can provide valuable insights into a contractor’s reliability and quality of work. Additionally, ask the contractor for references from past clients.

Questions to Ask References:

  • Were you satisfied with the quality of the repairs?

  • Did the contractor complete the work on time and within budget?

  • Were there any issues, and how were they resolved?

No. 5

Get a Detailed Estimate

A reliable contractor will provide a written estimate that outlines the scope of work, materials, timeline, and costs. Avoid contractors who offer vague estimates or demand payment upfront.

What to Look For in an Estimate:

  • Itemized Costs: Labor, materials, and additional fees should be clearly listed.

  • Timeline: A realistic schedule for completing the repairs.

  • Warranty: Details about warranties on materials and workmanship.

No. 6

Understand the Insurance Process

Navigating insurance claims can be daunting, but a good storm damage repair service can help.

Tips for Working with Insurance:

  • File Your Claim Promptly: Most insurance policies have deadlines for reporting damage.

  • Provide Documentation: Submit photos, videos, and repair estimates to support your claim.

  • Work with Your Contractor: Many contractors will communicate directly with your insurance adjuster to ensure fair compensation.

No. 7

Prioritize Safety

Storm damage can create hazardous conditions, such as exposed electrical wires, structural instability, or mold growth. A reliable contractor will prioritize safety during the repair process.

Safety Measures to Expect:

  • Proper equipment and protective gear.

  • Adherence to building codes and safety regulations.

  • Thorough inspections to identify hidden damage.

No. 8

Avoid Common Scams

Unfortunately, storm damage often attracts unscrupulous contractors looking to take advantage of vulnerable homeowners.

Red Flags to Watch For:

  • Unsolicited Offers: Be wary of contractors who knock on your door offering immediate repairs.

  • High-Pressure Tactics: Avoid contractors who pressure you into signing a contract on the spot.

  • No Written Contract: Never agree to verbal promises—always insist on a written agreement.

Benefits of Hiring Reliable Storm Damage Repair Services

Choosing a trustworthy contractor offers numerous benefits, including:

  • Peace of Mind: Knowing your property is in good hands.

  • Long-Term Savings: High-quality repairs reduce the likelihood of future issues.

  • Enhanced Property Value: Properly repaired damage maintains or even increases your property’s value.

Takeaways

Storm damage can be a stressful experience, but finding reliable storm damage repair services doesn’t have to be. By following these tips—acting quickly but carefully, verifying credentials, and avoiding scams—you can ensure your property is restored efficiently and effectively.

Remember, the right contractor will not only repair the damage but also help you navigate the insurance process and prioritize your safety. Take the time to choose wisely, and you’ll be back on your feet in no time.

Looking For Home Resources?

Looking to enhance your living space and create a sanctuary that supports your well-being? Explore our home partners who offer a wide range of resources to elevate your home environment.


homeHLL x Editor


Floor Lamps For Small Spaces: Stylish And Functional Options

Finding the right lighting for a small space can feel like a challenge, but it doesn’t have to be. Floor lamps are a fantastic way to add both style and functionality to compact rooms. They’re versatile, don’t take up much floor space, and can completely transform the mood of your home.


But how do you pick the perfect one? In this article, we explore floor lamps for small spaces that are stylish and functional.

No. 1

Why Floor Lamps Are Perfect for Small Spaces

When space is tight, every piece of furniture and décor has to earn its spot. Floor lamps from https://www.sunmory.com/ are ideal because they combine form and function.

They don’t require a table or extra surface, which is a big win if you’re working with limited square footage. Plus, they act as both a light source and a design element, adding height and style to your room.

Ever felt like a space just needed something? A floor lamp might be the answer. Floor lamps are also great for creating layers of light.

In a small space, relying on a single ceiling light can make the room feel flat and uninspired. Adding a floor lamp creates depth, warmth, and character. Whether you’re curling up with a book or hosting a cozy dinner party, having different lighting options can completely change the vibe.

No. 2

Choosing the Right Style for Your Space

So, how do you decide on the style that works best for your room? First, think about the overall aesthetic of your space.

Are you going for modern minimalism, a cozy boho vibe, or something more classic? The right floor lamp can complement your design and tie the room together.

Modern and Minimalist

If you love clean lines and simplicity, look for sleek, modern floor lamps with a slim profile. Think metal finishes, understated shapes, and neutral colors. A modern arc timeless look floor lamp is a great option—it provides plenty of light while curving gracefully over a chair or sofa, saving precious floor space.

Industrial Chic

For an edgy, industrial vibe, choose floor lamps with exposed bulbs, metal accents, and a rugged feel. Pair one with warm Edison-style bulbs to create a cozy, ambient glow.

Mid-Century Modern

Mid-century modern designs are timeless and versatile, making them perfect for small spaces. Lamps with slim, tapered bases and retro vibes, like those with natural wood or brass finishes, can add warmth and sophistication to your room.

Bohemian and Eclectic

For a relaxed, eclectic feel, consider floor lamps with woven shades, natural materials, or colorful accents. These styles add texture and personality to a room. If you’re working with a neutral palette, a boho lamp introduces a bit of warmth and whimsy.

Traditional and Classic

If you prefer a timeless look, classic floor lamps with decorative bases and fabric shades are always a good option. They blend seamlessly with traditional furniture and décor, offering elegance and functionality.

No. 3

Maximize Functionality in Small Spaces

A floor lamp isn’t just a pretty addition—it can also serve multiple purposes. If you’re short on space, look for designs that work double duty.

  • Adjustable Arms: Lamps with movable arms or heads let you direct the light exactly where you need it. Perfect for reading nooks or working from home.

  • Built-in Shelves: Some floor lamps come with built-in shelves for storage or display. This is a great option for apartments or small rooms where every inch counts.

  • Dimmer Switches: A lamp with a dimmer allows you to control the room’s mood—bright light for tasks, and softer light for relaxation.

The goal is to find a lamp that fits your space and meets your needs. Think about how you’ll use the lamp daily and choose a design that makes your life easier.


Lulu and Georgia

Lulu and Georgia provides a thoughtfully curated collection of modern light fixtures perfect for your home, beautifully blending form and function.


No. 4

Placement Tips for Small Spaces

Where you place your floor lamp can make a huge difference in how it functions and looks. In small spaces, placement is everything.

  • Next to Seating: Placing a lamp next to a sofa or armchair creates a cozy reading nook and makes the room feel more intentional.

  • Behind Furniture: Got a corner that feels empty? Tuck a lamp behind a chair or couch to make use of that dead space.

  • In Corners: A well-placed lamp can brighten a dark corner and make the room feel larger.

  • Near Mirrors: Placing a lamp near a mirror amplifies the light and makes the space feel more open.

Don’t be afraid to experiment! Sometimes shifting a lamp just a foot or two can completely change the look and feel of the room.

TAkeaways

Choosing a floor lamp for a small space is about finding the balance between style and practicality. Think about what your space needs—whether it’s more light, a touch of texture, or a bit of personality—and choose a lamp that delivers.

The right floor lamp can do so much more than just light a room. It can enhance the entire atmosphere, make the space feel bigger, and bring your décor to life.

Looking For Home Resources?

Looking to enhance your living space and create a sanctuary that supports your well-being? Explore our home partners who offer a wide range of resources to elevate your home environment.


homeHLL x Editor


8 Mistakes To Avoid When Designing Your Child's Bedroom

Designing your child's bedroom is an exciting opportunity to create a space where they can play, sleep, and dream. However, it’s not as simple as slapping some paint on the walls and calling it a day. Many well-meaning parents make common design mistakes that result in cluttered, impractical, or unsafe spaces.


Are you planning to revamp your little one’s room? Let’s ensure you avoid these pitfalls so you can create a comfortable and functional space. In this article, we explore common mistakes to avoid when designing your child’s bedroom.

No. 1

Forgetting to Think Long-Term

It’s easy to get swept up in the moment and choose designs that feel cute now but might not work as your child grows. Opting for overly babyish themes or furniture can lead to costly replacements in just a few years.

Instead, consider timeless pieces that evolve with your child:

  • Neutral wall colors that suit any age.

  • A sturdy bed frame that lasts through multiple stages of childhood.

  • Adaptable furniture like desks or storage units.

Wouldn’t it be nice not to repaint or refurnish every couple of years?

No. 2

Using Adult Hangers Instead of Kid-Sized Options

It might seem like a small detail, but using adult-sized hangers in your child’s wardrobe can stretch their tiny clothes and create a messy closet.

Switch to kids size wood clothes hanger to:

  • Keep their clothing in good condition.

  • Ensure everything fits neatly in their wardrobe.

  • Encourage organization, as smaller hangers are easier for kids to handle.

No. 3

Ignoring Storage Needs

We’ve all been there—stepping on toys that seem to appear everywhere. One of the biggest mistakes parents make is not planning for enough storage.

Consider these storage solutions:

  • Under-bed storage for toys or seasonal items.

  • Built-in shelves to maximize vertical space.

  • Multi-functional furniture, like beds with built-in drawers.

  • Open storage bins or cubbies to make tidying up easier for kids.

You’ll thank yourself when their room stays (mostly) neat!


hellolovelyliving pottery barn kids playroom

Pottery Barn Kids

Create a world of wonder for your little ones with Pottery Barn Kids! From playful decor to cozy essentials, they provide everything you need to inspire imagination and make every space feel like home. Explore their collection today!


No. 4

Overcomplicating the Design

It’s tempting to go big to make the room feel special, but overcrowding the space with bold wallpaper, excessive furniture, or too many themes can make it feel overwhelming.

Instead, keep it simple:

  • Choose a few well-chosen decorative items.

  • Leave some empty space for your child to grow into the room.

  • Focus on creating a balanced and inviting atmosphere.

Simplicity often leads to a more functional and calming space.

No. 5

Skimping on Quality Furniture

It’s tempting to choose the cheapest options, especially since kids seem to outgrow things quickly. However, investing in high-quality furniture can save you money in the long run.

Look for:

  • Solid wood dressers or bed frames that can withstand years of use.

  • Durable and safe designs, like rounded edges and non-toxic finishes.

Your child’s room should be as safe as it is stylish.

No. 6

Overlooking Lighting

Lighting is often an afterthought, but it plays a huge role in how functional and cozy a room feels.

Consider layered lighting options:

  • Overhead lights for general illumination.

  • Task lighting for reading or homework.

  • Accent lights to create a warm and inviting atmosphere.

  • A nightlight for little ones who aren’t fond of the dark.

The right lighting can make all the difference in creating a comfortable space.

No. 7

Making It All About You

While you’re the one designing the room, don’t forget who it’s really for. Incorporating your child’s personality, preferences, and interests will make the space feel like their own.

Ideas to involve your child:

  • Let them pick a favorite color for an accent wall.

  • Choose a fun piece of artwork together.

  • Add decor that reflects their hobbies or interests.

Giving them some control (within reason) makes the room more meaningful and exciting for them to spend time in.

No. 8

Neglecting Safety

While aesthetics are important, safety should always be a top priority in a child’s room.

Safety tips to keep in mind:

  • Keep blind cords out of reach.

  • Secure heavy furniture to the wall to prevent tipping.

  • Avoid sharp edges or breakable decor items.

Planning for safety upfront can save you worry—and prevent accidents—later on.

Takeaways

Designing a child’s bedroom is a balancing act between fun, function, and practicality. By steering clear of these common mistakes, you can create a space that:

  • Grows with your child.

  • Stays organized.

  • Keeps them safe.

So, what will your first step be? Maybe it’s choosing timeless furniture, rethinking the lighting, or adding kid-sized hangers. Whatever you decide, your child’s dream room is just a few smart decisions away.

Looking For Home Resources?

Looking to enhance your living space and create a sanctuary that supports your well-being? Explore our home partners who offer a wide range of resources to elevate your home environment.


homeHLL x Editor


10 Benefits Of Hiring Professionals For Your Landscaping Needs

Maintaining an attractive and functional outdoor space can be both rewarding and challenging. Outdoor improvement projects require creativity, skill, and time to ensure the area is visually appealing and practical for everyday use. While many homeowners attempt to tackle these tasks themselves, the process can quickly become overwhelming without the right expertise or tools.


Hiring expert landscapers offers a stress-free solution to transform outdoor areas. Professionals provide tailored designs, sustainable practices, and high-quality results that enhance the space's overall appeal and functionality.

Additionally, professionally done landscaping can significantly boost property value, making it a smart investment for homeowners. By choosing skilled experts, you can enjoy a beautiful, low-maintenance outdoor area without the time, effort, or guesswork of doing it yourself.

In this article, we explain why investing in professional landscaping is a smart choice for your property.

No. 1

Expertise in Landscape Design

Professional landscapers have the skills and experience to create designs tailored to your space. They know how to balance aesthetics and functionality, ensuring the outdoor area looks great while being practical for everyday use.

In addition to creating visually appealing designs, experts can address challenges like:

  • Uneven terrain.

  • Poor soil quality.

Their ability to identify and solve potential issues ensures the space is both beautiful and sustainable in the long term.

No. 2

Quality Services

When you hire professionals, you can expect high-quality results. Skilled landscapers focus on every detail, from plant selection to hardscaping features, ensuring the project is completed to your satisfaction.

For reliable and professional results, working with trusted companies is essential. Reputable providers have a proven track record of delivering top-notch services. Their expertise and customer-first approach make them a popular choice for outdoor improvement projects.

Visit bladerunneratx.com to learn more about how these experts can help you.

No. 3

Time-Saving Convenience

Creating and maintaining an outdoor area takes significant time, especially if you’re unfamiliar with the tasks involved. Professionals handle everything, from planning to execution, allowing you to focus on other priorities.

By delegating these tasks, you:

  • Save countless hours that can be spent with family or on other commitments.

  • Avoid the trial-and-error process often associated with DIY projects.

With experts taking care of the job, you can enjoy a stress-free experience.


hellololovelyliving terrain garden pots planters


Terrain

Indoor and outdoor living, garden, and entertaining essentials that are well-designed, lasting, and beautiful.


No. 4

Cost Efficiency in the Long Run

While hiring professionals may seem like a big investment upfront, it often saves money in the long term.

Experts:

  • Know which materials and methods work best, preventing costly mistakes.

  • Deliver well-executed projects that require less maintenance and fewer repairs.

  • Have access to high-quality materials at competitive prices.

This makes professional services a smart financial decision.

No. 5

Proper Equipment and Tools

Landscaping projects require specialized tools that can be expensive to purchase or rent. Professionals come equipped with all the necessary equipment, ensuring the job is done efficiently and to a high standard.

Benefits include:

  • No need to invest in or learn how to use complex machinery.

  • Guaranteed high-quality results for your outdoor space.

No. 6

Enhanced Curb Appeal and Property Value

A well-maintained outdoor area significantly enhances a property’s visual appeal.

Professional landscapers:

  • Design and maintain visually attractive and welcoming spaces.

  • Incorporate elements like pathways, flower beds, and lighting to create a stunning first impression.

Beyond aesthetics, an appealing outdoor area increases property value. Homes with well-designed landscapes often sell faster and at higher prices. Whether you’re planning to stay or sell, investing in expert services ensures your property stands out.

No. 7

Sustainable and Eco-Friendly Practices

Sustainability is increasingly important, and professional landscapers are well-versed in eco-friendly practices.

They can:

  • Incorporate native plants that require less water and maintenance.

  • Design systems that optimize natural resources, such as rainwater harvesting.

  • Use efficient irrigation systems and organic fertilizers to minimize environmental impact.

These practices save resources and create a healthy, thriving outdoor environment that benefits both the ecosystem and your wallet.

No. 8

Expertise in Plant Selection and Care

Choosing the right plants for your outdoor area can be challenging.

Professionals:

  • Understand which plants thrive in specific climates, soil conditions, and sunlight levels.

  • Recommend plants that look great year-round and are easy to maintain.

  • Provide ongoing care, including pruning, fertilizing, and pest control.

This ensures your garden remains vibrant and flourishing without the hassle of managing it yourself.

No. 9

Year-Round Maintenance

Outdoor spaces require consistent care to look their best throughout the seasons.

Professional landscapers offer year-round maintenance services, including:

  • Mowing.

  • Pruning.

  • Mulching.

  • Seasonal cleanups.

Regular maintenance prevents issues like overgrown plants, dead grass patches, or drainage problems. With experts managing the upkeep, you can relax knowing your outdoor space is in good hands.

No. 10

Personalized Designs Tailored to Your Vision

One of the greatest benefits of hiring professionals is their ability to create a design that reflects your personal style and preferences.

They take the time to understand your needs, whether it’s:

Professionals also consider factors like layout, climate, and maintenance requirements to ensure the design is both functional and practical. With their expertise, you can achieve a unique outdoor space that aligns with your vision and enhances your lifestyle.

No. 11

Stress-Free Process and Peace of Mind

Planning and executing outdoor improvement projects can be stressful, especially for those with little experience. Professionals handle every aspect, from initial design to final installation, ensuring a smooth and worry-free process.

By hiring experts, you:

  • Save time and effort.

  • Avoid guesswork.

  • Enjoy results that exceed expectations.

Takeaways

Hiring professionals for outdoor improvement projects offers numerous benefits, from saving time and money to enhancing property value and curb appeal. Experts use their knowledge, tools, and creativity to create functional, sustainable, and beautiful outdoor spaces.

Whether you’re looking for a complete redesign or regular maintenance, investing in professional services ensures long-lasting results. With the right team, you can create a space that enhances your lifestyle and boosts your property’s appeal.

Looking For Home Resources?

Looking to enhance your living space and create a sanctuary that supports your well-being? Explore our home partners who offer a wide range of resources to elevate your home environment.


homeHLL x Editor


Top Questions To Ask Before Renting A Dumpster

Renting a dumpster might not be something you think about every day, but when the need arises, it’s important to get it right. Whether you’re tackling a home renovation, clearing out years of clutter, or managing a construction project, the last thing you want is a dumpster that doesn’t meet your needs.


So, how do you make the right choice? By asking the right questions! In this article, we take the time to share the most important and top questions to consider asking before you make the decision to rent a dumpster for your upcoming project.

No. 1

What Size Dumpster Do I Need?

This is one of the most important questions to ask. Dumpsters from Waste Removal USA come in various sizes, and choosing the wrong one can either cost you extra money or leave you short on space.

  • Small Projects: For clearing out a small garage or attic, a 10-yard dumpster might suffice.

  • Larger Projects: For major renovations or demolitions, you may need a 20-yard or even a 30-yard dumpster.

Don’t underestimate how much debris you’ll have—always estimate a little more than you think you’ll need to avoid running out of room.

No. 2

What Can I Put in the Dumpster?

It’s easy to assume you can toss anything into a dumpster, but there are rules about what’s allowed.

Most rental companies prohibit hazardous materials like:

  • Paint

  • Chemicals

  • Batteries

  • Tires

Some companies may also restrict heavy materials like concrete or dirt, as they can make the dumpster too heavy to transport. Always check the specifics to avoid extra fees or the hassle of figuring out where to dispose of restricted items.

Tip: If you’re unsure about a specific item, ask your rental provider—they’ll have the answers.

No. 3

How Long Can I Keep the Dumpster?

Timing is everything. How long will you need the dumpster? A weekend? A week? Maybe longer?

  • Many companies offer flexible rental periods, but some charge extra if you exceed the agreed timeframe.

  • Be clear about your project timeline and ask about any late fees upfront.

  • Find out how much notice they need to schedule a pickup once you’re finished.

Knowing these details in advance can save you stress later.


hellolovelyliving the container store storage solutions closet

The Container Store

Your ultimate destination for innovative storage and organization solutions for home or office—offering everything from stylish bins and shelves to custom closet systems.


No. 4

Where Will the Dumpster Be Placed?

Placement matters. Do you have enough space on your property, or will the dumpster need to sit on the street?

  • If it’s going on public property, you might need a permit from your local council.

  • Consider accessibility—can the delivery truck easily reach your chosen spot?

If you’re unsure, ask the rental company for advice. They’ve seen it all and can recommend the best location for your situation.

No. 5

Are There Any Extra Fees?

Nobody likes surprise costs.

Beyond the basic rental fee, ask about additional charges, such as:

  • Overweight fees.

  • Charges for prohibited items.

  • Costs for extending the rental period.

  • Fuel surcharges or delivery fees, depending on your location.

Getting a full breakdown of potential costs upfront ensures you’re not caught off guard when the bill arrives.

No. 6

How Much Weight Can the Dumpster Hold?

Dumpster weight limits are often overlooked but are crucial. Every dumpster has a maximum weight capacity, and exceeding it can result in hefty fines.

  • This is especially relevant if you’re disposing of heavy materials like concrete, bricks, or dirt.

  • If you’re unsure how much your debris will weigh, a good rental company can help you estimate and recommend the right size.

No. 7

What’s Included in the Rental Price?

Before signing any agreement, clarify what’s included in the price.

  • Does it cover delivery and pickup?

  • Are disposal fees included?

Some companies bundle these costs into one flat rate, while others itemize them separately. Knowing what’s included will help you compare quotes and avoid hidden expenses.

No. 8

Is the Company Reliable?

Not all dumpster rental companies are created equal.

Look for one that is:

  • Transparent about pricing.

  • Responsive and easy to work with.

  • Backed by positive reviews and a track record of reliability.

If a company is hard to reach or vague about costs, consider it a red flag. A dependable provider will make the process straightforward and hassle-free.

No. 9

Do I Need a Permit?

If you’re planning to place the dumpster on the street or public property, you’ll likely need a permit.

  • Check with your local council to determine what’s required.

  • Some rental companies can assist with the paperwork or guide you through the process.

Skipping this step can lead to fines, so it’s worth sorting out before the dumpster arrives.

No. 10

What Happens if I Fill It Up Before the Job’s Done?

It’s not uncommon to underestimate how much debris a project will produce. If you fill the dumpster before you’re finished, ask the rental company if they offer “swap-outs.”

  • A swap-out involves delivering an empty dumpster and hauling the full one away.

  • Knowing this option is available can save you frustration if your project generates more waste than expected.

No. 11

What Happens to the Waste?

Curious about where your trash goes? Many rental companies work with local recycling facilities to ensure as much waste as possible is reused.

  • If sustainability matters to you, ask about their recycling policies.

  • Knowing your waste is being handled responsibly can make a big difference.

Takeaways

Renting a dumpster doesn’t have to be complicated. By asking the right questions, you’ll avoid common pitfalls and ensure you get exactly what you need. Whether it’s a quick clean-out or a massive renovation, the right dumpster can make your project much easier.

Remember—planning ahead and getting clear answers upfront is the key to a smooth rental experience.

Looking For Home Resources?

Looking to enhance your living space and create a sanctuary that supports your well-being? Explore our home partners who offer a wide range of resources to elevate your home environment.


homeHLL x Editor


Essential Materials For Your Garden Renovation

Spending time in your beautiful garden can do wonders for your well-being. Not only does it improve your physical health, but having a project like a garden renovation can also boost your mental health.


If you're planning to overhaul your outdoor space, it's essential to choose the right materials to suit your needs and vision. In this article, we share some tips to help you make the best choices when selecting materials for a garden renovation project.

No. 1

Choosing the Right Soil for Your Garden Beds

A thriving garden starts with good-quality soil. During the planning stages of your renovation, consider the types of plants you want to grow and the soil they require.

  • Clay Soils: Known as heavy soils, clay is excellent for retaining nutrients around plant roots. However, it can bake hard in the summer and compact easily when wet or walked on.

  • Sandy Soils: The opposite of clay, sandy soils are light and drain quickly after watering. They are easy to cultivate and work with but contain fewer nutrients and can be quite acidic.

Understanding your soil type will help you create the ideal environment for your plants to thrive.

No. 2

Incorporating Bulk Gravel Bags for Pathways and Ground Cover

Gravel is a versatile material that can be used in various ways, from creating low-maintenance, durable pathways to decorative ground areas for seating and entertaining.

If you're looking to reduce renovation costs, bulk gravel bags could be your answer, especially for covering larger areas. Not only can you save money, but having the gravel delivered also simplifies transportation and logistics.

No. 3

Durable Paving and Patio Materials

A beautiful patio area is often the centerpiece of a renovated garden. Choosing the right materials for this space is crucial, as it needs to withstand foot traffic as well as patio furniture weight.

Popular options include:

  • Natural Stone: Offers a timeless, elegant look but can be more expensive.

  • Concrete: Durable and cost-effective, with various design options.

  • Porcelain: Sleek and modern, with excellent durability and low maintenance.

Each material has its own aesthetic, so ensure it aligns with your overall garden vision.


hellolovelyliving terrain garden tools

Terrain

Indoor and outdoor living, garden, and entertaining essentials that are well-designed, lasting, and beautiful


No. 4

Selecting the Right Garden Fencing

Fencing is essential for defining your garden boundaries and providing privacy from neighbors.

There are many options to choose from, depending on your style preferences and maintenance willingness:

  • Wooden Fences: Traditional panel fences are easy to install and maintain but may not appeal to everyone aesthetically.

  • Hedges: A natural alternative that adds greenery and charm but requires regular trimming, watering, and care.

Consider the balance between functionality, appearance, and upkeep when selecting your fencing.

Takeaways

By carefully selecting the right materials for your garden renovation, you can create an outdoor space that is not only beautiful but also functional and long-lasting. Whether it's choosing the perfect soil, incorporating gravel, or selecting durable patio materials, thoughtful planning will ensure your garden becomes a space you can enjoy for years to come.

Looking For Home Resources?

Looking to enhance your living space and create a sanctuary that supports your well-being? Explore our home partners who offer a wide range of resources to elevate your home environment.


homeHLL x Editor


Best Ideas For Custom Epoxy Dining Tables

Epoxy dining tables have transformed home decor by combining natural materials with artistic design. Whether your style is modern, rustic, or luxurious, these custom creations can turn any dining area into a stunning centerpiece. In this article, we share some of the best ideas for custom epoxy dining tables to inspire your next project.


No. 1

River Epoxy Dining Table

The river table design is a timeless favorite. It features a wood slab split down the middle, with epoxy resin filling the gap to create a striking "river" effect.

Key Features:

  • Natural Appeal: Live edges preserve the wood’s organic shape for a rugged, natural look.

  • Color Variations: Choose clear, tinted, or vibrant epoxy colors like ocean blue, emerald green, or smoky gray.

  • Textures: Enhance depth by adding crushed glass, metallic flakes, or small stones to the epoxy.

Customization Tips: Add LED lighting beneath the river for a glowing effect. Use woods like walnut or maple for bold contrast.

No. 2

Live-Edge Epoxy Dining Table

Live-edge tables retain the natural curves of the wood, blending them seamlessly with epoxy for a rustic yet artistic design.

Key Features:

  • Organic Shape: Preserved live edges make each table unique.

  • Epoxy Inlays: Fill cracks or holes with epoxy for added color and structural integrity.

Customization Tips: Use gold or silver pigments for a luxurious finish. Pair with raw steel or iron legs to emphasize the rustic charm.

No. 3

Geometric Pattern Epoxy Table

For a modern twist, epoxy can be used to create intricate geometric patterns, from simple hexagons to complex tessellations.

Key Features:

  • Sleek and Modern: Clean lines and sharp angles give the table a contemporary look.

  • Custom Designs: Use contrasting epoxy colors to highlight the patterns.

Customization Tips: Experiment with bold color combinations like black and white or gold and navy. Opt for a matte finish for a sophisticated touch.


hellolovelyliving burke decor dining chairs

Burke Decor

Burke Decor is a trusted source of aesthetically exceptional products for style-conscious shoppers and believes that every home, environment, and interior can be beautiful through artfulness and great design.


No. 4

Marble-Effect Epoxy Dining Table

Epoxy resin can replicate the luxurious look of marble at a fraction of the cost, offering elegance with added durability.

Key Features:

  • Elegant Appearance: Swirling patterns mimic natural marble veining.

  • Durability: Scratch-resistant and easy to maintain compared to real marble.

Customization Tips: Add pearl or metallic pigments for a shimmering effect. Pair with wooden legs for a modern-traditional blend.

No. 5

Glow-in-the-Dark Epoxy Dining Table

Glow-in-the-dark epoxy creates a whimsical or futuristic vibe, making it a standout piece in any dining area.

Key Features:

  • Unique Appeal: Glows in low light, adding ambiance.

  • Versatility: Glow intensity can range from subtle to bold, depending on the pigment.

Customization Tips: Combine glow-in-the-dark epoxy with a river table design for dramatic flair. Use eco-friendly pigments for safety and quality.

No. 6

Ocean-Inspired Epoxy Dining Table

Recreate the tranquility of the sea with an ocean-inspired design, featuring wave-like layers of blue and white resin.

Key Features:

  • Realistic Detail: Layers mimic waves, with white resin resembling foam.

  • Beach Vibes: Embed sand, seashells, or pebbles for added authenticity.

Customization Tips: Use clear epoxy for a glossy, water-like finish. Pair with driftwood or light-toned wood for a coastal theme.

No. 7

Abstract Art Epoxy Table

Abstract designs allow for maximum creativity, making each table a one-of-a-kind masterpiece.

Key Features:

  • Bold Colors: Swirl vibrant pigments like red, orange, or yellow for dynamic designs.

  • Endless Possibilities: Incorporate textures, patterns, or embedded objects like coins or flowers.

Customization Tips: Collaborate with an epoxy artist for a polished result. Seal with a high-gloss finish to enhance the colors.

No. 8

Minimalist Clear Epoxy Table

For understated elegance, a minimalist clear epoxy table highlights the natural beauty of the wood while maintaining a sleek look.

Key Features:

  • Simple and Chic: Clear epoxy fills imperfections without overshadowing the wood grain.

  • Timeless Appeal: Complements both traditional and contemporary spaces.

Customization Tips: Pair with minimalist metal legs and consider a matte finish for a refined touch.

No. 9

Layered Epoxy and Wood Dining Table

Layering epoxy and wood creates a multi-dimensional effect, alternating materials for a bold, artistic design.

Key Features:

  • Three-Dimensional Depth: Layers add visual complexity.

  • Contrasting Materials: Combine natural wood with vibrant epoxy for a striking look.

Customization Tips: Use irregularly shaped wood pieces for an organic feel. Metallic epoxy adds drama and sophistication.

No. 10

Custom Inlaid Epoxy Dining Table

Personalized inlays, such as names, logos, or intricate designs, make your table truly unique.

Key Features:

  • Personalized Design: Reflect your family name, a meaningful quote, or a unique symbol.

  • Eye-Catching Details: Metallic or glitter epoxy highlights the inlay.

Customization Tips: Work with a skilled craftsman for precise engraving. Use contrasting epoxy colors to make the inlay stand out.

No. 11

Black Epoxy with Metallic Highlights

Black epoxy paired with metallic accents creates a bold, luxurious aesthetic, perfect for modern or industrial interiors.

Key Features:

  • Bold and Elegant: Dark epoxy serves as a striking backdrop for metallic flakes.

  • Sophistication: Complements gold, silver, or copper highlights beautifully.

Customization Tips: Pair with dark wood like walnut or ebony. Use polished metal legs for a cohesive look.

No. 12

Nature-Inspired Epoxy Table

Incorporating natural elements like leaves, flowers, or small branches into epoxy creates a serene, earthy design.

Key Features:

  • Earthy Aesthetic: Embedded elements add a calming, organic vibe.

  • Customizable: Use seasonal flowers or leaves for a personal touch.

Customization Tips: Seal natural elements with clear epoxy to preserve their texture and color. Opt for a matte finish for a softer, natural look.

Choosing the Right Design for Your Space

When selecting a custom epoxy dining table, consider the following:

  • Room Aesthetic: Match the table design to your interior style—rustic, modern, or eclectic.

  • Table Size: Ensure it fits comfortably in your dining area.

  • Budget: Custom epoxy tables vary in cost based on materials and complexity.

  • Functionality: Choose durable finishes for daily use.

Takeaways

Epoxy dining tables offer endless customization possibilities, blending functionality with artistic flair. Whether you prefer the natural beauty of live-edge wood, the elegance of marble effects, or the boldness of geometric designs, there’s an epoxy table to suit every style. With thoughtful planning and creativity, you can transform your dining space into a true masterpiece.

Looking For Home Resources?

Looking to enhance your living space and create a sanctuary that supports your well-being? Explore our home partners who offer a wide range of resources to elevate your home environment.


homeHLL x Editor


Common Causes Of Slip And Fall Accidents And Prevention Tips

Slip and fall incidents are among the most common types of personal injury cases in Louisville. These accidents can occur at home, in a store, on a sidewalk, or at the workplace. While they might seem like minor mishaps, they can lead to serious injuries such as fractures, head trauma, or back pain.


Even though Louisville boasts a relatively low cost of living, the financial consequences of such accidents can still be significant. Understanding the common causes of these accidents and how to prevent them can help keep you and your loved ones safe.

If you’ve been injured in a slip-and-fall accident, you might wonder if you’re entitled to compensation. That’s where a Louisville slip and fall lawyer can assist. An experienced attorney can help you file a claim and secure the compensation you deserve, which may include medical expenses, lost wages, and damages for pain and suffering caused by the accident.

In this article, we share some of the most common causes of slip and fall accidents, along with practical strategies on how to prevent them from occurring in various environments. Understanding these factors is essential for promoting safety and reducing the risk of such incidents.

What Are the Common Causes of Slip and Fall Accidents?

Slip and fall injuries often result from hazardous conditions that could have been prevented. Some of the most common causes include:

  • Wet or Slippery Surfaces: Spills, poorly mopped floors, or leaks are major culprits. For example, slipping on a wet grocery store floor without a warning sign is a common scenario.

  • Uneven Floors and Cracked Sidewalks: Loose rugs, uneven flooring, or damaged sidewalks are often overlooked but can cause serious tripping hazards.

  • Poor Lighting: Dimly lit areas, such as staircases or parking lots, increase the risk of accidents. If you can’t clearly see where you’re stepping, the likelihood of a fall rises significantly.

  • Weather Conditions: Rain, snow, and ice make outdoor surfaces slippery. In cities like Louisville, where winters can be harsh, icy sidewalks and parking lots are common hazards.

Property owners are responsible for maintaining safe premises. They may be held liable for accidents caused by their failure to address known hazards, such as broken stairs, wet entryways, or poorly lit areas.

How to Avoid Slip and Fall Accidents

While accidents can happen to anyone, there are steps you can take to reduce the risk of injury:

  1. Wear Proper Footwear: Shoes with good grip can help prevent slips on uneven or slippery surfaces. In Louisville, wearing appropriate footwear is especially important during snowy or rainy weather.

  2. Stay Alert: Pay attention to your surroundings. Look out for warning signs, wet floors, or obstacles that could cause you to trip.

  3. Improve Lighting: Ensure areas like staircases and outdoor walkways are well-lit, whether at home or work. Proper lighting reduces the risk of accidents.

  4. Fix Hazards Immediately: Address dangers like loose rugs or spills as soon as you notice them. If the property isn’t yours, report the hazard to the responsible party.

  5. Be Cautious in Bad Weather: During Louisville’s icy winters, take extra care on sidewalks and parking lots. Use salt or sand on icy surfaces and take small, deliberate steps to maintain balance.

  6. Regular Maintenance: Property owners should prioritize routine upkeep. Fix cracks in sidewalks, clean up spills promptly, and ensure the area is safe for visitors.


hellolovelyliving aircraft hard floor cleaner machine


Aircraft

Achieve spotless floors with Aircraft hard floor cleaners! Designed for efficiency and effectiveness, their products ensure a clean and safe environment for everyone. Elevate your home or office cleanliness today!


Takeaways

Slip and fall accidents are more than minor inconveniences—they can have serious physical, emotional, and financial consequences. By understanding the common causes and following these simple preventive measures, you can reduce the likelihood of such accidents.

If you live in Louisville and have sustained a slip-and-fall injury, seeking legal guidance is crucial. A knowledgeable slip-and-fall lawyer can protect your rights and help you obtain the compensation you deserve. With the right legal support, you can focus on recovering while ensuring that those responsible are held accountable.

Looking for resources?

At Hello Lovely Living, we aim to empower you to earn and save money and time while benefiting from our expansive network of home, life, wellness, travel, work-from-home, career, and business resources and opportunities. Discover a wealth of tools to support your journey.


business, homeHLL x Editor


Ideas For Styling A Cozy Living Room

Creating a cozy living room is all about balancing comfort, warmth, and style. Whether you’re arranging small living room furniture or incorporating luxurious accents, the right design choices can make your space feel welcoming and snug. In this article, we share some inspiring living room furniture ideas to help you style a cozy and inviting space.


No. 1

Roll Out the Rugs

Rugs are essential for adding warmth and texture to your living room. Choose soft, plush rugs that anchor your living room furniture sets and define the space. A large rug can tie together modern living room furniture, creating a unified and cohesive look. Opt for neutral or earthy tones to enhance the room's coziness and complement your overall design.

No. 2

Bring on the Blankets

Nothing says cozy like a collection of soft blankets and throws. Drape them over sofas, chairs, or ottomans to add layers of warmth and texture. Pairing blankets with small living room furniture can make even compact spaces feel inviting. Choose fabrics like wool or faux fur for a luxurious, comforting touch.

No. 3

Opt for an Ottoman

An ottoman is a versatile piece that enhances both comfort and functionality. Use it as extra seating, a footrest, or even a coffee table by adding a tray. Ottomans pair perfectly with living room furniture ideas that prioritize coziness and style. For budget-friendly options, explore living room furniture sets clearance deals to find the perfect addition to your space.


hellolovelyliving two pages modern curtains

Two Pages

Transform your space with Two Pages Curtains! Elegant designs meet functionality to enhance any room. Create the perfect ambiance while enjoying privacy and light control. Elevate your decor today!


No. 4

Start with a Sectional

A sectional sofa is a cozy living room staple. Its expansive seating invites relaxation and is ideal for hosting family and friends. Look for modern living room furniture sectionals that offer deep seating and soft cushions. If space is a concern, opt for small living room furniture sectionals specifically designed for compact areas without sacrificing comfort.

No. 5

Layer Your Lighting

Lighting plays a critical role in creating a cozy ambiance. Incorporate a mix of overhead lights, floor lamps, and table lamps to layer your lighting. Warm-toned bulbs enhance the room's inviting feel, especially when paired with luxury living room furniture that reflects the glow beautifully.

No. 6

Make Use of Wall Space

Maximize your wall space with shelves, artwork, or sconces. Floating shelves are perfect for displaying books, candles, or decorative items, adding personality to the room. Wall-mounted lighting is a practical solution for small living room furniture layouts, freeing up valuable floor space while maintaining style and functionality like that found at furniture store toronto.

No. 7

Decorate with Plants

Plants bring life and warmth to your living room. Incorporate greenery that complements your living room furniture, such as potted palms, succulents, or trailing vines. Place them on shelves, side tables, or in corners to create a natural and vibrant atmosphere that enhances the room's coziness.

No. 8

Mix Up Your Materials and Patterns

Mixing materials and patterns is a great way to add depth and interest to your cozy living room. Combine wood, metal, and soft textiles to achieve a balanced look. Layer patterns through cushions, throws, and rugs to enhance the visual appeal of your living room furniture sets while maintaining a cohesive and inviting design.

No. 9

Work Those Window Treatments

Window treatments are essential for creating a cozy environment. Opt for floor-to-ceiling curtains or thick drapes in warm fabrics like velvet. These not only add insulation but also pair beautifully with the best living room furniture designs. For a modern twist, consider layering sheer panels with blackout curtains to achieve both style and functionality.

No. 10

Add Warm Tones to Your Color Palette

Warm tones like beige, rust, or terracotta make your living room feel snug and inviting. Incorporate these hues through your living room furniture, accent pieces, or wall colors. Complement the palette with metallic accents, such as gold or bronze, for a touch of sophistication and warmth.

No. 11

Fill Up Those Shelves

Shelves are an excellent way to showcase your personality. Fill them with books, photo frames, or unique trinkets that reflect your style. When paired with modern living room furniture, well-styled shelves can become a cozy focal point in the room, adding both functionality and charm.

No. 12

Pepper in Some Poufs

Poufs are versatile additions that enhance both comfort and functionality. Use them as extra seating, footrests, or decorative accents. They are perfect for small living room furniture layouts, offering flexibility without taking up too much space. Choose poufs in soft fabrics and warm colors to complement your cozy design.

No. 13

Add Some Lush Luxury Fabrics

Luxurious fabrics like velvet, silk, or chenille can elevate the coziness of your living room. Incorporate these materials through cushions, throws, or upholstery. These fabrics pair beautifully with luxury living room furniture, adding an opulent and inviting touch to your space.

Takeaways

Styling a cozy living room is all about layering textures, choosing the right furniture, and incorporating warm tones. Whether you’re working with small living room furniture or exploring living room furniture buy now, pay later options, these tips will help you create a space that’s as inviting as it is stylish. By combining thoughtful design elements with personal touches, your living room can become the ultimate haven for relaxation and comfort.

Looking For Home Resources?

Looking to enhance your living space and create a sanctuary that supports your well-being? Explore our home partners who offer a wide range of resources to elevate your home environment.


homeHLL x Editor


Real Estate Investment Tips For First-Time Buyers In 2025

The real estate market is constantly evolving, and 2025 is shaping up to be a year full of opportunities for first-time investors. In Spring Hill, where demand for housing remains steady, understanding market trends can give you a significant advantage.


According to studies, the global real estate market is projected to grow at a compound annual rate of 5.2% by 2030, underscoring the increasing appeal of real estate as a secure and lucrative investment.

As a first-time investor, being well-prepared can help you avoid common pitfalls and set you up for success in the industry. In this article, we’ve compiled a quick guide with actionable tips to help you make informed decisions, including exploring the potential of condos as a smart investment choice.

No. 1

Understanding Market Dynamics

Real estate markets fluctuate based on factors such as demand, economic conditions, and government policies. In 2025, high inflation and fluctuating interest rates may influence property prices. However, real estate remains a stable investment, particularly in areas with growing populations, where housing demand is expected to stay strong.

Stay informed about market trends. For example, rising urbanization and the work-from-home culture are reshaping property preferences, with increased interest in suburban and semi-urban areas. By understanding these shifts, you can align your investment with what’s in demand.

No. 2

Choosing the Right Property Type

Selecting the right property type is critical when investing in real estate. Options include single-family homes, townhouses, and condominiums, depending on your budget and investment goals.

For first-time buyers, condos are increasingly popular due to their unique advantages:

  • Low Maintenance: Condos typically require less upkeep than single-family homes, as the homeowners’ association (HOA) manages common areas and exterior maintenance.

  • Amenities: Many condos come with attractive features like gyms, pools, and shared workspaces, making them appealing to renters and buyers alike.

  • Affordability: Condos are often more affordable than detached homes, allowing first-time investors to enter the market without overextending their budget.

No. 3

Location, Location, Location

The location of your property plays a significant role in its value and growth potential. Investing in the right area can maximize your returns over time.

For example, spacious condos in Society Hill neighborhood are an excellent choice for those seeking properties in a well-connected and vibrant area. Society Hill offers charm, and easy access to shops, parks, and cultural attractions, making it a desirable location for buyers and renters.

When exploring potential investments, look for up-and-coming neighborhoods that show signs of development, such as new infrastructure, schools, or businesses. Properties in these areas often experience long-term value growth.


hellolovelyliving arhaus night stand modern interior design

Arhaus

Modern indoor and outdoor furniture and décor sustainably sourced, lovingly made, and built to last.


No. 4

Evaluating Financial Readiness

Before diving into real estate investment, assess your financial health. Start by calculating your budget, taking into account the down payment, monthly mortgage payments, and potential rental income if you plan to lease the property.

  • Credit Score: Ensure your credit score is strong, as it directly impacts your mortgage rate.

  • Mortgage Options: Explore different mortgage options and choose one that aligns with your long-term financial goals. Fixed-rate mortgages are often ideal for first-time buyers, as they provide predictable payments over the loan term.

  • Additional Costs: Factor in expenses such as property taxes, insurance, and maintenance to get a complete picture of your financial commitment.

No. 5

Navigating Legal and Tax Considerations

Real estate investments come with legal and tax implications that require careful attention. For first-time buyers, this process can feel overwhelming, but consulting experts can help you avoid costly mistakes.

  • Real Estate Attorneys: They can review contracts to ensure your interests are protected.

  • Tax Professionals: They can help you understand property taxes, deductions, and benefits available for first-time buyers. For instance, some locations offer tax incentives for investing in eco-friendly homes or urban redevelopment areas.

By addressing legal and tax concerns early, you’ll avoid potential hurdles that could delay or complicate your investment.

No. 6

Planning for Long-Term Success

A successful real estate investment isn’t just about the initial purchase—it’s about effectively managing the property over time.

  • Self-Management vs. Property Management: Decide whether you’ll manage the property yourself or hire a property management service. While self-management saves money, it requires time and effort. Condos can be a simpler choice for first-time investors, as the HOA handles external maintenance and common areas.

  • Maintenance: Stay on top of maintenance tasks, address tenant concerns promptly, and monitor market trends. These habits will help you maintain the property’s value and ensure consistent returns.

Takeaways

Investing in real estate offers exciting opportunities for first-time investors. Understanding market trends, choosing the right property type, and planning for the long term are crucial for success.

Whether you’re considering a single-family home or a condo in a prime location, making informed decisions and seeking expert guidance can turn your first investment into a rewarding journey.

Looking For Home Resources?

Looking to enhance your living space and create a sanctuary that supports your well-being? Explore our home partners who offer a wide range of resources to elevate your home environment.


homeHLL x Editor


Why Seasonal Roof Repairs Are Essential For Protecting Your Home

Your roof is one of the most important parts of your home. It protects you from harsh weather, keeps your home warm, and helps maintain your property’s value. However, over time, it can wear down due to changing seasons.


That’s why seasonal repairs are essential to keeping your home safe and secure. In this article, we explore how different seasons affect your roof and why timely repairs are the key to avoiding costly surprises.

No. 1

Understanding Seasonal Roof Challenges

Every season puts your roof to the test, from spring showers to winter freezes.

Let’s take a closer look at how each season impacts your roof:

Spring

Spring rains may feel refreshing, but they can wreak havoc on your roof. Water can seep into small cracks or under loose shingles, causing leaks or mold growth. Additionally, debris like twigs and leaves can clog gutters, adding extra strain to your roof.

Summer

Summer heat doesn’t just make you sweat—it also impacts your roof. High temperatures can cause shingles to curl, crack, or blister. Intense UV rays weaken roofing materials over time, making them more susceptible to damage.

Fall

When leaves fall, they don’t just pile up in your yard. They can clog gutters and trap moisture, leading to rot. Autumn storms often bring strong winds, which can loosen shingles or knock overhanging branches onto your roof.

Winter

Winter is often the toughest season for your roof. Heavy snow and ice can weigh it down, stressing the structure. Ice dams, which form when melted snow refreezes at the roof’s edge, can cause water to back up under shingles, leading to leaks and damage.

No. 2

How These Challenges Affect Your Home

These seasonal challenges might seem minor at first, but they can lead to serious issues if left unaddressed.

For example:

  • Winter’s snow and ice add significant weight to your roof, potentially causing sagging or structural strain.

  • Spring rains can seep into small cracks, leading to leaks that damage ceilings, walls, and insulation.

  • Summer heat weakens roofing materials, making them more prone to breaking under pressure.

Addressing these issues promptly can save you from costly repairs down the line.

No. 3

How Seasonal Repairs Help

A seasonal roof repair addresseses the damage each season leaves behind. During the process, professionals don’t just patch up visible issues—they perform a thorough inspection to identify hidden problems that could escalate later.

They look for leaks, weak spots, or areas stressed by heavy snow, ice, or high winds. Once identified, these issues are repaired properly to prevent them from resurfacing.

Additionally, professionals can help prepare your roof for the challenges of the upcoming season. They may seal vulnerable areas, replace worn materials, or clear debris to strengthen your roof’s defenses. This proactive approach keeps your roof a reliable shield, maintaining your home’s structure and protecting your family.


hellolovelyliving home rejuvenation outdoor project guide

Rejuvenation

Rejuvenation believes in the power of thoughtful design - explore their extensive range of outdoor hardware, including stylish accessories that add character and charm to your home's exterior.


No. 4

Additional Perks of Seasonal Repairs

Beyond keeping your home safe, seasonal roof repairs offer several additional benefits:

1. Energy Efficiency

A damaged roof can let air escape, forcing your heating or cooling system to work harder. Seasonal repairs improve insulation, lowering your energy bills and maintaining a comfortable indoor temperature year-round.

2. Boosted Home Value

A well-maintained roof enhances your home’s curb appeal. Potential buyers notice when a roof is in good shape, which can increase your property’s market value. It’s an investment that pays off whether you plan to sell or stay put.

3. Improved Air Quality

Seasonal repairs prevent leaks and moisture buildup, which can lead to mold, mildew, and poor indoor air quality. This creates a healthier living environment for your family.

No. 5

Tips for Effective Seasonal Repairs

To make your seasonal roof repairs truly effective, keep these tips in mind:'

1. Choose a Professional Roofer

Not all roofers are created equal. Look for professionals with good reviews, proper certifications, and experience. A reliable roofer will use high-quality materials and address issues thoroughly.

2. Combine Repairs with Maintenance

Combining repairs with routine maintenance is a smart way to keep your home protected while saving time and money.

For example, while fixing small issues like leaks or cracks, you can also:

This comprehensive approach ensures your roof works seamlessly to protect your home from the elements.

Takeaways

Your roof takes on the elements every single day, but it needs your help to stay strong. Seasonal repairs are essential for keeping your home safe, preventing major issues, and ensuring your roof lasts for years.

Don’t wait for a leak or crack to catch you off guard. Protect your home by making seasonal roof repairs a priority—it’s a small effort that brings big rewards.

Looking For Home Resources?

Looking to enhance your living space and create a sanctuary that supports your well-being? Explore our home partners who offer a wide range of resources to elevate your home environment.


homeHLL x Editor