Posts in home
How Vertical Solar Panels Are Transforming Urban Installations

The world of home aesthetics has expanded far beyond traditional decor elements, with innovative vertical solar panel installation options now seamlessly blending renewable energy with sophisticated design sensibilities. Urban dwellers previously excluded from sustainable upgrades due to limited roof access are discovering creative facade solar panel installation possibilities that transform vertical surfaces into both energy generators and striking architectural features.


hellolovelyliving vertical solar panels on pergola with plants


These beautiful energy solutions are reimagining how clean power integrates with thoughtful living spaces, proving that sustainability and style can brilliantly coexist in even the most space-constrained urban environments.

In this article, we explore how vertical solar panels are dramatically transforming urban installations and reshaping the landscapes of our cities. By harnessing the sun's energy more efficiently, these innovative structures are becoming a pivotal component of sustainable urban development.

No. 1

The Vertical Solar Revolution: Beauty Meets Function

Gone are the days when solar energy required vast, unobstructed roof space and resulted in utilitarian-looking installations. The latest vertical solar applications have evolved into something that might be described as functional art – panels that serve an essential purpose while simultaneously enhancing a home's visual appeal.

Like the shift from bulky tube televisions to sleek wall-mounted screens, vertical solar has undergone a stunning design transformation. Today's options include subtle glass balcony railings that generate electricity while maintaining views, fence panels that create privacy while harvesting sunlight, and facade elements that add architectural interest while powering homes.

This evolution mirrors how pendant lighting evolved from purely practical fixtures to statement pieces that anchor a room's design. Vertical solar installations now serve as conversation-starting design elements that express a homeowner's values while performing an essential function.

No. 2

The Design Palette: Vertical Solar Options

The range of vertical solar applications has expanded dramatically, offering solutions for various urban living situations:

Window-Integrated Systems

The latest solar window technologies transform ordinary glass into power-generating surfaces without sacrificing transparency. These installations function much like transitional eyeglasses that adapt to changing light conditions – they appear nearly transparent from the inside looking out while absorbing energy from sunlight.

Perfect for apartments and condos with limited exterior modification options, these systems can be incorporated into existing window openings or specified for renovations. The visual effect resembles slightly tinted glass while silently generating electricity throughout the day.

Balcony Transformations

Urban balconies represent prime real estate for vertical solar installations.

Modern systems include:

  • Glass balustrades with integrated photovoltaic cells

  • Decorative privacy screens that double as solar collectors

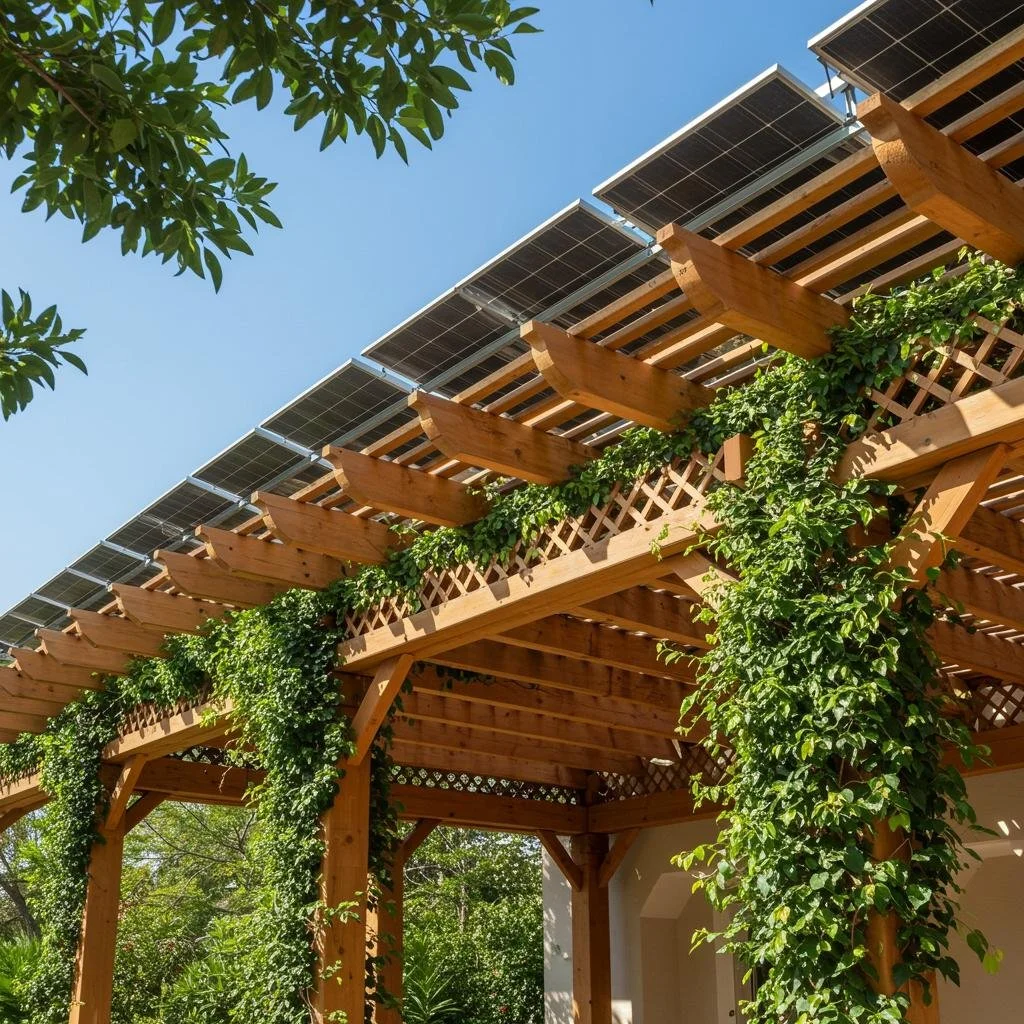
  • Pergola structures with solar panel roofing

  • Planter boxes with integrated solar edges

These multifunctional elements transform previously underutilized vertical spaces into energy-generating zones without sacrificing the aesthetic appeal or functionality of outdoor living areas.

Facade Systems as Architectural Features

Perhaps the most visually striking application, vertical facade installations can transform an ordinary building exterior into a distinctive architectural statement. These systems range from subtle integrated panels that blend with existing materials to dramatic full-facade treatments that become the building's defining characteristic.

Like statement wallpaper that transforms an interior space, these installations change how a building presents itself to the world while harvesting clean energy. The visual impact can be subtle or bold, depending on the homeowner's preferences and the building's architectural context.

No. 3

The Styling Approach: Making Vertical Solar Shine

Integrating vertical solar into a cohesive design vision requires thoughtful consideration:

Complementary Color Palettes

The expanded color options for solar cells and framing materials now extend well beyond traditional blue-black.

Consider:

  • Terra cotta tones that complement Mediterranean-inspired exteriors

  • Sleek monochromatic panels for contemporary urban settings

  • Colorized cells that coordinate with exterior paint schemes

  • Customized frame finishes that match existing window treatments

This variety allows vertical solar to enhance rather than contradict established color schemes, much like selecting cabinet hardware that complements rather than competes with kitchen design.

Texture and Visual Interest

Vertical installations offer opportunities to introduce textural elements through:

  • Varied panel arrangements that create rhythm and pattern

  • Mixed materials that combine solar surfaces with complementary finishes

  • Light and shadow play as sun angles change throughout the day

  • Visual layering that adds depth to flat facades

These textural elements transform utilitarian energy production into a design feature that adds visual interest to exterior spaces.

Integration with Landscaping

Vertical solar particularly shines when thoughtfully combined with greenery:

  • Climbing plants that partially frame solar elements

  • Green walls that alternate with solar panels in a coordinated pattern

  • Container gardens positioned to complement rather than shade solar surfaces

  • Strategic placement that enables winter sun exposure while providing summer shade

This harmonious relationship between plants and panels demonstrates how technology and nature can enhance rather than oppose each other.


hellolovelyliving houzz home design

Houzz

Make your home project a reality. Find inspiration, products, and the pros to make it happen - all in one place.


No. 4

The Installation Experience: What to Expect

Understanding the practical aspects of vertical solar installation helps homeowners prepare for this significant design upgrade:

The Design Consultation

The process begins with a collaborative design approach focused on both aesthetics and performance:

  1. Assessment of available vertical surfaces and their solar exposure

  2. Discussion of design preferences and integration with existing elements

  3. Customized renderings showing how the installation will look upon completion

  4. Performance estimates based on orientation and local climate conditions

This consultative approach ensures the final installation enhances rather than detracts from the home's design integrity.

The Installation Choreography

The actual installation typically progresses more quickly than many other home renovations:

  1. Structural assessment and reinforcement if needed

  2. Mounting system installation following architectural lines

  3. Panel placement with attention to visual alignment

  4. Electrical connection and system testing

  5. Final adjustments for optimal appearance and performance

Many homeowners are pleasantly surprised by how quickly vertical installations transform from concept to completion, often requiring just 2-3 days for the entire process.

The Finishing Touches

After installation, thoughtful details maximize both function and beauty:

  • Discreet cable management that preserves clean design lines

  • Strategically placed lighting that highlights the installation after dark

  • Smart home integration allows monitoring from design-friendly interfaces

  • Weatherproofing details that ensure long-term performance without compromising aesthetics

These finishing elements ensure vertical solar enhances the home's design story rather than creating a visual distraction.

No. 5

Styling Around Your Vertical Solar

Once installed, vertical solar becomes part of your home's design narrative, offering new opportunities for complementary elements:

Coordinating Exterior Finishes

Consider refreshing surrounding surfaces to harmonize with new solar elements:

  • Paint colors that complement panel framing

  • Exterior lighting that highlights solar features after dark

  • Window treatments that coordinate with panel aesthetics

  • Door hardware that echoes solar mounting details

These thoughtful touches create a cohesive exterior that feels intentionally designed rather than haphazardly assembled.

Interior Design Responses

The interior spaces adjacent to vertical solar installations benefit from thoughtful coordination:

  • Window treatments that work with rather than against solar windows

  • Furniture placement that capitalizes on changing light patterns

  • Color schemes that respond to the quality of filtered light

  • Decor elements that subtly reference sustainability themes

This inside-outside connection creates a harmonious transition between interior comfort and exterior technology.

No. 6

The Social Dimension: Conversations Around Vertical Solar

Beyond their functional and aesthetic benefits, vertical solar installations often become catalysts for meaningful social interactions:

The Neighborhood Conversation Starter

Distinctive vertical solar installations naturally attract attention and questions, creating opportunities to:

  • Share sustainable living insights with interested neighbors

  • Inspire others to consider creative energy solutions

  • Build a community around shared environmental values

  • Showcase how beauty and functionality can coexist

Many homeowners find these social connections become unexpected but welcome byproducts of their design decisions.

The Instagram-Worthy Upgrade

In an age of social media sharing, unique vertical solar features often become popular content that:

  • Generates positive engagement around sustainable design choices

  • Connects homeowners with like-minded design enthusiasts

  • Provides opportunities to showcase personal style philosophy

  • Positions homeowners as trendsetters in sustainable living

These digital conversations extend the impact of vertical solar beyond immediate physical surroundings.

Takeaways

The integration of vertical solar installations into urban homes represents a beautiful convergence of design sensibility and environmental responsibility. No longer limited to sprawling roof surfaces, solar energy has evolved to embrace the vertical dimension, turning previously unused spaces into both power generators and design statements.

For urban dwellers seeking to create homes that reflect their values while delighting the eye, vertical solar offers a compelling solution that transcends the traditional limitations of renewable energy aesthetics. These installations prove that sustainability need not require design compromise – instead, they demonstrate how thoughtful integration of technology can actually enhance a home's visual story.

As vertical solar continues evolving, the line between energy technology and architectural art will likely blur further, creating even more possibilities for homes that are as beautiful as they are responsible. The future of solar isn't just bright – it's vertically expansive and aesthetically inspiring.

Looking For Home Resources?

Looking to enhance your living space and create a sanctuary that supports your well-being? Explore our home partners who offer a wide range of resources to elevate your home environment.


5 Ways To Curate A Home With Character

A home with character isn’t just a place to live—it’s a space that reflects your personality, history, and style. While perfectly coordinated interiors may look polished, they can sometimes feel impersonal.


A home with true character embraces uniqueness, layering textures, eras, and meaningful details to create a warm and inviting atmosphere. Whether you’re starting fresh or refining your space, in this article, we share five strategies that will help you curate a home that feels lived-in, storied, and distinctly yours.

No. 1

Mix Old and New for a Timeless Look

Character comes from contrast, and one of the best ways to achieve this is by mixing old and new design elements. Pairing antique furniture with modern decor creates a dynamic aesthetic that feels curated rather than staged.

  • An ornate wooden dining table surrounded by sleek contemporary chairs adds depth.

  • A vintage mirror placed in a minimalist entryway creates an intriguing focal point.

  • A classic Persian rug under a modern glass coffee table balances tradition and innovation.

Choosing pieces with history adds authenticity to your home. Instead of relying solely on mass-produced decor, explore unique vintage finds to bring depth and individuality into your space. If you’re looking for rare and distinctive pieces, selling antiques online is a great way to discover furniture and decor that tells a story.

No. 2

Showcase Personal Collections with Intention

Collections are a great way to infuse personality into your home. Whether it's vintage postcards, ceramic pottery, travel souvenirs, or antique books, displaying curated collections can transform a space into a reflection of your experiences and tastes.

How to Display Collections Without Clutter

To avoid a cluttered look, group similar items together for a cohesive, museum-style display:

  • Use floating shelves to showcase small collectibles.

  • Arrange glass cabinets to highlight delicate treasures.

  • Create a dedicated gallery wall for framed artwork or photography.

The key is to strike a balance—too few pieces can feel underwhelming, while too many can create visual chaos. Thoughtful placement ensures your collections enhance your home’s character rather than overwhelm it.

No. 3

Use Textures and Layers to Create Warmth

A home with character is one that feels inviting, and texture plays a crucial role in achieving that warmth. Layering different materials—wood, linen, leather, velvet, and metal—adds depth and makes a room feel more lived-in.

Ways to Layer Textures for a Cozy Atmosphere

  • Combine rustic, natural elements with modern finishes.

  • Pair a reclaimed wood coffee table with a soft wool rug.

  • Drape a linen throw over a leather sofa for contrast.

  • Use exposed brick alongside smooth plaster walls for dimension.

Even small touches like textured cushions, woven baskets, or vintage quilts can help bring a space to life. The goal is to create a rich and dynamic environment that feels comfortable and timeless.


hellolovelyliving minted art marketplace

Minted

Discover the perfect blend of artistry and quality with Minted - the online marketplace showcasing a diverse collection of unique designs from independent artists around the world.


No. 4

Choose Meaningful Statement Pieces Over Trendy Decor

Trends come and go, but a home with character embraces timeless, meaningful pieces that tell a story. Instead of filling your space with trendy, mass-produced items, invest in a few standout pieces with personal or historical significance.

Examples of Meaningful Statement Pieces

  • A weathered farmhouse table passed down through generations.

  • A hand-painted portrait from a local artist.

  • An antique armoire repurposed as a modern storage solution.

These statement pieces don’t just decorate a room—they add soul, depth, and a sense of continuity that makes your home feel truly lived-in.

No. 5

Incorporate Art and Handcrafted Elements for Authenticity

Art has the power to define a space, giving it personality and emotion. A well-curated selection of artwork—whether it's contemporary paintings, vintage prints, or framed photography—adds a distinct visual narrative to your home.

How to Curate an Art Collection That Feels Personal

  • Mix different styles and mediums for a gallery-like effect.

  • Frame travel photography to showcase personal experiences.

  • Support local artists by purchasing unique, handcrafted pieces.

Handmade items also bring authenticity into a space. Look for handwoven rugs, ceramic pottery, or bespoke furniture pieces crafted by artisans. These details not only add warmth but also support craftsmanship and individuality, ensuring your home feels less like a showroom and more like a true reflection of your unique taste.

FAQ

How can I make my home feel more personal?

Incorporate meaningful decor, such as family heirlooms, travel souvenirs, and personal artwork. Displaying items with sentimental value makes a space feel uniquely yours.

What are some budget-friendly ways to add character to my home?

  • Thrift vintage furniture for unique finds.

  • DIY projects like repurposing old furniture.

  • Use textiles like rugs, curtains, and throws to add warmth.

How do I mix modern and vintage decor without clashing?

Balance is key—pair sleek modern furniture with antique accents. Use neutral colors to tie different styles together and create a cohesive look.

What’s the best way to display a collection without making my home look cluttered?

Group similar items together in dedicated spaces, such as floating shelves, gallery walls, or glass cabinets. Keep displays curated and intentional.

How can I make my home feel warm and inviting?

Layer textures, use warm lighting, incorporate natural materials, and add personal touches like books, plants, and cozy textiles.

Takeaways

Creating a home with character isn’t about following design rules—it’s about curating a space that feels personal, welcoming, and full of life. By blending different eras, layering textures, displaying meaningful collections, and incorporating handcrafted elements, you can transform your home into a space that feels effortlessly authentic.

Your home should tell your story, reflecting not just your style, but also your experiences and passions. Thoughtfully choosing decor with depth and history ensures that every corner of your space feels intentional, inviting, and timeless.

Looking For Home Resources?

Looking to enhance your living space and create a sanctuary that supports your well-being? Explore our home partners who offer a wide range of resources to elevate your home environment.


homeHLL x Editor


Perfect Turf For Playful Kids And Pets: Why It’s A Game Changer For Your Home

When you think of a perfect backyard, what comes to mind? For many homeowners, it's a space that caters to family fun, offers a safe environment for children to play, and accommodates pets that love to run around.


hellolovelyliving home wih artificial turf and children and dog playing


Installing artificial turf is one of the best ways to create this kind of space. Unlike natural grass, which can quickly become worn down from foot traffic or pet activity, synthetic turf offers a durable, easy-to-maintain solution that will stand the test of time.

In this article, we share how turf can significantly transform your outdoor environment and provide a safe, inviting space for relaxation, recreation, and enjoyment. By incorporating high-quality turf, you can create a lush, green oasis that enhances the aesthetics of your property while ensuring a comfortable area for family and friends to gather.

If you're ready to transform your outdoor space into a paradise for your kids and pets, working with expert Turft Installers can help you find the perfect solution.

No. 1

Safety First: A Soft Landing for Kids and Pets

The safety of your children alongside your pets requires absolute priority. Natural grass lawns sometimes create areas with exposed dirt alongside muddy and unlevel surfaces, creating hazards for people who might fall and get hurt.

Artificial turf provides a non-threatening surface with softness that minimizes the possibility of knee or elbow scrapes. The synthetic grass surface duplicates natural grass sensation through its premium fibers, creating protective cushioning suitable for children's active play.

The advantages of artificial grass extend to pets precisely the way they do for other users. Dogs' natural digging and running behavior causes severe damage to natural grass lawns, which become muddy through their rough activities.

The material structure of turf enables it to remain resistant during active use without developing damage. Artificial grass requires minimal maintenance to avoid dirt stains on your children and pets, and the mess they bring into your home.

No. 2

Low Maintenance and No Mess

Homeowners with children and pets face significant obstacles when trying to maintain their outdoor spaces in a neat condition. The existence of natural grass creates two problems: rainwater leaves muddy trails behind, and pets create undesirable waste.

Artificial turf prevents all outside maintenance problems from occurring. The turf drainage mechanism operates efficiently to let water through, which stops puddles and mud formation even during heavy rainstorms.

The process of cleaning up after pets becomes straightforward. The advantage of artificial turf over natural grass is its ability to receive water pressure from a hose that removes unwanted smells and stains from your outdoor space.

Synthetic turf possesses excellent longevity, ensuring its perfect appearance will endure for multiple years. Your outdoor space remains worry-free since synthetic turf prevents both grass death and damage to high-traffic areas.

The artificial turf surface is designed to stand strong and resilient throughout soccer matches involving energetic children, as well as enthusiastic dog fetch games, ensuring the maintenance of a beautiful and inviting outdoor playing environment for all to enjoy.

No. 3

Environmental Benefits of Artificial Turf for Your Family

Synthetic grass benefits children and pets precisely, but also brings environmental benefits, which should be noted. Maintaining traditional lawns through watering consumes a substantial amount of water, especially when drought conditions are present in your location.

Moving your lawn to artificial turf greatly minimizes your water consumption. Artificial grass enables water conservation by eliminating the need for watering yet maintaining its green appearance.

Turf provides an eco-friendly advantage because it allows homeowners to eliminate the need for dangerous pesticides and fertilizers. Natural grass maintenance with chemical products harms both environmental systems and human health, specifically children and pets who play on treated areas. Synthetic turf doesn't require chemicals, ensuring safety for families and the environment.


hellolovelyliving rejuvenation outdoor project guide

Rejuvenation

Rejuvenation believes in the power of thoughtful design - explore their extensive range of outdoor hardware, including stylish accessories that add character and charm to your home's exterior.


No. 4

Creating a Kid-Friendly and Pet-Approved Outdoor Space

Artificial turf transforms ordinary outdoor spaces into functional areas that deliver entertainment value. It serves as an ideal playground for children who want to perform backyard sports and games or relax under the sunlight. Synthetic turf provides a flexible playing surface that gives children safe, endless entertainment through activities ranging from soccer matches to dog playtime.

For pets, the benefits are just as compelling. Dogs love to run, roll, and chase, and turf provides an ideal surface for all these activities. The turf’s ability to stand up to heavy use means that even the most playful of pets can enjoy it without causing damage.

Furthermore, turf can help reduce the mess that often comes with pets, keeping your home cleaner and your backyard looking great year-round.

Takeaways

Integrating artificial turf into your outdoor environment serves both functional and practical purposes by enhancing how your family interacts with the yard space. Homeowners benefit from turf as it provides a secure playground base for children and a durable surface for pets, all with minimal maintenance requirements.

Artificial grass is an excellent choice for families looking to create the ultimate backyard, as it combines sturdy construction with environmental benefits. When you're ready to upgrade your outdoor space, contact professional turf installers to help you find the perfect solution for your needs!

Looking For Home Resources?

Looking to enhance your living space and create a sanctuary that supports your well-being? Explore our home partners who offer a wide range of resources to elevate your home environment.


homeHLL x Editor


Mindful Appliance Care: How Expert Fridge Repair Enhances Home Harmony

In our journey toward conscious living, we often overlook how the maintenance of our everyday appliances impacts our well-being and environmental footprint. When your refrigerator starts making unusual noises or fails to maintain proper temperature, seeking fridge repair from experienced technicians doesn't just solve an immediate problem—it represents a mindful choice that aligns with intentional living.


Quality refrigerator repair service restores more than just functionality; it creates space for peace of mind and supports sustainable practices that resonate with conscious homeownership. In this article, we share how expert refrigerator repair can enhance overall harmony within the home environment.

No. 1

Creating Serenity Through Expert Care

The kitchen is the heart of the home, a place of nourishment, connection, and care. When a refrigerator malfunctions, it disrupts not only food preservation but also the household’s natural rhythm. The stress of a failing appliance can create an underlying tension that interferes with the calm sanctuary we strive to maintain.

Entrusting your fridge repair to skilled technicians relieves the mental burden of troubleshooting. Just as we delegate specialized tasks to experts in other areas of life, calling in a repair professional acknowledges both our limitations and the value of our time.

No. 2

The Sustainable Choice: Repair Over Replacement

In a consumer-driven world, choosing to repair rather than replace is a conscious act of environmental stewardship. A well-maintained refrigerator can last 15-20 years, while premature replacements contribute to electronic waste.

Mindful Benefits of Refrigerator Repair

  • Reduces landfill waste from discarded appliances

  • Minimizes environmental impact by avoiding unnecessary manufacturing

  • Optimizes energy efficiency for lower power consumption

  • Extends the lifespan of valuable household resources

This approach reflects the Japanese concept of "mottainai", which expresses regret for waste and a commitment to using resources fully. By choosing repair over replacement, we honor both the materials used to create our appliances and our responsibility to the planet.

No. 3

Cultivating Mindfulness Through Maintenance Rituals

Just as we schedule self-care routines to maintain health, regular appliance check-ups prevent breakdowns before they occur. Creating a seasonal maintenance schedule ensures that your refrigerator remains efficient and reliable.

A Mindful Refrigerator Maintenance Routine

By shifting from reactive repairs to proactive care, we mirror the preventative approach we take with our own health and well-being.


hellolovelyliving caraway non toxic kitchenware

Caraway

Cook with confidence and care! Caraway's non-toxic kitchenware combines sleek design with health-conscious materials for a safer, smarter kitchen experience.


No. 4

Unexpected Mindfulness Lessons from Appliance Care

Working with repair technicians can offer surprising lessons in patience and adaptability. The waiting period for parts or diagnosis can feel frustrating, but it also presents an opportunity to practice non-attachment and flexibility.

When your refrigerator requires a complex repair, you may initially feel irritated by the delay. However, reframing the situation as a lesson in mindfulness nurtures a different perspective. This may cause you to reorganize your food storage, borrow cooler space from a neighbor, and embrace the temporary disruption as a chance to practice resilience.

A technician, noticing your curiosity, can explain each step of the repair process. What could have been a stressful experience then becomes an educational opportunity, reinforcing the idea that mindful curiosity can transform even mundane tasks into moments of growth.

No. 5

Building Community Through Shared Resources

Developing a relationship with local repair specialists strengthens community ties—an often overlooked aspect of conscious living. Supporting local tradespeople helps sustain small businesses and fosters interdependence within neighborhoods.

In many communities, homeowners maintain a shared document of reliable service providers, including their go-to appliance repair technicians. This resource helps countless households avoid unnecessary replacements while ensuring skilled professionals receive continued support.

No. 6

The Intersection of Technology and Mindfulness

Modern refrigerator repair involves advanced diagnostic tools, which might seem at odds with mindful living. However, when used correctly, technology enhances sustainability by pinpointing issues with precision—reducing wasteful part replacements.

During a repair, the technician will use a specialized tool to identify an electrical issue within your fridge’s control board. Instead of replacing the entire system, he will repair only the affected component. This targeted approach saved resources, money, and unnecessary waste, demonstrating how technology can support mindful consumption.

No. 7

Financial Peace Through Preventative Care

Mindfulness extends to our financial well-being, and refrigerator maintenance is a smart financial decision. Regular check-ups prevent costly emergencies, allowing for predictable budgeting instead of unexpected expenses.

Just as we set aside funds for self-care, budgeting for appliance maintenance acknowledges the importance of caring for the tools that support daily life. This proactive mindset aligns with mindful money management, ensuring stability and peace of mind.

No. 8

Honoring the Full Lifecycle of Our Possessions

A mindful approach to homeownership includes recognizing the full lifecycle of our appliances—from manufacturing to disposal. Professional refrigerator repair extends this lifecycle, allowing us to honor the resources, labor, and energy invested in these essential tools.

When repair is no longer viable, responsible disposal becomes the next mindful step. Knowledgeable technicians can advise on eco-friendly recycling options, ensuring that harmful refrigerants are handled properly and recyclable materials are repurposed.

This full-cycle awareness transforms even the end of an appliance’s usefulness into an opportunity for conscious decision-making rather than wasteful consumption.

No. 9

Embracing Imperfection in Home Management

Finally, mindfulness teaches us to accept imperfection, and this applies to home maintenance as well. Appliances will inevitably require care, and rather than seeing repairs as failures, we can view them as part of the journey.

By releasing unrealistic expectations of perpetual household harmony, we reduce unnecessary stress and approach home management with greater ease. This perspective shift transforms our relationship with our living spaces, turning them from sources of frustration into places of acceptance and grace.

Takeaways

Choosing expert fridge repair is more than just a practical decision—it’s a mindful act that supports sustainability, financial stability, and home harmony. By embracing preventative care, community connections, and conscious consumption, we create a home environment that reflects our values.

The next time your refrigerator hums quietly in the background, take a moment to appreciate its role in your daily life. In its steady, reliable function, we find a reminder that mindfulness extends to every aspect of our environment, fostering balance between technology and intentional living.

Looking For Home Resources?

Looking to enhance your living space and create a sanctuary that supports your well-being? Explore our home partners who offer a wide range of resources to elevate your home environment.


homeHLL x Editor


Your Ultimate Guide To Building A New Luxury Home: Tips For Every Stage

Designing a personalized living space has become an increasingly popular choice for homeowners seeking more than just a standard residence. In thriving markets like Orlando, FL, this trend continues to grow as more individuals aspire to create homes that seamlessly blend personal style with functional design.


Orlando effortlessly combines modern design, comfort, and prime location advantages with its warm climate, vibrant neighborhoods, and evolving architectural trends, making it an ideal destination for a truly distinctive luxury home.

Bringing your vision to life starts with the right team, ensuring every detail reflects both aesthetic excellence and functional needs. Whether you're building from the ground up or refining each space with meticulous precision, expert guidance ensures a seamless and rewarding home-building experience.

In this guide, you'll find essential tips for every stage of luxury home construction, ensuring a seamless and refined building process from start to finish.

No. 1

Selecting the Right Area to Bring Your Vision to Life

Where you decide to build matters just as much as the layout and finishes of your home. It’s important to think beyond the lot size and consider what surrounds it, as these factors will influence your daily experience and long-term property value.

Nearby schools, parks, shopping centers, and commute routes all contribute to convenience and livability. Orlando offers a balance of quiet suburban communities and lively urban settings, allowing homeowners to choose what best suits their lifestyle.

Researching neighborhood trends, upcoming developments, and zoning regulations will help you make an informed decision. A well-placed location creates a strong foundation for everything that follows.

No. 2

Working with a Builder Who Understands Your Goals

A successful project requires the right collaboration and expertise. Partnering with an Orlando-based builder who understands the local market can save time and reduce stress.

Ballard Custom Homes in Orlando FL, stands out by offering comprehensive services that guide clients through every phase of construction. Their team assists with planning, design, and material selection, ensuring that every aspect of your home aligns with your vision.

Whether you prioritize energy-efficient features, smart technology, or custom finishes, working with a builder who values clear communication and client-focused solutions will keep your project on track.

No. 3

Creating a Budget That Works from Day One

Planning costs and establishing a realistic budget early in the process help prevent unexpected financial challenges. A well-planned budget should include materials, permits, design fees, and contingency funds to cover unforeseen expenses.

Discussing pricing transparency with your builder ensures that you understand what’s included upfront. Some homeowners prefer to prioritize custom elements early, while others phase in upgrades over time.

Keeping communication open and tracking expenses at each stage will help you stay within budget while maintaining flexibility for adjustments.


hellolovelyliving rejuvenation design services

Rejuvenation

Rejuvenation believes in the power of thoughtful design - explore their extensive range of home decor, including stylish accessories and hardware that add character and charm to your home.

Get free design services when you book an appointment


No. 4

Designing Around Everyday Routines

A home’s layout should reflect how you live, ensuring that each space is both functional and comfortable. Consider your morning routines, weekend activities, and how guests move through shared areas when planning your design.

Popular features include open-concept living areas, flexible room configurations, smart home technology, and ample natural lighting.

Collaborating with your design team to explore different layouts will help you visualize how each room will be used. Beyond aesthetics, thoughtful planning enhances efficiency, convenience, and overall livability.

No. 4

Choosing Materials That Reflect Your Style and Priorities

The materials you select impact your home’s durability, maintenance, and visual appeal. Whether you prefer sleek modern finishes or warm traditional elements, there are countless options to explore.

Consider factors such as flooring, countertops, wall textures, and appliance finishes when making selections. Discussing the pros and cons of each material with your builder will help you make informed decisions based on usage and environmental conditions.

Quality doesn’t always mean the most expensive choice—it’s about selecting materials that work well together and stand the test of time.

No. 5

Staying Involved Throughout the Process

Remaining engaged in the construction process ensures that your vision is executed accurately. Regular updates and walkthroughs allow you to monitor progress and address any concerns before they become major issues.

A builder who values open communication will help reduce missteps and confusion. While you don’t need to oversee every small task, being available for key decisions and adjustments is essential.

If something doesn’t look right, speaking up early can prevent costly delays. Walking the site occasionally and asking questions will keep you informed and confident in the project’s direction.

No. 6

Keeping Your Timeline on Track

Every construction project moves through distinct phases, including planning, foundation work, framing, finishing, and final inspections. Establishing a realistic schedule from the start helps reduce stress and ensures a smooth workflow.

Discussing timelines with your builder will give you a clear understanding of how long each stage will take. Delays can occur due to factors such as material availability or weather conditions, so building flexibility into your plan is essential.

While efficiency is important, rushing through stages can lead to mistakes. A well-coordinated project results in a higher-quality final outcome.

No. 7

Understanding Local Rules and Permitting Steps

Before construction begins, you must comply with local building codes and permitting requirements. These regulations ensure that your home meets safety and zoning standards, preventing legal issues down the line.

Your builder should be familiar with permit applications, zoning laws, and structural inspections. While the process can seem technical, staying informed and asking questions will help you navigate it smoothly.

Addressing regulatory requirements early prevents delays and ensures that your project progresses without complications.

No. 8

Adding Personal Details That Make an Impact

Sometimes, the smallest details make the biggest difference in a home’s comfort and character. Features like built-in shelving, cozy reading nooks, unique lighting fixtures, and smart home integrations can enhance both aesthetics and functionality.

Customization allows you to create a space that truly reflects your personality and lifestyle. Instead of overloading every room with extras, focus on key features that add value and convenience.

Discussing your priorities with your builder will help you determine what’s possible within your budget and timeline. Thoughtful personal touches don’t just enhance visual appeal—they contribute to a home that feels uniquely yours.

Takeaways

Starting a custom home project may feel overwhelming at first, but having a clear plan and expert guidance makes all the difference. From choosing the right location to making smart design decisions, each step plays a crucial role in shaping your future living experience.

Working with a reliable team ensures that every detail is handled with care, resulting in a home that aligns with your needs and aspirations. The key to success is staying informed, involved, and focused on what works best for your lifestyle.

By taking a thoughtful and strategic approach, you can create a home that is not only beautiful and functional but also a true reflection of your vision. When each aspect of the process is carefully managed, the final result reflects both quality and personal expression.

If you're ready to begin your luxury home construction journey in Orlando, FL, partnering with the right professionals will set you on the path to success.

Looking For Home Resources?

Looking to enhance your living space and create a sanctuary that supports your well-being? Explore our home partners who offer a wide range of resources to elevate your home environment.


homeHLL x Editor


How To Enhance Your Home With Expert Siding Services In Texas

Your home’s exterior plays a crucial role in both curb appeal and protection. In Texas, where weather conditions can be unpredictable—ranging from scorching heat to intense storms—having high-quality siding is essential.


Professional Siding Services in Texas not only improve your home’s aesthetic appeal but also enhance durability, energy efficiency, and property value. If you're considering upgrading your home’s siding, this guide will walk you through the benefits, best materials, and how to choose the right siding professionals in Texas.

No. 1

Why Siding Matters for Texas Homes

Siding is more than just an exterior covering—it serves as a protective barrier against the elements. Investing in expert siding services ensures your home remains structurally sound and visually appealing for years to come.

Protection Against Harsh Weather

Texas experiences extreme heat, heavy rains, and strong winds, which can cause significant wear and tear on a home’s exterior. High-quality siding shields your home from moisture damage, UV rays, and temperature fluctuations, preventing structural deterioration over time.

Improved Energy Efficiency

Proper siding installation helps regulate indoor temperatures, reducing the strain on your HVAC system and lowering energy costs. Insulated siding can keep your home cooler in summer and warmer in winter, making it an excellent investment for long-term savings.

Enhanced Curb Appeal

New siding instantly refreshes your home’s appearance, making it look modern and well-maintained. Whether you prefer classic vinyl, elegant fiber cement, or rustic wood siding, the right choice can boost your home’s aesthetic charm and resale value.

Increased Property Value

A well-maintained exterior increases resale value, making your home more attractive to potential buyers. Homes with durable, low-maintenance siding often sell faster and at higher prices than those with outdated or damaged exteriors.

Low Maintenance and Longevity

Unlike traditional paint, which requires frequent touch-ups, high-quality siding is designed to last decades with minimal upkeep. Many modern siding materials are resistant to fading, cracking, and pests, ensuring long-term durability.

No. 2

Best Siding Materials for Texas Homes

Choosing the right siding material is essential for ensuring durability, energy efficiency, and aesthetic appeal. Each material offers unique benefits, making it important to select one that suits your home’s style and climate needs.

1. Vinyl Siding

  • Affordable and versatile, making it a popular choice for homeowners.

  • Low maintenance and weather-resistant, requiring minimal upkeep.

  • Available in a variety of colors and textures, allowing for customization.

  • Energy-efficient options with insulation backing, improving home efficiency.

2. Fiber Cement Siding

  • Highly durable and fire-resistant, offering excellent protection.

  • Mimics the look of wood, stucco, or stone, providing aesthetic flexibility.

  • Resistant to termites, rot, and extreme weather, ensuring longevity.

  • Long lifespan with minimal maintenance, making it a cost-effective choice.

3. Wood Siding

  • Classic and timeless appearance, enhancing curb appeal.

  • Can be painted or stained for customization, allowing for personal style.

  • Eco-friendly and biodegradable, making it a sustainable option.

  • Requires regular maintenance to prevent moisture damage, ensuring durability.

4. Metal Siding (Aluminum & Steel)

  • Extremely durable and resistant to rust, providing long-term protection.

  • Reflects heat, making it energy-efficient, especially in hot climates.

  • Ideal for modern and industrial-style homes, offering a sleek look.

  • Low maintenance but may dent under impact, requiring occasional repairs.

5. Brick and Stone Veneer Siding

  • Elegant and sophisticated look, enhancing property value.

  • Highly durable with excellent insulation, improving energy efficiency.

  • Resistant to fire, pests, and extreme weather, ensuring long-lasting performance.

  • Higher upfront cost but long-term value, making it a worthwhile investment.

No. 3

How to Choose the Right Siding Contractor in Texas

Selecting a professional siding contractor ensures that your project is completed with precision and quality. A skilled contractor will help you choose the best materials and ensure proper installation for maximum durability.

1. Verify Licensing and Insurance

  • Ensure the contractor is licensed, bonded, and insured to protect yourself from liability.

  • Proper credentials indicate professionalism and adherence to industry standards.

2. Check Experience and Reputation

  • Look for contractors with years of experience and a strong reputation in your area.

  • Read customer reviews, testimonials, and project portfolios to assess their work quality.

3. Request Detailed Estimates

  • Get written estimates that outline material costs, labor fees, and project timelines.

  • A transparent estimate helps avoid unexpected expenses and ensures budget accuracy.

4. Ask About Warranties

  • A reputable contractor should offer warranties on materials and workmanship.

  • Warranties provide long-term protection and peace of mind for your investment.

5. Ensure Clear Communication

  • The best contractors provide regular updates, answer questions, and address concerns.

  • Open communication ensures a smooth process and satisfactory results.


hellolovelyliving lowes home improvement siding

Lowe’s

Transform your home with confidence! From tools to materials, Lowe’s has everything you need to tackle your next siding project.


No. 4

The Siding Installation Process: What to Expect

Understanding the installation process helps you prepare for your siding upgrade. A well-planned project ensures efficiency and minimizes disruptions.

1. Initial Consultation and Inspection

  • A professional contractor will assess your home’s exterior and discuss your siding options.

  • A detailed estimate will be provided, outlining costs and project scope.

2. Old Siding Removal

  • If replacing existing siding, the old material is carefully removed.

  • The underlying structure is inspected for any damage that needs repair.

3. Surface Preparation

  • The contractor will repair any damaged areas and install moisture barriers.

  • A smooth surface is essential for proper siding installation and durability.

4. Siding Installation

  • The new siding is installed with precision and proper sealing.

  • Proper installation enhances durability and weather resistance.

5. Final Inspection and Cleanup

  • The contractor will inspect the work, make necessary adjustments, and clean up the site.

  • A final walkthrough ensures the project meets quality standards.

FAQ

How much does a siding installation cost in Texas?

The cost varies based on material choice, home size, and labor fees. On average, siding installation ranges from $5,000 to $20,000, depending on the project scope.

How long does a siding installation take?

Most siding projects take 1 to 2 weeks, depending on weather conditions and home size. Proper planning ensures minimal disruptions and timely completion.

What is the most durable siding material for Texas weather?

Fiber cement and metal siding are among the most durable options. These materials offer resistance to heat, moisture, and storms.

Does new siding increase home value?

Yes, high-quality siding improves curb appeal, energy efficiency, and structural integrity. Homes with updated siding often sell faster and at higher prices.

How do I maintain my siding?

Regular maintenance includes washing with mild detergent and inspecting for damage. Sealing cracks and addressing minor repairs prolongs the siding lifespan.


Takeaways

Investing in professional siding services is one of the best ways to enhance your home’s durability, energy efficiency, and curb appeal. Whether you choose vinyl, fiber cement, wood, or metal siding, the right material and expert installation will ensure long-lasting beauty and protection.

By choosing expert siding services, you can enhance your home’s beauty, protection, and efficiency for years to come. Ready to get started? Contact a trusted Texas siding contractor today!

Looking For Home Resources?

Looking to enhance your living space and create a sanctuary that supports your well-being? Explore our home partners who offer a wide range of resources to elevate your home environment.


homeHLL x Editor


How To Elevate Your Home With Professional Remodeling Services

A home is more than just a place to live—it’s a reflection of your personal style, comfort, and functionality. Whether you're looking to modernize outdated spaces, enhance energy efficiency, or increase property value, professional remodeling services can help you achieve your vision. With expert craftsmanship and strategic planning, you can transform your home into a space that truly meets your needs.


In this guide, we’ll explore the key benefits of home remodeling, the most impactful renovations, and how to choose the right remodeling professionals for your project.

If you're ready to transform your home into a space that reflects your unique style and functionality with high-quality professional remodeling services, we invite you to explore Expert Remodeling Services by Panda Contractors, where skilled craftsmanship will help bring your vision to life with precision, expertise, and a commitment to excellence.

No. 1

Why Invest in Professional Home Remodeling?

Home remodeling is a significant investment, but when done correctly, it offers long-term benefits that make it worthwhile.

Here’s why hiring professional remodeling services is the best decision for homeowners:

Increases Property Value

A well-executed renovation can boost your home’s market value, making it more appealing to potential buyers. Upgrades such as kitchen remodels, bathroom renovations, and energy-efficient improvements often yield the highest return on investment (ROI).

Enhances Functionality and Comfort

Remodeling allows you to reconfigure spaces to better suit your lifestyle. Whether it’s expanding a kitchen, adding a home office or granny flat, or upgrading a bathroom, renovations improve the overall livability and convenience of your home.

Improves Energy Efficiency

Modern renovations often incorporate energy-efficient appliances, insulation, and windows, reducing utility costs and promoting sustainable living. This not only benefits your wallet but also contributes to a greener environment.

Updates Outdated Designs

If your home feels outdated or lacks modern appeal, a remodel can bring it up to date with contemporary aesthetics, smart technology, and stylish finishes. This enhances both visual appeal and functionality.

Addresses Structural Issues

Over time, homes develop wear and tear, including plumbing issues, outdated wiring, and foundation concerns. Professional remodeling services ensure that these problems are addressed, improving safety and durability.

No. 2

Top Home Remodeling Projects to Consider

Not all renovations offer the same level of impact.

Here are some of the most effective remodeling projects that can transform your home:

Kitchen Remodeling

The kitchen is often the heart of the home, making it one of the most valuable areas to renovate.

Consider:

  • Upgrading countertops with quartz or granite.

  • Installing modern cabinetry for better storage.

  • Adding energy-efficient appliances to reduce electricity costs.

  • Enhancing lighting with under-cabinet LEDs and pendant fixtures.

Bathroom Renovations

A luxurious, well-designed bathroom enhances comfort and adds value to your home.

Key bathroom upgrades include:

  • Walk-in showers with glass enclosures for a sleek look.

  • Freestanding bathtubs for a spa-like experience.

  • Smart mirrors and lighting for added convenience.

  • Water-saving fixtures to improve efficiency.

Basement and Attic Conversions

Unused spaces like basements and attics can be transformed into functional living areas, such as:

  • Home offices for remote work.

  • Guest suites for visitors.

  • Entertainment rooms with home theaters.

  • Fitness areas for at-home workouts.

Outdoor Living Enhancements

Expanding your living space outdoors can create a perfect area for relaxation and entertainment.

Consider:

  • Deck or patio installations for outdoor gatherings.

  • Landscaping improvements to enhance curb appeal.

  • Outdoor kitchens and fire pits for year-round enjoyment.

  • Pergolas and covered seating areas for shade and comfort.

Whole-Home Renovations

For homeowners looking for a complete transformation, a whole-home remodel can modernize every aspect of the property.

This may include:

  • Open-concept floor plans for a spacious feel.

  • New flooring and paint to refresh interiors.

  • Smart home technology for automation and security.

  • Energy-efficient windows and doors to reduce heating and cooling costs.


hellolovelyliving houzz home remodeling project ideas

Houzz

Make your home project a reality. Find inspiration, products, and the pros to make it happen - all in one place.


No. 1

How to Choose the Right Remodeling Professionals

Selecting the right remodeling contractor is crucial for a successful renovation.

Here’s how to ensure you hire the best professionals for the job:

1. Check Credentials and Licensing

Ensure the contractor is licensed, insured, and certified to perform remodeling work in your area. This protects you from potential liabilities.

2. Review Past Projects and References

Look at their portfolio of completed projects and read customer reviews to assess their quality of work and reliability.

3. Get Detailed Estimates

Request written estimates that outline labor costs, materials, and timelines to avoid unexpected expenses.

4. Discuss Project Timelines

A clear timeline ensures that your renovation stays on schedule and minimizes disruptions to your daily life.

5. Ensure Clear Communication

A good contractor should provide regular updates, answer questions, and address concerns throughout the remodeling process.

FAQ

How much does a home remodeling project cost?

The cost varies depending on the scope of the project, materials used, and labor costs. A small renovation may cost a few thousand dollars, while a full-home remodel can range from $50,000 to $150,000 or more.

How long does a typical home renovation take?

Project timelines depend on the complexity of the renovation. A kitchen or bathroom remodel may take 4-8 weeks, while a whole-home renovation can take several months.

Do I need permits for home remodeling?

Yes, certain renovations require building permits, especially for structural changes, electrical work, and plumbing upgrades. A professional contractor will handle the permit process for you.

What are the best renovations for increasing home value?

The most valuable renovations include kitchen remodels, bathroom upgrades, energy-efficient improvements, and curb appeal enhancements.

Can I live in my home during a remodel?

For minor renovations, you can typically stay in your home. However, for major remodels, such as kitchen overhauls or full-home renovations, temporary relocation may be necessary.

Takeaways

Investing in professional home remodeling services is one of the best ways to enhance your living space, increase property value, and improve functionality. Whether you’re upgrading a single room or undertaking a full-scale renovation, expert craftsmanship ensures a seamless transformation.

By following these expert tips and working with professional remodeling services, you can create a home that is beautiful, functional, and tailored to your lifestyle. Ready to get started? Contact a trusted remodeling contractor today!

Looking For Home Resources?

Looking to enhance your living space and create a sanctuary that supports your well-being? Explore our home partners who offer a wide range of resources to elevate your home environment.


homeHLL x Editor


Best Home Staging Tips For 2025

Thinking about selling your home or putting a listing on the market? It can feel like a lot to handle, but there are simple ways to make any home more appealing to buyers and increase its value.


One of the best ways to do this is through home staging. A lot of people think staging is just about decorating, but it’s actually about helping buyers picture themselves living in the space. And it works—homes that are staged sell faster and often for a higher price.

In fact, according to the International Association of Home Staging Professionals, staged homes sell 3 to 30 times faster than unstaged ones and can bring in up to 20% more value. This makes it worth investing in the home staging costs

In 2025, buyers will be drawn to clean, simple designs, eco-friendly touches, and smart home features. If you want to attract serious offers, these trends can make a big difference. In this article, we explore some of the best home staging tips for 2025.

Top Home Staging Tips for 2025

Getting a home ready for buyers is all about making it look welcoming, spacious, and well-maintained.

Here are some simple ways to stage your home so it stands out:

No. 1

Declutter the Space

Start by going through each room and removing anything that is no longer needed. This not only makes the space look bigger but also helps with packing if you are planning to move.

In smaller homes or apartments, a few simple tricks can make a big difference. Lighter shades on walls, furniture, and decor help reflect light, making the space feel open and airy.

Mirrors are another great way to create the illusion of depth. A large mirror placed on one wall can instantly make a room feel larger.

The way furniture is arranged also matters. Keep walkways clear and avoid placing bulky pieces in the middle of the room to create a better sense of flow.

No. 2

Deep Clean Every Corner

Once the clutter is gone, it’s time for a deep clean. Wash the windows, mop the floors, and shampoo the carpets to refresh the space.

Dust every surface, polish furniture, and vacuum thoroughly. Ceiling fans and air vents should also be cleaned to remove any built-up dust.

Bathrooms need special attention. Fresh towels and a new bar of soap can make a big difference in making the space feel clean and welcoming.

In the bedroom, fresh bedding and neatly made beds create an inviting atmosphere.

No. 3

Make the Most of Lighting

Good lighting can completely change how a space feels. Installing dimmers on overhead lights allows for better control over brightness throughout the day, making the home feel warm and inviting.

Table lamps are another great addition. Choosing lamps with unique designs and placing them at different heights around the room can add character while improving the overall lighting.


hellolovelyliving terrain potted plants planters for garden and home

Terrain

Discover the beauty of nature with Terrain’s curated selection of planters and plants. From lush greenery to blooming florals, find the perfect touch for your home or garden!


No. 4

Improve the First Impression

The outside of a home is the first thing buyers will see, and if it looks neglected, they might not even want to step inside.

A clean and well-maintained exterior sets the right tone. This means washing the windows, power-washing the walls, and refreshing the front door with a new coat of paint or updated hardware.

The driveway and sidewalks should be cleaned and repaired if needed. Outdoor areas like patios, decks, and pools should be decluttered and in good shape.

Adding a few decorative touches can also help. Potted plants, fresh mulch, and proper outdoor lighting can make a home feel warm and inviting. Simple details like a new mailbox or neatly trimmed hedges can go a long way in making the property more attractive.

No. 5

Use Neutral Colors

A fresh coat of paint or new curtains in a neutral shade can instantly make a home feel brighter and more spacious.

Light colors like off-white, beige, or soft gray work well because they make it easier for buyers to picture themselves living in the space. Bold or personalized colors might appeal to some, but they can also turn away potential buyers who prefer a blank slate.

Neutral walls also give more flexibility when rearranging furniture or adding decor. It creates a balanced background that works with any style, making staging easier and the home more inviting.

No. 6

Refresh the Kitchen and Bathroom

The kitchen and bathroom play a big role in a buyer’s decision, so these spaces should be as clean and updated as possible. Clutter should be kept to a minimum—only a few decorative touches are needed.

Fresh white towels in the bathroom, a small plant or orchid in the kitchen, and some well-placed lighting can create a polished, welcoming look. Adding simple upgrades like modern cabinet handles, a stylish mirror, or fresh caulk around sinks and tubs can make a home feel well-maintained.

A little effort in these areas can make a big difference in how buyers perceive the overall condition of the home.


No. 7

Consider Virtual Staging

Staging a home with physical furniture and decor can be expensive and time-consuming, but virtual staging offers a practical alternative. This process involves digitally placing furniture and decor in listing photos to help buyers see the full potential of a space. It allows sellers to showcase a home’s best features without the cost of traditional staging.

Virtual staging is especially useful for empty homes or spaces that need a fresh look. It helps create an inviting atmosphere in photos, making it easier to attract buyers online. Since most home searches start with listing photos, visually appealing images can make a big difference in getting more interest and offers.

No. 8

Add More Storage

Buyers always appreciate a home with enough storage space. If your home lacks built-in storage like closets or cabinets, consider adding furniture that doubles as storage.

A sideboard, for example, can be a great addition to store extra dishes, napkins, or flatware while also enhancing the decor. Simple additions like this make a space look more organized and functional, which can be a big plus for buyers.

No. 9

Pay Attention to Your Backyard

Backyards and outdoor areas have become more important to buyers in recent years. Many people now look for homes with patios, porches, or outdoor seating areas. In fact, studies from the National Association of Realtors show that 82% of buyers want a patio, and many also prefer front and rear porches. 

Before listing your home, make sure your outdoor space looks inviting. Mow the lawn, pull out any weeds, and set up some outdoor furniture to show how the space can be used. Even if you don’t have a built-in patio, a clean and well-arranged outdoor area can still attract buyers.

No. 10

Rearrange the Furniture

A home should feel open and easy to move through. Too much furniture can make rooms look smaller and cluttered, making it harder for buyers to picture themselves in the space.

Store away any oversized or mismatched furniture, and arrange what’s left to create a spacious and welcoming feel. The more walkable and open the space, the easier it is for buyers to imagine their own furniture in the home.

Takeaways

Staging a home doesn’t have to be complicated or expensive. Simple changes like decluttering, fresh paint, and good lighting can make a big difference in how buyers see the space.

A well-presented home attracts more interest and can lead to better offers. With the right touches, selling a home in 2025 can be a smoother and more rewarding experience.

Looking For Home Resources?

Looking to enhance your living space and create a sanctuary that supports your well-being? Explore our home partners who offer a wide range of resources to elevate your home environment.


homeHLL x Editor


Top Tips And Trends For Your Dream Kitchen Plumbing

You want a kitchen that not only looks stunning but also functions seamlessly. Modern plumbing solutions can transform your kitchen space, prevent common water disasters, and enhance efficiency.


Concerns about hidden leaks, rising water bills, or outdated fixtures are common, but today’s advanced faucet designs, water-saving technology, and professional installation methods provide reliable solutions. In this article, we explore the top tips and emerging trends to help you create the kitchen of your dreams, with a special focus on innovative plumbing solutions.

Ready to explore the latest faucets, sinks, and piping methods to elevate your cooking space? fergusonsplumbingkitcheninspiration.com offers expert advice, tips, and inspiration. Together, we'll address every concern and bring your kitchen plumbing dreams to life.

No. 1

Plan Your Appliances Early

Booking your kitchen appliances well ahead of time frees you from last-minute decisions. It also lets you coordinate plumbing connections, cabinetry spaces, and functional additions.

1. Map Out Your Workflow

Visualize how you move between the sink, stove, and refrigerator. This triangle forms the heart of your kitchen, shaping every aspect of your plumbing layout.

2. Think About Spaciousness

Large pots require generous clearance under faucets, and dish-drying racks benefit from deep basins. Factor these dimensions in before selecting each fixture and sink type.

3. Coordinate With Cabinetry

Appliance placement impacts how your cabinets open and close. Plan around door swings, drawer extensions, and plumbing lines to ensure unobstructed access to stored items.

4. Factor in Plumbing Lines

Your sink's location depends on drain routes, while pot fillers may require a specialized supply path. Anticipate these needs to avoid renovations down the road.

5. Check for Compatibility

Not all appliance brands match well with every faucet or sink style. Look for fittings designed to work seamlessly together to streamline each installation phase.

No. 2

Choose the Right Fitter

Finding an experienced professional goes beyond comparing prices. You want someone who understands your preferred fixtures, local codes, and the intricacies of modern kitchen plumbing.

  • Ask about Licensing - Confirm they meet the required standards and carry appropriate liability coverage.

  • Discuss Projects - Gauge their experience with sink installations, pot-filler faucets, and dishwasher drain lines.

  • Request a Visit - Have them inspect plumbing and confirm feasibility of your desired layout.

  • Ask about Warranties - This guarantees coverage for leaks or any other installation issues later on.

  • Compare References - This ensures the fitter has been tested in real situations.

  • Insist on Written Estimates - Ensure it details labor, parts, and costs that might arise if unforeseen issues occur.

  • Verify Timelines - This ensures your fitter can coordinate with countertops, cabinets, and other trades involved.

  • Ask about Tools for Plumbing - This includes pipe cutting and sink mounting, to expedite the timeline.

  • Consider Communication - A fitter who explains clearly helps you make decisions throughout every stage.

  • Evaluate Pricing - This ensures fees align with norms, and match the services you require for your kitchen upgrade.

Following these tips helps you find a professional who aligns with your vision. Your fitter's expertise can make or break your dream kitchen's plumbing success.

No. 3

Install a Pot-Filler Faucet

Pot-filler faucets are major time-savers in busy kitchens. Installing them requires careful measurement, the right placement, and reliable connections to ensure a leak-free cooking experience.

1. Check the Water Supply Position

Your existing hot or cold water line determines how easily you can connect the pot filler. Confirm the route and accessibility before finalizing your faucet's location to avoid costly adjustments later.

2. Locate Your Studs

A secure mount prevents damage when the pot filler is extended over heavy cookware. Use a stud finder to locate sturdy support and mark the positions accurately for proper installation.

3. Mount the Faucet Body

  • Drill pilot holes as recommended by the manufacturer.

  • Align the faucet precisely to ensure a level installation.

  • Fasten bolts securely and seal any gaps to prevent moisture intrusion.

4. Test for Leaks

  • Turn on the water supply and inspect all joints carefully.

  • If you notice dripping, tighten connections or replace worn-out washers.

  • Check for consistent water pressure and smooth flow to ensure optimal performance.


hellolovelyliving rejuvenation kitchen plumbing hardware

Rejuvenation

Elevate your kitchen design with Rejuvenation's exquisite hardware and decor collection - where style meets functionality


No. 4

Don't Forget the Dishwasher

You might overlook how critical the dishwasher's drain line is until it malfunctions. Proper planning ensures efficient drainage and prevents unpleasant odors or messy leaks.

  • Review Manufacturer Guidelines - Examine guides specific to your dishwasher model for drain hose height and air gap requirements to ensure proper installation.

  • Locate the Knockout Port - If connecting the dishwasher’s drain hose to a garbage disposal, locate and remove the knockout plug to allow unrestricted water flow.

  • Install a High-Loop or Air Gap- Use a high-loop setup or an air gap device to prevent dirty water from reentering the dishwasher and contaminating clean dishes.

  • Check for Kinks or Obstructions - Inspect the drain hose for bends, twists, or blockages that could cause slow drainage or backups.

  • Secure Clamps Properly - Tighten clamps at both the dishwasher and disposal connection points to minimize leaks, especially during high-pressure wash cycles.

  • Inspect Gaskets for Wear - Check the hose fittings for worn or cracked gaskets. Replace any damaged components immediately to prevent leaks.

  • Avoid Over-Tightening Plastic Fittings - Excessive force can crack plastic connections, leading to unexpected leaks. Tighten fittings firmly but carefully.

  • Separate Drain and Water Supply Lines - Keep hot water lines away from drain hoses to prevent heat damage to plastic tubing and avoid premature wear.

  • Run a Test Cycle Before Sealing Cabinets - Before finalizing the installation, run a test wash cycle to verify proper drainage and leak-free operation.

  • Consult a Plumber for Persistent Issues - If drainage problems persist, seek professional assistance to identify underlying issues such as improper slope or clogged pipes.

Addressing every dishwasher detail up front helps you avoid service calls. Keeping your drain line unobstructed delivers cleaner dishes and a smoother overall kitchen routine.

No. 5

Measure Everything Twice

Exact measurements prevent overly large sinks or misaligned faucets. Double-checking every dimension saves time, money, and unneeded stress during your kitchen remodeling or renovation process.

1. Gather the Right Tools

Use a reliable tape measure, level, and a ruler for depth checks. Keep a notepad handy to record each reading precisely and remain consistent throughout.

2. Assess Cabinet Space

Measure the cabinet's interior width and depth to avoid buying a sink that won't fit. Subtract clearances for plumbing lines and faucet assembly very thoroughly.

3. Check Sink Dimensions

Some sinks stretch to 36 inches or more, while compact versions are around 25 inches wide. Know your countertop cutout size before finalizing any purchase.

4. Double-Confirm Before Cutting

Always measure twice and mark your cut lines. Incorrect cuts can lead to irreparable counters, wasted materials, or an awkwardly fitting sink alignment and frustration.

5. Review the Fit

For comprehensive instructions, see this guide. Place your sink temporarily, confirm it aligns with faucets, and ensure there's enough space for accessories and adjustments.

No. 6

Start With the Sink

A reliable sink forms the backbone of your kitchen. Planning its style, size, and finish early sets the tone for all other decisions to come.

  • Decide on Style – Choose between drop-in, undermount, or farmhouse sinks, as each affects countertop fit and installation ease.

  • Assess Faucet Placement – Ensure the faucet aligns properly with the sink basin and surrounding workspace for convenience.

  • Pick a Material – Consider stainless steel, cast iron, or composite, balancing durability, maintenance, and personal preference.

  • Evaluate Bowl Configuration – Decide between single, double, or triple basins, depending on your dishwashing habits and available space.

  • Consider Depth – Opt for a deeper sink to fit large cookware, but be mindful of potential back strain from excessive depth.

  • Look for Self-Rimming Sinks – These offer easier installation and allow for simpler replacements without disturbing countertops.

  • Select Undermount for a Seamless Look – This option provides easier cleaning but requires sturdy countertop support.

  • Weigh Farmhouse Designs – A deep, exposed front sink accommodates large loads effectively, adding a rustic aesthetic.

  • Plan Accessory Holes – Factor in soap dispensers, sprayers, or additional fixtures for both functionality and aesthetics.

  • Research Reputation – Check reviews and warranties to ensure your sink meets durability standards and resists wear.

Making the sink priority sets the stage for a coordinated kitchen. Dimension and detail revolves around ensuring it fits perfectly and functions at its best.

No. 7

Select the Perfect Sink Size

Picking the perfect sink width, length, and depth requires balancing form and function. Consider how you use the space before ultimately making a final statement.

1. Consider Kitchen Layout

If your counters are undersized, fitting a massive sink could cramp walkways. Think about everyday traffic flow and kitchen zones to ensure comfortable overall movement.

2. Balance Aesthetics With Function

An oversized sink offers room but might look bulky in a streamlined setting. Find a balance that complements cabinets, countertops, and your kitchen's overall theme.

3. Water Usage Habits

If you typically use a dishwasher, a huge sink may sit unused. Conversely, frequent hand washers benefit from added basin depth or multiple compartments and capacity.

4. Faucet Compatibility

Not all sinks fit every faucet's arch or reach. Double-check spout clearance and handle operation, especially if you choose deeper basins or a farmhouse design.

5. Coordinate With Existing Decor

Whether your motif is modern, rustic, or transitional, confirm your sink size blends visually. It should enhance, not overwhelm, the look and feel you desire.

Takeaways

Transform your dream kitchen into a reality with careful planning, expert guidance, and meticulous attention to detail. By making informed and thoughtful choices, you'll curate a stylish and highly functional space that not only meets but also exceeds your expectations. For even more expert insights and valuable tips, explore our other articles and take the essential final step toward perfecting your culinary oasis today!

Looking For Home Resources?

Looking to enhance your living space and create a sanctuary that supports your well-being? Explore our home partners who offer a wide range of resources to elevate your home environment.


homeHLL x Editor


The Importance Of Properly Installed Gutters For Roof Protection

A well-maintained roof is essential for the longevity and safety of any home. While many homeowners focus on roofing materials and insulation, one critical yet often overlooked component is the gutter system. Properly installed gutters play a crucial role in protecting the roof, foundation, and overall structural integrity of a home.


Without professional gutter systems, rainwater can accumulate on the roof, leading to water damage, leaks, and costly repairs. In this article, we explore the importance of properly installed gutters, their benefits, and how they contribute to roof protection and home longevity.

No. 1

How Gutters Protect Your Roof

Preventing Water Damage

One of the primary functions of gutters is to channel rainwater away from the roof and foundation. Without gutters, water can pool on the roof, leading to shingle deterioration, leaks, and structural damage. Over time, trapped moisture can cause rotting in wooden structures, weakening the roof’s integrity.

By ensuring proper water drainage, gutters help maintain the durability of roofing materials, preventing expensive repairs and replacements.

Reducing Ice Dams in Winter

In colder climates, ice dams can form when melted snow refreezes at the roof’s edge. This can lead to water backing up under the shingles, causing leaks and interior damage.

Properly installed gutters, combined with effective insulation and ventilation, help direct melted snow away from the roof, reducing the risk of ice dam formation.

Protecting Fascia and Soffits

The fascia and soffits are crucial components of a roofing system, providing support and ventilation. When gutters are missing or improperly installed, water can overflow and seep into these areas, leading to wood rot, mold growth, and structural weakening.

By directing water away from these vulnerable areas, gutters help maintain the structural integrity of the roof.

No. 2

The Impact of Poor Gutter Installation

Roof Leaks and Interior Damage

Improperly installed or clogged gutters can cause water to overflow, leading to roof leaks and interior water damage. This can result in stained ceilings, peeling paint, and even mold growth, which can pose health risks.

Foundation Erosion

Gutters don’t just protect the roof—they also safeguard the foundation. When rainwater is not properly directed away from the house, it can erode the soil around the foundation, leading to cracks, basement flooding, and structural instability.

Landscape Destruction

Without functional gutters, water runoff can damage landscaping, washing away soil, plants, and mulch. Over time, this can lead to uneven ground and drainage issues, affecting the home’s curb appeal and stability.

No. 3

Key Features of a Properly Installed Gutter System

To ensure maximum roof protection, gutters must be installed correctly and maintained regularly.

Here are some essential features of a high-quality gutter system:

Correct Slope and Positioning

  • Gutters should have a slight downward slope to direct water toward the downspouts.

  • Incorrect slope can cause water pooling and overflow, leading to roof damage.

Durable Materials

  • Aluminum, copper, and stainless steel are popular gutter materials due to their durability and rust resistance.

  • Choosing high-quality materials ensures a long-lasting system.

Properly Placed Downspouts

  • Downspouts should be positioned to direct water away from the foundation.

  • Extensions or splash blocks can further prevent water accumulation near the home.

Gutter Guards for Debris Prevention

  • Installing gutter guards helps prevent leaves, twigs, and debris from clogging the system.

  • This reduces the need for frequent cleaning and maintenance.


hellolovelyliving rejuvenation outdoor project guide

Rejuvenation

Rejuvenation believes in the power of thoughtful design - explore their extensive range of outdoor hardware, including stylish accessories that add character and charm to your home's exterior.


No. 4

Maintenance Tips for Long-Lasting Gutters

Even the best-installed gutters require regular maintenance and attention to detail to function effectively and prevent potential issues. Regular cleaning and inspections are essential to ensure that they can properly channel water away from your home and safeguard your property.

Here are some essential gutter maintenance tips:

Regular Cleaning

  • Remove leaves, dirt, and debris at least twice a year (spring and fall).

  • Clogged gutters can lead to overflow and roof damage.

Inspect for Leaks and Damage

  • Check for cracks, rust, or loose fasteners that could cause leaks.

  • Repair or replace damaged sections promptly.

Ensure Proper Water Flow

  • Test gutters by running water through them to ensure smooth drainage.

  • Adjust the slope if water is pooling.

Trim Overhanging Branches

  • Trees near the roof can drop leaves and branches, leading to clogged gutters.

  • Trim branches to minimize debris buildup.

No. 5

Choosing the Right Gutter System for Your Home

When selecting a gutter system, homeowners should consider factors such as climate, roof size, and material durability.

Here are some common gutter types and their benefits:

K-Style Gutters

  • Most popular choice for residential homes.

  • High water capacity and aesthetically pleasing design.

Half-Round Gutters

  • Ideal for historic or traditional homes.

  • Smooth shape reduces debris buildup.

Seamless Gutters

  • Custom-made to fit the home, reducing leak risks.

  • Fewer joints mean less maintenance and longer lifespan.

Box Gutters

  • Common in commercial buildings.

  • Can handle large volumes of water.

Takeaways

A well-installed gutter system is essential for roof protection, foundation stability, and home longevity. By ensuring proper water drainage, gutters prevent roof leaks, structural damage, and costly repairs.

Investing in high-quality materials, professional installation, and regular maintenance can extend the lifespan of both your roof and home. Whether you’re installing new gutters or upgrading an existing system, prioritizing proper installation and upkeep will safeguard your home against water damage and costly repairs.

For homeowners looking to enhance roof protection, properly installed gutters are a smart investment that ensures long-term durability and peace of mind.

Looking For Home Resources?

Looking to enhance your living space and create a sanctuary that supports your well-being? Explore our home partners who offer a wide range of resources to elevate your home environment.


homeHLL x Editor


Rustic Aesthetic On A Budget: How To Use Scaffold Boards In Your Kitchen

Creating a warm, rustic vibe in your kitchen doesn’t have to break the bank. Scaffold boards offer an affordable, durable, and versatile solution for homeowners looking to add character to their space. These reclaimed wooden planks can be transformed into shelves, countertops, islands, or decorative accents, bringing a cozy farmhouse feel to your kitchen.


Beyond their aesthetic appeal, scaffold boards are a practical choice for budget-conscious renovators. They provide ample workspace, sturdy construction, and a sustainable alternative to expensive hardwoods. With just a few tools and a bit of creativity, you can revamp your kitchen effortlessly while maintaining a timeless charm.

If you’re looking for affordable, high-quality materials, consider checking out scaffold boards for sale. In this guide, we will walk you through the benefits, preparation steps, treatments, and design ideas to help you make the most of these rustic planks.

No. 1

Why Choose Scaffold Boards for Your Kitchen?

Scaffold boards are an excellent choice for kitchen upgrades due to their strength, versatility, and affordability. Whether you're looking to create floating shelves, countertops, or a rustic dining nook, these boards offer a cost-effective alternative to traditional wood materials.

Key Benefits of Scaffold Boards

  • Exceptional Durability – Designed for heavy loads, scaffold boards can withstand daily kitchen use.

  • Timeless Aesthetic – Their natural grain and weathered look add rustic charm to any space.

  • Eco-Friendly Choice – Reclaimed boards reduce waste and promote sustainable home improvement.

  • Budget-Friendly – Compared to hardwood, scaffold boards offer a more affordable option.

  • Easy to Work With – Minimal construction experience is needed for DIY projects.

  • Versatile Applications – Suitable for countertops, shelving, islands, and decorative accents.

By incorporating scaffold boards, you can achieve a high-end rustic look without overspending. Their natural imperfections and rich textures make them a perfect fit for farmhouse-style kitchens.

No. 2

Essential Preparation Steps

Before installing scaffold boards in your kitchen, proper preparation is crucial to ensure safety, durability, and a polished finish.

Step 1: Inspect the Boards

Check each plank for splits, warping, or structural weaknesses. High-quality boards will provide a sturdy foundation for kitchen surfaces.

Step 2: Gather Necessary Tools

Having the right tools on hand will streamline the process.

Essential supplies include:

  • Measuring tape – Ensures precise cuts and proper fit.

  • Level – Helps maintain even surfaces.

  • Screws and brackets – Secure boards in place.

  • Sandpaper – Smooths rough surfaces for a refined finish.

  • Sealant or wood oil – Protects against moisture and stains.

Step 3: Cut Boards to Size

Measure and mark your boards before cutting to ensure a perfect fit for countertops, shelves, or islands. Accurate cuts prevent material wastage and enhance the final look.

Step 4: Sand the Surface

Start with coarse-grit sandpaper, then switch to finer grit for a smooth, splinter-free finish. Sanding enhances the wood’s natural grain and prepares it for sealing.

Taking the time to properly prepare your boards will ensure a long-lasting, professional-quality installation.

No. 3

Choosing the Right Finish: Indoor vs. Outdoor Treatments

Scaffold boards can endure different environments, but applying the right finish will maximize their lifespan.

Indoor Finishing Options

  • Wax or quick-drying oil – Ideal for controlled indoor environments.

  • Food-safe sealants – Protect kitchen surfaces from spills and stains.

  • Breathable finishes – Maintain air quality while preserving wood texture.

Outdoor Finishing Options

  • Water-resistant sealers – Protect against rain and humidity.

  • UV-protective coatings – Prevent fading from sun exposure.

  • Regular reapplication – Helps maintain integrity in fluctuating weather.

Selecting the appropriate treatment ensures your scaffold boards remain functional and visually appealing for years to come.


hellolovelyliving non toxic kitchenware

Caraway

Cook with confidence and care! Caraway's non-toxic kitchenware combines sleek design with health-conscious materials for a safer, smarter kitchen experience.


No. 4

Applying Oil-Based Sealers for a Rich Finish

Oil-based sealers penetrate deep into the wood, enhancing durability and moisture resistance. They also bring out the natural beauty of the grain, making them a great choice for rustic kitchens.

Steps to Apply Oil-Based Sealers

  1. Choose a High-Quality Product – Opt for Danish oil, tung oil, or linseed oil for a rich, protective finish.

  2. Apply Evenly – Use a brush or cloth to distribute the oil across the surface, ensuring full coverage.

  3. Allow Proper Drying Time – Let each coat cure completely before applying the next layer.

  4. Build Multiple Layers – Adding extra coats strengthens the wood’s resistance to moisture and wear.

Oil-based sealers enhance the wood’s natural character while providing long-lasting protection.

No. 5

Using Water-Based Sealers for a Quick, Eco-Friendly Finish

Water-based sealers dry faster, emit fewer fumes, and provide a clear protective layer. They are a great option for busy kitchens where quick application and drying times are essential.

Steps to Apply Water-Based Sealers

  • Check for Food-Safe Labels – Ensure the product is safe for kitchen surfaces.

  • Stir Thoroughly Before Use – Prevents inconsistencies in color and texture.

  • Apply Thin Coats – Use a brush or roller for an even finish.

  • Sand Lightly Between Coats – Improves adhesion and durability.

  • Reapply Periodically – Maintains protection in high-traffic areas.

Water-based sealers offer a simple, eco-friendly solution for preserving scaffold boards in a kitchen setting.

No. 6

Creative DIY Design Ideas for Your Kitchen

Scaffold boards provide endless design possibilities, allowing you to create custom, rustic-inspired kitchen elements on a budget.

1. Floating Shelves

  • Install L-brackets to mount scaffold boards as open shelving.

  • Display cookbooks, potted herbs, or vintage kitchenware for a farmhouse look.

2. Rustic Breakfast Bar

  • Use scaffold boards and metal supports to create a cozy breakfast nook.

  • Pair with industrial stools for a stylish, functional space.

3. Kitchen Island Countertop

  • Replace an existing island top with scaffold boards for a rustic upgrade.

  • Apply food-safe oil to protect the surface while maintaining its natural charm.

4. Sliding Barn Doors

  • Use scaffold boards to create barn-style pantry doors.

  • Install metal tracks for a modern farmhouse aesthetic.

Scaffold boards allow you to customize your kitchen affordably, blending functionality with rustic elegance.

Takeaways

Incorporating scaffold boards into your kitchen is a budget-friendly way to achieve a rustic, farmhouse-inspired aesthetic. Their durability, affordability, and versatility make them an excellent choice for homeowners looking to revamp their space without overspending.

Here are the key takeaways:

  • Scaffold boards offer a durable, cost-effective alternative to traditional wood.

  • Proper preparation and finishing ensure longevity and protection.

  • Oil-based and water-based sealers provide different benefits for indoor and outdoor use.

  • DIY projects like shelving, countertops, and barn doors enhance kitchen functionality.

  • A rustic kitchen upgrade doesn’t have to be expensive—scaffold boards make it achievable.

By following these steps, you can transform your kitchen into a cozy, rustic retreat while staying within budget. Whether you’re adding functional shelving or a statement countertop, scaffold boards provide an affordable, stylish solution that will stand the test of time.

Looking For Home Resources?

Looking to enhance your living space and create a sanctuary that supports your well-being? Explore our home partners who offer a wide range of resources to elevate your home environment.


homeHLL x Editor


Simple Ways To Choose A Plumbing Expert For Your Home

You want your home's plumbing to run smoothly, but finding the right professional can be challenging. By focusing on expertise, reviews, and communication, you’ll be able to choose a plumber who can handle clogged drains, leaks, and other common issues. Taking the time to research and compare options ensures that you receive high-quality service and long-term solutions.


hellolovelyliving woman looking up reviews online for a plumbing expert


Proper credentials matter when selecting a plumber. Always look for licensed and insured specialists who stay updated on industry trends. Visiting an About.me profile or professional website can help you explore a plumber’s track record and gain confidence in your choice.

Once you pinpoint the perfect fit, request written estimates and verify warranties to avoid unexpected costs. By following these simple steps, you’ll secure a reliable plumber who can handle emergencies, installations, and routine maintenance with ease.

In this article, we explore effective ways to select a plumbing expert for your home, ensuring that the specialist you choose truly qualifies for the job and can meet your specific needs.

No. 1

Research Plumbing Options Carefully

Before planning major plumbing upgrades, consider both style and functionality when selecting fixtures. Doing thorough research can save you money and ensure the best results.

Key Factors to Consider

  • Functionality – Determine your household’s needs, including water heater capacity and faucet styles that complement your kitchen or bathroom layout.

  • Durability – Look for corrosion-resistant finishes, sturdy brass fittings, or stainless steel designs that can withstand long-term use.

  • Aesthetic Appeal – Choose fixtures that match your décor, ensuring a seamless blend with tiles, countertops, and overall interior design.

If you're unsure about fixture compatibility, consult a professional plumber for expert insights. Their guidance can help you make informed decisions that enhance both performance and style.

No. 2

Check Licensing and Insurance

Verifying a plumber’s credentials ensures that your project meets local regulations and safety standards. This diligence protects you from liabilities and guarantees high-quality service.

Steps to Verify Credentials

  • Confirm Licenses – Request up-to-date state licensing details to ensure the plumber is legally authorized to perform repairs, installations, or remodeling.

  • Ask About Insurance – Inquire about general liability coverage and worker’s compensation to prevent unexpected costs in case of accidents.

  • Choose Legitimate Contractors – Avoid unlicensed handymen who may offer lower rates but lack the necessary credentials for complex plumbing tasks.

Additionally, use official resources to verify a plumber’s standing. Taking this step minimizes risks and ensures you hire a qualified professional.

No. 3

Compare Cost Estimates Fairly

Evaluating multiple quotes helps you balance affordability and quality. Comparing estimates clarifies costs and prevents unwelcome surprises.

How to Assess Estimates

  • Request Detailed Breakdowns – Ask for itemized quotes that outline labor, materials, and additional fees. Transparency prevents misunderstandings and disputes.

  • Consider Standard Rates – Familiarize yourself with average plumbing costs to spot suspiciously high or unrealistically low prices.

  • Look for Hidden Costs – Ask about potential travel surcharges, emergency call fees, or weekend rates to avoid unexpected expenses.

Always compare at least three quotes to ensure fair pricing. If you notice significant price gaps, request an explanation to determine whether higher costs reflect better materials or advanced workmanship.


hellolovelyliving rejuvenation kitchen fixtures and plumbing

Rejuvenation

Elevate your kitchen design with Rejuvenation's exquisite hardware and decor collection - where style meets functionality


No. 4

Match Skills to Your Needs

Choosing the right specialist is crucial for your plumbing project’s success. Not all plumbers offer the same expertise, so it’s important to find one that aligns with your needs.

What to Look For

  • Specialized Expertise – Some plumbers focus on new installations, while others excel in repairs or remodeling.

  • Training and Certifications – Look for professionals with advanced skills, especially for complex systems requiring modern techniques.

  • Proper Equipment – Ensure the plumber has the necessary tools to complete your project efficiently.

Selecting a plumber with the right skills eliminates guesswork and ensures a smooth, hassle-free experience.

No. 5

Read Customer Reviews Online

Exploring feedback from previous clients provides insight into a plumber’s reliability and responsiveness. Online reviews reveal real experiences, helping you make an informed decision.

Where to Look

  • Reputable Platforms – Use websites like Trustpilot or the Better Business Bureau for verified ratings.

  • Review Timestamps – Check recent reviews to assess the plumber’s current performance and service quality.

  • Look for Patterns – Identify recurring themes in feedback, such as punctuality, professionalism, and reliability.

While negative reviews aren’t always deal-breakers, a pattern of similar complaints may indicate deeper issues. A plumber who actively resolves concerns demonstrates accountability and professionalism.

No. 6

Ask Homeowners for Recommendations

Speaking with trusted friends or family can lead you to reliable plumbing professionals. Personal experiences often provide valuable insights that online reviews may overlook.

Ways to Find Trusted Plumbers

  • Join Local Community Groups – Neighborhood forums and social media pages often feature contractor referrals and honest reviews.

  • Attend Home Improvement Events – Trade shows and expos showcase reputable plumbers and allow you to assess their expertise in person.

  • Ask for Before-and-After Photos – Seeing completed work helps verify a plumber’s skill and attention to detail.

Maintaining open communication with those who recommend a plumber ensures you receive accurate, firsthand insights before making a decision.

No. 7

Clarify Warranties and Repairs

Understanding warranty terms protects your investment in plumbing services. Clear coverage details ensure that repairs or replacements are handled efficiently if issues arise.

Key Warranty Considerations

  • Coverage Length – Ask how long the warranty lasts and what specific parts it includes.

  • Labor Guarantees – Some warranties cover parts but not labor. Clarify whether follow-up visits are free if issues occur.

  • Exclusions – Understand any limitations, such as damage caused by improper maintenance or external factors.

Store warranty documents and invoices in a safe place for easy access. Quick retrieval ensures you can resolve disputes or request repairs without unnecessary delays.

Takeaways

Finding a reliable plumber requires careful research, but the effort pays off in long-term satisfaction and peace of mind. By prioritizing credentials, customer feedback, and clear communication, you can confidently hire a professional who delivers quality service.

Take the time to compare estimates, verify warranties, and seek recommendations from trusted sources. These steps will help you make an informed decision, ensuring your home’s plumbing remains in excellent condition for years to come.

Count on Dan’s Plumbing FAQ for helpful insights as you finalize your trusted home solutions.

Looking For Home Resources?

Looking to enhance your living space and create a sanctuary that supports your well-being? Explore our home partners who offer a wide range of resources to elevate your home environment.


homeHLL x Editor


10 Ways To Transform Your Kitchen With Expert Remodeling

The kitchen is the heart of every home—a space where meals are prepared, memories are made, and families gather. If your kitchen feels outdated, cramped, or lacks functionality, a kitchen remodel can breathe new life into your space. With expert remodeling strategies, you can enhance aesthetics, improve efficiency, and increase your home’s value.


hellolovelyliving kitchen remodel modern clean aesthetic


Whether you’re planning a complete overhaul or a minor update, in this article, we share some effective ways to transform your kitchen with expert remodeling.

If you are looking for experienced professionals to assist you with your kitchen renovation, consider exploring versatile 321 Construction kitchen remodeling services. Their skilled team is dedicated to transforming your culinary space into a beautiful and functional area that meets your unique needs and style preferences.

No. 1

Upgrade to Modern Cabinetry

Cabinets play a crucial role in both storage and design. If your current cabinets look worn out or don’t offer enough space, upgrading to modern, custom cabinetry can completely change the look and feel of your kitchen.

Consider options like:

  • Shaker-style cabinets for a timeless appeal.

  • Glass-front cabinets to showcase elegant dishware.

  • Soft-close drawers and doors for a touch of luxury.

  • Pull-out shelves and organizers to maximize storage efficiency.

Opting for high-quality materials such as solid wood, plywood, or MDF ensures durability and longevity.

No. 2

Install High-End Countertops

Countertops are one of the most used surfaces in the kitchen, so choosing the right material is essential. Upgrading to premium countertops can enhance both functionality and aesthetics.

Popular choices include:

  • Quartz – Durable, low-maintenance, and available in various colors.

  • Granite – Natural beauty with unique patterns and high resistance to heat.

  • Marble – Luxurious and elegant, though it requires regular maintenance.

  • Butcher block – Warm, rustic appeal with excellent durability for food prep.

Selecting the right countertop material ensures a stunning and practical kitchen workspace.

No. 3

Enhance Lighting for Ambiance and Functionality

Lighting plays a vital role in setting the mood and improving visibility in your kitchen. A well-lit kitchen enhances both safety and ambiance.

Consider incorporating:

  • Recessed ceiling lights for even illumination.

  • Pendant lights over the island for a stylish focal point.

  • Under-cabinet lighting to brighten workspaces.

  • Dimmable LED lights for adjustable brightness.

A layered lighting approach ensures your kitchen is both functional and inviting.


hellolovelyliving rejuvenation kitchen hardware and decor

Rejuvenation

Elevate your kitchen design with Rejuvenation's exquisite hardware and decor collection - where style meets functionality


No. 4

Upgrade to Smart Appliances

Modern kitchens benefit greatly from smart appliances that offer convenience, energy efficiency, and advanced features.

Some must-have smart appliances include:

  • Smart refrigerators with touch screens and Wi-Fi connectivity.

  • Induction cooktops for faster, safer cooking.

  • Voice-controlled ovens for hands-free operation.

  • Dishwashers with energy-saving modes for efficiency.

Investing in energy-efficient, high-tech appliances can make your kitchen more modern and user-friendly.

No. 5

Create a Functional Kitchen Layout

A well-designed kitchen layout improves workflow and efficiency. If your kitchen feels cramped or disorganized, consider reconfiguring the space for better functionality.

Popular kitchen layouts include:

  • Open-concept kitchens that connect seamlessly with the dining or living area.

  • L-shaped or U-shaped layouts for optimal counter space.

  • Galley kitchens for compact yet efficient designs.

  • Kitchen islands for additional prep space and seating.

A thoughtfully designed layout ensures your kitchen is both practical and visually appealing.

No. 6

Incorporate Stylish Backsplashes

A backsplash is more than just a protective surface—it’s an opportunity to add personality and style to your kitchen.

Trendy backsplash options include:

  • Subway tiles for a classic, clean look.

  • Mosaic tiles for a pop of color and texture.

  • Marble or quartz slabs for a seamless, luxurious appearance.

  • Metallic or mirrored finishes for a modern touch.

Choosing the right backsplash can tie together your kitchen’s design elements beautifully.

No. 7

Add a Kitchen Island for Extra Space

A kitchen island is a game-changer for both functionality and aesthetics. It provides additional counter space, storage, and seating options.

Consider features like:

  • Built-in sinks or cooktops for added convenience.

  • Extended countertops for casual dining.

  • Hidden storage compartments for better organization.

  • Multi-level designs to separate prep and dining areas.

A well-designed kitchen island enhances both efficiency and style.

No. 8

Upgrade Flooring for Durability and Style

Kitchen flooring should be durable, easy to clean, and visually appealing. If your current flooring is outdated or worn, upgrading to a high-quality material can make a significant difference.

Popular kitchen flooring options include:

  • Hardwood for warmth and timeless elegance.

  • Luxury vinyl plank (LVP) for water resistance and durability.

  • Porcelain or ceramic tiles for a sleek, easy-to-maintain surface.

  • Natural stone for a high-end, sophisticated look.

Choosing the right flooring ensures a long-lasting and stylish kitchen.

No. 9

Maximize Storage with Smart Solutions

An organized kitchen is a functional kitchen. If clutter is a problem, incorporating smart storage solutions can help keep everything in place.

Effective storage ideas include:

  • Pull-out pantry shelves for easy access.

  • Hanging pot racks to free up cabinet space.

  • Drawer dividers for better utensil organization.

  • Corner carousel cabinets to utilize hard-to-reach spaces.

Maximizing storage ensures your kitchen stays tidy and efficient.

No. 10

Personalize with Unique Design Elements

Adding personal touches to your kitchen remodel makes the space feel truly yours.

Consider incorporating:

Personalized details bring warmth and charm to your kitchen, making it a space you love spending time in.

Takeaways

A kitchen remodel is one of the most rewarding home improvement projects, offering both aesthetic and functional benefits. By upgrading cabinetry, countertops, lighting, appliances, and storage solutions, you can create a kitchen that is stylish, efficient, and inviting.

Whether you opt for small updates or a full renovation, expert remodeling ensures your kitchen becomes a modern, functional, and beautiful space that enhances your home’s value and your daily life.

With the right planning and design choices, your dream kitchen is within reach!

Looking For Home Resources?

Looking to enhance your living space and create a sanctuary that supports your well-being? Explore our home partners who offer a wide range of resources to elevate your home environment.


homeHLL x Editor


Essential Pool Safety Tips You Should Follow To Avoid Accidents

Having a pool at home is enjoyable but also a responsibility. Numerous serious accidents occur each year in pools.


In this article, we discuss some safety rules to keep your family and guests safe. Whether you have a pool or simply visit one, learning how to stay safe can prevent unfortunate events.

In case an accident happens, legal help might be required. The best swimming pool accident attorneys can assist if someone is hurt due to negligence.

However, preventing accidents before they occur is always the best course of action. That is why you should diligently follow these essential pool safety tips to ensure a secure and enjoyable swimming experience at all times.

No. 1

Always Supervise Children

Children are at a greater risk for pool accidents. When you have kids at home or they're visiting, never allow them to be alone near the pool. Even if they know how to swim, they might have an accident. Watch them carefully and be close enough to assist if necessary.

No. 2

Install a Fence Around the Pool 

A pool fence may keep younger kids or pets from falling into the water. The fence has to be more than four feet tall with a self-closing, latching gate. This prevents accidental drownings and keeps your pool area safe.

No. 3

Use Pool Alarms

Pool alarms are a good addition. These alarms can sense if someone enters the pool unauthorized. Pool alarms may be gate alarms, underwater motion detectors, or wearable alarms for kids.


hellolovelyliving swimply rent out your pool and earn money when people book

Swimply

An online marketplace for hourly rentals of pools, courts, entire homes, and many other amenities.

Host or rent a pool in your area. Get $25 off when you book a private pool, or join as a host and list your pool to earn thousands of dollars a month.

Sign up below for a free gift!


No. 4

Teach Kids to Swim

Teaching children to swim early can help avoid accidents. Swimming lessons show kids how to stay safe in the water. Even if they know how to swim, they should be supervised at all times.

No. 5

Do Not Run Near the Pool

Slippery pool decks lead to serious falls and injuries. Remind children and guests to walk and not run around the pool area. Non-slip mats or textured surfaces around the pool could also help prevent slipping.

No. 6

Keep Safety Equipment Nearby

Have safety equipment, including a life ring, a reaching pole, and a first aid kit, near your pool. In case of an emergency, these tools will enable you to rescue and take care of someone immediately.

No. 7

Never Swim Alone

Even if you are a great swimmer, it's safer to swim with another person. Accidents like sudden health problems or cramps can happen to anyone. Having another person around will help in emergencies.

No. 8

Avoid Alcohol Near the Pool

Consuming alcohol while swimming or supervising swimmers is unsafe. Alcohol slows response time and impairs judgment, leading to drowning or injuries. Stay alert and avoid drinking around the pool.

No. 9

Cover the Pool When Not in Use

A pool cover is another essential safety feature. It helps prevent accidental falls, particularly for kids and pets. Be sure that the cover can hold weight and remains in place when the pool is not in use.

Takeaways

A swimming pool should be a place for relaxation and fun, not a potential risk. By following these basic safety tips, you can protect your family and avoid accidents. Be alert, take precautions, and take pool safety seriously.

In case an accident does happen due to negligence, you might need the very best swimming pool accident lawyers on your side. However, prevention is better than having to live with the consequences of an accident. Be safe and enjoy your pool responsibly!


Looking For Home Resources?

Looking to enhance your living space and create a sanctuary that supports your well-being? Explore our home partners who offer a wide range of resources to elevate your home environment.


homeHLL x Editor


Common Household Water Leaks And How To Fix Them

Water leaks in the home can be a significant inconvenience, not to mention a potential source of costly repairs if left unaddressed. Whether you’ve noticed a small drip or a more serious flood, it’s crucial to understand the various types of water leaks that could arise and how to handle them promptly.


An essential first step is to pinpoint the origin of the leak, which could be due to a damaged pipe, malfunctioning appliance, or even a leaking fridge. In this article, we explore common household water leaks and provide practical advice on when to handle them yourself and when it’s time to call a local plumber for assistance.

No. 1

Leaking Faucets and Pipes

One of the most common types of water leaks is a leaking faucet. Although a dripping faucet might appear harmless, it can lead to considerable water waste over time, resulting in increased utility costs. Often, the leak is caused by a deteriorated washer or a problem with the faucet’s valve.

This is an easy fix for most homeowners, as it often just requires replacing the washer or tightening the valve. Similarly, leaking pipes under sinks or in other areas of your home can lead to water damage if not addressed.

If you spot a leak around the pipe joints or notice water pooling near a pipe, it’s essential to act quickly. Begin by shutting off the water supply to avoid additional damage, then examine the pipes for any issues.

You may be able to patch up small leaks with a temporary fix like pipe tape, but for more extensive damage, it’s advisable to seek professional help from a local plumber.

No. 2

Water Heater Leaks

Water heaters are another appliance prone to leaks. These leaks can occur at the tank’s base or around the connections to the pipes. The primary cause of water heater leaks is often corrosion or damage from sediment build-up inside the tank.

If you notice a pool of water around your water heater, it could be a sign that the tank is deteriorating, and you may need to replace it. If the leak originates from the connections, a local plumber can assist in replacing damaged connections or valves.

A malfunctioning water heater can also lead to inconsistent water temperature and reduced efficiency, meaning you might end up spending more on energy bills. Consistent maintenance of your water heater, such as flushing sediment buildup and inspecting the connections, can help prevent leaks from developing.

No. 3

Fridge Leaking Water

A common issue many homeowners face is a fridge leaking water, especially from the freezer or refrigerator compartment. Water pooling around the fridge can be due to a blocked defrost drain or a faulty door seal.

In some cases, the water may even be due to a blocked condensation line or an issue with the refrigerator's water filter. It’s essential to first unplug the fridge and inspect the drainage system and the door seal for any visible damage.

If the problem persists, there could be a more complex issue, such as a frozen defrost drain or broken water line. If you’re unable to solve the issue on your own, contacting a local plumber who is familiar with appliance-related leaks is a good option.

It’s critical not to ignore a fridge leaking water, as over time, it could lead to water damage in the surrounding areas or even mould growth in hidden spaces.


hellolovelyliving smell away odor neutralizing machine home

Smell Away

Say goodbye to stubborn odors with the Smell Away® Odor Neutralizing Machine! Perfect for homes, it eliminates pet smells, cooking odors, dampness, and more—leaving your space fresh and inviting.

Shop now for cleaner, healthier air!


No. 4

Leaking Washing Machines

Washing machines are another common appliance prone to leaks. Water can pool around the machine due to a variety of causes, including damaged hoses, worn-out seals, or overloading the machine.

If you spot water leaking from the washing machine, begin by checking the hoses for any signs of cracks or damage. Tightening or replacing the hoses may solve the issue.

Additionally, check the door seal to ensure it isn’t worn out or damaged, as this could cause leaks during the wash cycle. In some cases, the problem could be more complex, such as issues with the washing machine’s internal plumbing.

If tightening the hoses doesn’t solve the problem, or if you notice leaks from the machine's internal components, it’s best to call a professional plumber for assistance.

No. 5

Roof and Ceiling Leaks

While not often thought of as part of the plumbing system, roof and ceiling leaks can also cause significant water damage to your home. These leaks usually occur due to damaged roofing materials or clogged gutters, which prevent water from properly draining off the roof.

Water can infiltrate the roof and seep into the ceiling beneath. Regular upkeep is essential to prevent roof leaks. Be sure to clear gutters of debris and check the roof for any missing or damaged shingles.

If you observe any signs of a roof leak, such as water stains on the ceiling, it’s crucial to consult a professional roofer or plumber to evaluate the damage and carry out necessary repairs. If left untreated, roof leaks can lead to structural problems and mold development.

When to Contact a Local Plumber

While some small leaks can be fixed with basic DIY methods, it’s best to reach out to a local plumber when dealing with more significant issues. If you are unable to identify the source of the leak, if the leak is persistent despite your attempts at fixing it, or if it’s causing damage to your home, it’s time to call in a professional.

A qualified plumber possesses the knowledge and skills to resolve the issue promptly, preventing any additional damage.

Takeaways

Water leaks in the home are not merely a nuisance—they can lead to serious damage if not addressed in time. Whether it’s a leaking faucet, water heater, fridge, or washing machine, understanding the common causes and solutions for these leaks can help you protect your home and prevent costly repairs.

If you find yourself unable to fix the issue on your own, don’t hesitate to reach out to a local plumber to get your home back in top shape and avoid further water damage.

Looking For Home Resources?

Looking to enhance your living space and create a sanctuary that supports your well-being? Explore our home partners who offer a wide range of resources to elevate your home environment.


homeHLL x Editor


What Is The Best Hot Water System Type For The Gold Coast?

Choosing the right hot water system for your Gold Coast home is essential for comfort, energy efficiency, and cost savings. With various options available, it's important to consider the climate, energy sources, household size, and budget to determine the most suitable system.


In this article, we uncover the best hot water system type specifically designed for the unique climate and conditions of the Gold Coast region. We aim to provide you with informed insights that will help you make the right choice for your home heating needs.

For residents seeking prompt and professional service, Same Day Hot Water Service Gold Coast offers expert advice and installations tailored to your needs.

Types of Hot Water Systems

Understanding the different types of hot water systems can help you make an informed decision:

No. 1

Electric Hot Water Systems

These hot water systems utilize electric heating elements to effectively raise the temperature of water that is stored within a specialized tank.

Pros:

  • Lower Initial Cost: Generally more affordable to purchase and install.

  • Ease of Installation: Straightforward setup, especially if replacing an existing electric unit.

Cons:

  • Higher Operating Costs: This can be more expensive to run, particularly on continuous tariffs.

  • Environmental Impact: Dependent on electricity, which may come from non-renewable sources.

Suitability for Gold Coast:

While easy to install, the higher running costs may be a consideration for budget-conscious households.

No. 2

Gas Hot Water Systems

These hot water systems utilize natural gas or LPG as a reliable energy source to efficiently heat water, which is available in various options including storage tank models or instantaneous (tankless) units that provide hot water on demand.

Pros:

  • Energy Efficiency: Generally more efficient than electric systems.

  • Lower Operating Costs: Gas is often cheaper than electricity, leading to savings over time.

  • Continuous Hot Water: Tankless models provide hot water on demand.

Cons:

  • Higher Initial Cost: Especially for tankless models.

  • Gas Availability: Requires a gas connection, which may not be available in all areas.

Suitability for Gold Coast:

A viable option if gas is readily available, offering efficiency and potential cost savings.

No. 3

Solar Hot Water Systems

These hot water systems harness the power of solar energy to efficiently heat water, often enhanced by supplementary electric or gas boosters. This eco-friendly approach not only reduces energy costs but also promotes sustainable living practices.

Pros:

  • Eco-Friendly: Utilizes renewable energy, reducing carbon footprint.

  • Lower Operating Costs: Sunlight is free, leading to significant savings.

Cons:

  • High Initial Investment: Installation can be costly.

  • Weather Dependent: Efficiency can be affected by cloudy days, though boosters mitigate this issue.

Suitability for Gold Coast:

With abundant sunshine, solar systems are an excellent choice for environmentally conscious residents.


Bed Threads

Elevate your sleep sanctuary with Bed Threads—luxurious, 100% French flax linen bedding for ultimate comfort and style.

Shop now for the perfect night's sleep!


No. 4

Heat Pump Hot Water Systems

This innovative type of hot water system extracts valuable heat from the surrounding air in order to warm the water, functioning efficiently and effectively even in cooler temperatures. This design ensures optimal performance throughout the entire year, providing consistent access to hot water regardless of seasonal changes in climate.

Pros:

  • Energy Efficient: Uses less electricity compared to traditional electric systems.

  • Eco-Friendly: Lower greenhouse gas emissions.

Cons:

  • Higher Upfront Cost: More expensive to purchase and install.

  • Noise: Some units can be noisy during operation.

Suitability for Gold Coast:

An efficient option suitable for the mild Gold Coast climate.

Factors to Consider

When selecting the best hot water system for your Gold Coast home, consider the following:

  • Household Size: Larger families may require systems with higher capacities or continuous flow options.

  • Energy Efficiency: Opt for systems that offer long-term savings on energy bills.

  • Installation Space: Ensure adequate space is available for the system, especially for solar panels or large tanks.

  • Budget: Balance initial costs with ongoing operating expenses.

Takeaways

Determining what is the best hot water system type for the Gold Coast depends on your specific needs and circumstances.

Solar and heat pump systems are ideal for those prioritizing energy efficiency and environmental impact, while gas systems offer a balance between efficiency and cost. Electric systems, though less efficient, may be suitable for those with budget constraints.

Consulting with professionals, such as Same Day Hot Water Service Gold Coast, can provide personalized recommendations to ensure you choose the optimal system for your home.

Looking For Home Resources?

Looking to enhance your living space and create a sanctuary that supports your well-being? Explore our home partners who offer a wide range of resources to elevate your home environment.


homeHLL x Editor


How Much Does A Shower Cartridge Replacement Cost?

If you're experiencing a persistent leak or poor water flow, a faulty shower cartridge could be the cause. Understanding replacement costs and potential hidden expenses will help you manage your budget effectively. This guide outlines the key pricing factors and helps you decide between repairing or replacing your shower cartridge.


For detailed cost breakdowns and expert repair insights, visit Dan’s Plumbing for professional advice and step-by-step guidance on maintaining your shower system.

No. 1

Cost Range Overview

This section provides a breakdown of labor and material costs, helping you plan your budget accordingly.

  • Total Replacement Cost: $100 – $350 (includes parts, labor, and installation fees).

  • Cartridge Price: $10 – $80 (depends on material, brand, and valve type).

  • DIY Savings: If you replace it yourself, costs range from $40 – $120, reducing labor expenses.

Tip: Review these figures to determine if a DIY approach or professional service suits your situation.

No. 2

Labor Expense Details

Labor costs can vary significantly based on several factors, including the level of expertise and experience of the plumber, the specific location in which the work is being done, and the complexity of the installation process itself. Each of these elements plays a crucial role in determining the final cost of plumbing services.

Hourly Rates:

  • Plumber Fees: $75 – $160 per hour (rates depend on expertise and region).

  • Comparison Tip: Always get multiple quotes to find the best deal.

Average Work Duration:

  • Typical Time Frame: 30 minutes to 1 hour.

  • Estimated Labor Cost: $90 – $270, depending on job complexity.

DIY Savings:

  • Avoid labor fees by handling the replacement yourself.

  • Potential savings: $75 – $160 per hour.

No. 3

Key Cost Factors

Several factors influence shower cartridge replacement costs, including materials, labor, and accessibility.

  • Type & Material: Brass and ceramic cartridges last longer but cost more than plastic options.

  • Labor Charges: Service fees typically range from $90 – $270, depending on local rates.

  • Accessibility Issues: If the cartridge area is difficult to access, expect higher labor costs.

  • Warranty Coverage: Check if your cartridge has a lifetime warranty to offset replacement expenses.

  • Regional Variations: Prices differ by location (e.g., New York costs may be higher than Miami).

Understanding these factors helps you decide whether professional service or DIY is the right choice.


hellolovelyliving rejuvenation bathroom fixtures and hardware

Rejuvenation

Elevate your space with Rejuvenation's timeless bathroom plumbing fixtures – where style meets functionality.


No. 4

Cartridge Component Types

Different cartridges serve specific functions in shower systems:

  • Flow Cartridges: Control water speed and act as an on/off regulator.

  • Diverter Cartridges: Direct water between multiple shower outlets.

  • Thermostatic Cartridges: Maintain a steady water temperature, counteracting sudden pressure changes.

Tip: Regular maintenance and proper lubrication extend the lifespan of these components. For detailed installation tips, visit This Old House.

No. 5

Warranty Coverage Options

A solid warranty can save money on future repairs.

Here’s what to check:

  • Warranty Period: Many manufacturers offer lifetime warranties for residential use.

  • Ownership Terms: Most warranties are non-transferable and apply only to the original homeowner.

  • Coverage Scope: Typically covers leak-free and defect-free parts, but not labor costs.

  • Exclusions: Improper installation or abrasive cleaning may void the warranty.

  • Claim Process: Keep proof of purchase and ownership documentation for claims.

Tip: Always read warranty terms carefully to avoid unexpected costs.

No. 6

Hiring a Professional

Hiring a qualified expert not only ensures proper installation but also significantly reduces the risk of costly mistakes that can arise from inadequate knowledge or experience. Their expertise will help you navigate the complexities of the installation process with confidence.

Cost Considerations:

  • Average Replacement Cost: $275 (range: $100 – $400).

  • Plumber Hourly Rate: $75 – $160 per hour.

  • Survey Fees: Some professionals charge an assessment fee for complex jobs.

Preparation & Inspection:

  • Request at least three estimates before making a decision.

  • Ensure the plumber inspects the shower system before starting work.

  • Check HomeGuide for additional hiring tips.

Tip: Hiring a professional can prevent errors that might lead to future plumbing issues.

No. 7

Essential Steps Ahead

Before Replacing Your Shower Cartridge

  1. Evaluate costs (labor vs. DIY).

  2. Check warranty coverage to minimize expenses.

  3. Compare professional estimates to secure fair pricing.

  4. Act quickly if you notice signs of failure.

FAQ

Why does a shower cartridge fail?

  • Water pressure imbalances and mineral buildup cause deterioration.

  • Over time, O-rings and internal components may wear out or corrode.

What are the key signs of failure?

  • Constant Water Flow: A worn cartridge may let water drip continuously.

  • Stuck Faucet Handles: Corrosion or damage can cause stiff or immovable handles.

  • Temperature Fluctuations: Sudden hot and cold shifts suggest cartridge failure.

  • Reduced Water Pressure: Clogs or wear may impede water flow.

  • Leakage & Structural Damage: Unnoticed leaks can cause wall or ceiling stains.

How do you replace a faulty cartridge?

  1. Turn off the water supply.

  2. Remove the shower handle.

  3. Use proper tools to extract and replace the cartridge.

TAkeaways

By understanding cost factors, labor fees, and cartridge types, you can make an informed decision about repairing or replacing your shower cartridge. Whether you choose a DIY approach or hire a professional, maintaining your shower system prevents costly future repairs and ensures optimal water flow.

Visit this professional site to review expert advice. Act quickly to fix signs of failure, thereby safeguarding your investment and enhancing safety.

Looking For Home Resources?

Looking to enhance your living space and create a sanctuary that supports your well-being? Explore our home partners who offer a wide range of resources to elevate your home environment.


homeHLL x Editor


Big Moves, Small Spaces: Where Do Your Things Go?

Moving is exciting—until you realize your belongings don’t fit. Downsizing can feel like a puzzle, especially when shifting from a larger home to a smaller one. What stays, what goes, and where do you put the rest?


In Amarillo, TX, where families and professionals are moving into cozy homes and apartments, space is a common challenge. With rising housing costs and changing lifestyles, smart storage solutions matter more than ever.

Figuring out what to do with your things doesn’t have to be stressful. In this article, we share practical tips on organizing small spaces, making smart choices, and finding solutions for the things you’re not ready to part with.

No. 1

Why Are Homes Shrinking While Belongings Multiply?

If it feels like homes are getting smaller, that’s because they are. The average new home in the U.S. is nearly 10% smaller than it was a decade ago. Meanwhile, rent is rising, especially in cities.

In places like New York or San Francisco, people are paying premium prices for spaces barely larger than a parking spot. Even in more affordable areas like Amarillo, TX, families are moving into smaller homes, whether by choice or necessity.

But while homes shrink, the amount of stuff we own keeps growing. Online shopping has made it easier than ever to accumulate things we don’t need. Subscription services send new clothes, gadgets, and household items straight to our doors.

And let’s not forget the "just in case" mindset—keeping things because we might need them one day.

The result? People are living in tighter spaces, struggling to find room for their belongings. That’s why storage solutions are more important than ever.

If you’re facing a space crunch, just look up storage Amarillo TX to find reliable options that can help keep your home functional without forcing you to part with everything.

The goal isn’t just to store things but to store them smartly. The way you manage your space can make a huge difference in how comfortable your home feels.

No. 2

Smart Strategies for Fitting More in Less

When space is tight, every inch counts. Instead of piling things in corners or stuffing closets until they barely close, try these strategies to make the most of your space.

Think Vertical

Most people focus on floor space, but walls are underused real estate. Tall shelves, wall-mounted organizers, and even ceiling storage can help free up room. Hooks and pegboards are lifesavers in kitchens and entryways. Using vertical space keeps everyday items within reach while freeing up valuable floor area for essential furniture.

Invest in Multi-Use Furniture

A bed with built-in drawers. A coffee table that doubles as storage. A fold-out desk that disappears when not in use. These items are game-changers in small spaces. The more functions one piece can serve, the fewer things you need.

Multipurpose furniture allows you to stay organized without sacrificing style or comfort.  If you’re downsizing, consider incorporating cozy mid-century modern furniture—it’s known for clean lines, compact form, and practicality, making it ideal for smaller spaces.

Rotate Seasonal Items

If it’s summer, why keep winter coats and holiday decorations in your main closet? Pack them away and swap them out when needed. Under-the-bed storage bins work great for this, as do vacuum-sealed bags that reduce bulk.

Declutter with Purpose

Downsizing isn’t about getting rid of everything. It’s about making smart choices. Do you really need three sets of measuring cups? Five throw blankets? If something hasn’t been used in over a year, reconsider its place in your home.

Use Hidden Storage

Benches with compartments. Ottomans that open up. Stairs with built-in drawers. If your furniture isn’t working double duty, you’re missing a chance to maximize your space.

Managing a small home isn’t about limiting what you own—it’s about being strategic with how you store and use it.

No. 3

What to Keep, What to Let Go, and What to Store

When moving into a smaller space, every item should earn its place. The trick is knowing what stays, what goes, and what can wait.

What Stays

Keep the things you use daily. Kitchen essentials, work supplies, clothes that fit and get worn regularly—these deserve a spot in your home. Sentimental items are okay, but limit them to a reasonable amount. You don’t need to keep every childhood keepsake or every souvenir from past vacations.

What Goes

Let go of duplicates, broken items, and things that no longer serve a purpose. If you haven't used something in a year, chances are you won’t miss it. Donate, sell, or recycle what you can. Keeping clutter just because you might need it later usually leads to a crowded home.

What Waits

Some things are important but not for daily use. This includes seasonal decorations, extra furniture, and sentimental belongings you’re not ready to part with. If you don’t have space for these, storing them safely offsite is a smart option.

The key is balance — keeping what adds value while freeing yourself from unnecessary clutter.


Retold Recycling

Downsizing or decluttering? Simplify your life and recycle responsibly with Retold Recycling.

Ship in your unwanted textiles and make space sustainably.


No. 4

Why Managing Space Matters

A cluttered home doesn’t just make life inconvenient—it affects your mood, focus, and overall well-being. Studies show that messy spaces can increase stress and make it harder to concentrate. When your environment is chaotic, your mind feels the same way.

On the flip side, a well-organized space brings clarity and peace. It’s easier to relax, find what you need, and feel comfortable in your own home. That’s why space management isn’t just a practical skill — it’s a lifestyle choice.

As the housing market continues to shift, and more people embrace smaller living spaces, efficient organization will become even more important. Whether it’s through creative storage, downsizing with purpose, or using outside storage solutions wisely, finding ways to live well in limited space is key to making the most of any home.

The bottom line? Moving into a smaller home doesn’t mean you have to sacrifice comfort or style. With smart organization, creative storage, and a willingness to let go of what no longer serves you, even the smallest space can feel functional and inviting.

The challenge isn’t just about fitting things—it’s about rethinking what truly matters. Less space can mean fewer distractions, less clutter, and a more intentional way of living. So, whether you’re downsizing by choice or necessity, remember: the size of your home doesn’t define its value—how you use it does.

Takeaways

Downsizing doesn’t have to be overwhelming—it’s an opportunity to create a more functional and clutter-free space. With homes shrinking and belongings multiplying, smart storage solutions like vertical shelving and multi-functional furniture can help maximize every inch.

Decluttering with purpose ensures that only essential and meaningful items remain, while storage units provide a practical way to manage overflow. A well-organized home not only enhances efficiency but also improves mental clarity and relaxation.

Ultimately, downsizing is about intentional living—focusing on what truly matters and transforming any space into a comfortable, stylish, and stress-free home.

Looking For Home Resources?

Looking to enhance your living space and create a sanctuary that supports your well-being? Explore our home partners who offer a wide range of resources to elevate your home environment.


homeHLL x Editor


How To Make Unpacking Easier After A Move

Moving into a new home is exciting, but the process doesn’t end once the moving truck is unloaded. Unpacking can be just as time-consuming and overwhelming as packing, especially without a clear plan.


Without a strategy, boxes can pile up, making it take weeks or even months to fully settle in. Many homeowners focus all their energy on packing and organizing the move itself, only to feel drained when it comes time to unpack.

Instead of dealing with clutter and confusion, it’s helpful to have a structured approach. Breaking the process into smaller tasks, prioritizing essential rooms, and organizing as you unpack can make the transition much smoother.

For those moving into smaller homes or needing time to decide where everything should go, extra storage space can be a great solution. In places like Lexington, where people frequently relocate for work, school, or lifestyle changes, finding a flexible storage option can make unpacking much more manageable.

In this article, we explore several helpful ways to make the process of unpacking easier and more manageable after a move. By sharing insightful strategies, we aim to simplify what can often feel like an overwhelming task.

No. 1

Use Storage to Manage Unpacking at Your Own Pace

One of the biggest challenges of unpacking is dealing with too many boxes in a limited space. When every room is filled with packed items, it becomes difficult to move around and set up furniture properly.

Instead of trying to unpack everything at once, placing non-essential items in storage can help create a more organized process. Self-storage Lexington facilities provide a convenient way to store extra furniture, seasonal decorations, and items that aren’t immediately needed.

This allows you to focus on unpacking the essentials first while keeping non-urgent belongings in a secure space. Using a storage unit is particularly helpful for those who are downsizing or transitioning between homes.

If certain furniture pieces don’t fit but may be useful later, a storage unit can prevent homeowners from making rushed decisions about selling or donating them. Additionally, it provides a temporary solution for those wanting to renovate or redesign their space.

No. 2

Start with the Essentials and Prioritize Rooms

Unpacking everything at once can feel overwhelming, so it’s important to focus on essential items first. Before moving, pack a separate box with necessities such as toiletries, medications, chargers, basic kitchen supplies, and a few changes of clothes.

This ensures that daily routines can continue smoothly while the rest of the unpacking process takes place. Once essentials are easily accessible, unpacking by room can make the process more manageable.

No. 3

Prioritize High-Use Rooms First

  • The Kitchen – Setting up kitchen essentials allows for easy meal preparation, reducing the need to eat out.

  • The Bedrooms – Making beds and organizing basic clothing provides a comfortable place to rest after a long day of unpacking.

  • The Bathroom – Having toiletries, towels, and cleaning supplies in place helps maintain daily hygiene routines.

By focusing on these rooms first, you can gradually move on to less urgent spaces, such as the living room, garage, or guest rooms.

No. 4

Label and Organize Boxes for a Smooth Process

One of the most time-saving steps during unpacking is having a clear labeling system. Boxes that are properly labeled with their contents and designated rooms make it much easier to find specific items without having to open everything at once.

A good approach is to label each box clearly on multiple sides and use color-coded labels or stickers to identify different rooms. Keeping an inventory list can also help track important items.

For those who prefer a digital approach, using moving apps or spreadsheets can help organize box contents and ensure that nothing gets misplaced. Additionally, unpacking by category rather than randomly opening boxes can speed up the process.

For example, unpacking all kitchen items at once instead of mixing them with living room decor makes setting up each space more efficient. This method reduces clutter and helps maintain order throughout the process.


Public Storage

Discover secure, reliable, and easily accessible storage solutions tailored to your needs.

Whether you're moving, decluttering, or in need of extra space, Public Storage offers a wide range of unit sizes, climate-controlled options, and 24/7 security to keep your belongings safe and accessible when you need them.


No. 5

Declutter and Arrange as You Unpack

Unpacking is the perfect opportunity to get rid of unnecessary items. Even after decluttering before the move, there may still be things that no longer fit the new home or aren’t needed.

Instead of holding onto items that take up space, donating or selling them can help create a cleaner, more organized living area. As boxes are unpacked, it’s important to find designated spaces for each item rather than leaving them scattered around.

Setting up furniture, organizing storage solutions, and arranging decorations early on can prevent clutter from building up. For those moving into smaller homes, maximizing space is key.

Ways to Maximize Space

  • Use vertical storage options like shelves and wall-mounted organizers.

  • Invest in multi-functional furniture such as storage ottomans and foldable tables.

  • Keep frequently used items accessible while storing less-used belongings in closets or storage bins.

Taking the time to organize properly from the beginning prevents the need for re-organizing later and makes settling in much easier.

No. 6

Staying Motivated and Avoiding Burnout

Unpacking can take time, so it’s important not to rush the process. Setting realistic goals, such as unpacking one or two rooms per day, can help avoid burnout.

Taking short breaks, staying hydrated, and playing music while unpacking can make the experience more enjoyable. Getting help from family or friends can also speed up the process and make it feel less overwhelming.

Assigning tasks and working together as a team can turn unpacking into a more efficient and even fun activity. For those with busy schedules, unpacking over several days or weeks can be a practical approach.

Prioritizing essentials first and gradually organizing the rest ensures that the process is manageable without unnecessary stress. Unpacking after a move doesn’t have to be stressful or overwhelming.

Takeaways

With the right approach, you can make the process smooth and efficient. Using a storage unit can help manage extra items while settling into the new home.

Prioritizing essentials, labeling boxes clearly, and organizing as you go can make unpacking faster and easier. Decluttering during the process prevents unnecessary items from taking up space, and staying motivated helps maintain momentum.

By following these strategies, you can transition into your storagenew home with less stress and more ease. With a little planning and organization, you can enjoy your new space sooner and feel truly at home.

Looking For Home Resources?

Looking to enhance your living space and create a sanctuary that supports your well-being? Explore our home partners who offer a wide range of resources to elevate your home environment.


homeHLL x Editor


The Joy Of Year-Round Celebrations: Making Every Day Special With Fresh Blooms

Embracing the thoughtful charm of a flower subscription has become the secret weapon of those who love to celebrate life’s moments with grace and ease. A dedicated floral delivery service ensures that every special occasion receives the blooming touch it deserves, transforming ordinary days into unforgettable experiences.


From enhancing home décor to strengthening personal connections, a recurring flower subscription brings beauty, organization, and heartfelt gestures into everyday life. In this article, we share the joy of year-round celebrations, where the beauty of fresh blooms significantly enhances the entire experience, creating an atmosphere filled with vibrancy and love.

No. 1

Creating Year-Round Beauty with Fresh Blooms

The allure of a monthly bloom delivery lies in its ability to keep a home feeling fresh, vibrant, and inviting. Each arrangement introduces new colors, textures, and fragrances, reflecting the changing seasons while maintaining an elegant and harmonious aesthetic.

Why a Flower Subscription Elevates Home Décor

  • Consistent Freshness – A steady stream of seasonal flowers ensures that living spaces always feel lively and well-curated.

  • Seasonal Transitions – Spring tulips give way to summer sunflowers, followed by autumn dahlias and winter amaryllis, creating a natural flow of beauty throughout the year.

  • Effortless Elegance – Whether placed on a dining table, entryway, or home office, each bouquet enhances the ambiance of any room.

A flower subscription transforms a home into a living, breathing work of art, where each delivery tells a new seasonal story.

No. 2

The Art of Never Missing a Special Moment

A seasonal flower subscription serves as a built-in reminder system for important dates, ensuring that birthdays, anniversaries, and milestones are always celebrated with stunning floral arrangements.

How a Floral Subscription Enhances Celebrations

  • Automated Gifting – Never worry about forgetting an important occasion—flowers arrive right on time.

  • Personalized Touch – Choose custom arrangements that reflect the recipient’s favorite blooms and colors.

  • Surprise and Delight – Unexpected floral deliveries bring joy and appreciation to loved ones throughout the year.

By integrating a flower subscription into a celebration calendar, every special moment is marked with beauty and thoughtfulness.

No. 3

Personal Touch in Modern Living: Elevating Home Styling

A curated flower delivery service brings the expertise of floral design into the home, allowing for creative styling and ever-changing focal points.

Ways to Incorporate Fresh Flowers into Home Décor

  • Dining Table Centerpieces – A rotating selection of seasonal blooms creates a stunning focal point for meals and gatherings.

  • Entryway Elegance – A fresh bouquet in the foyer offers a warm welcome to guests.

  • Bedroom Serenity – Soft, delicate flowers like lavender or peonies add a calming touch to personal spaces.

With each new delivery, homeowners can reimagine their space, keeping interiors fresh, stylish, and inspiring.


hellolovelyliving boqs wildflower floral subscription

Bouqs

Bouqs has farm-fresh flowers for every type of moment including monthly subscriptions.


No. 4

Building Lasting Connections Through Thoughtful Gestures

A continuous flower service fosters meaningful connections by ensuring that loved ones always feel cherished and appreciated.

How a Flower Subscription Strengthens Relationships

  • Surprise Deliveries – Sending flowers to a friend’s workplace or a family member’s home creates unexpected moments of joy.

  • Tradition of Thoughtfulness – A recurring floral gift becomes a cherished ritual, reinforcing love and appreciation.

  • Memory-Making Moments – Fresh blooms serve as beautiful backdrops for family dinners, morning coffee rituals, and intimate celebrations.

Flowers have a unique ability to convey emotions, making them a timeless and heartfelt way to stay connected.

No. 5

Practical Elegance: Organization Meets Beauty

A home flower subscription seamlessly integrates beauty with organization, ensuring that celebrations and décor updates happen effortlessly.

How a Floral Subscription Simplifies Life

  • Digital Calendar Integration – Syncing deliveries with a digital planner ensures that every celebration is perfectly timed.

  • Consistent Home Aesthetic – A tailored floral program maintains a home’s style and seasonal harmony.

  • No Last-Minute Scrambling – With flowers arriving automatically, there’s no need for last-minute gift shopping.

By combining practicality with elegance, a flower subscription becomes an effortless way to enhance daily life.

No. 6

Living in Full Bloom: The Everyday Joy of Fresh Flowers

Beyond special occasions, regular flower deliveries provide daily inspiration, encouraging creativity and enhancing well-being.

The Unexpected Benefits of a Flower Subscription:

  • Creative Inspiration – Fresh blooms can be used for photography, floral pressing, or DIY décor projects.

  • Mood Enhancement – Studies show that flowers reduce stress, boost happiness, and promote relaxation.

  • A Connection to Nature – Bringing botanical beauty indoors fosters a sense of peace and tranquility.

With each new bouquet, a home is infused with fresh energy, creativity, and serenity.

Takeaways

A flower subscription service does more than just keep your home beautiful – it creates a framework for celebrating life's moments both big and small. By maintaining this consistent connection to fresh blooms, you ensure that every special occasion is marked with beauty while transforming everyday moments into celebrations worth remembering.

Why a Flower Subscription is a Must-Have

  • Ensures every special occasion is celebrated with elegance.

  • Brings seasonal beauty into the home year-round.

  • Strengthens personal connections through thoughtful gestures.

  • Simplifies organization while enhancing home aesthetics.

  • Provides daily inspiration and promotes well-being.

By maintaining a consistent connection to fresh blooms, homeowners can transform everyday moments into celebrations worth remembering—one bouquet at a time.

Looking For Home Resources?

Looking to enhance your living space and create a sanctuary that supports your well-being? Explore our home partners who offer a wide range of resources to elevate your home environment.


homeHLL x Editor